Free to Set Readonly Attribute for Disk Partition
Set Readonly for Partition in Windows 7 8 10 11
If your computer runs Windows 7, 8 or 10 operating system, you can set readonly attribute for a partition on your computer without relying on any tool. There are two basic methods to read partition as readonly on Windows 7, 8 and 10.
Freeware to Set Read-only for Disk Partition
IM-Magic Partition Resizer is a freeware that is able to set read-only attribute for disk partition on any Windows operating system:
Step1. Right click the disk or drive and select "Set readonly Attribute" option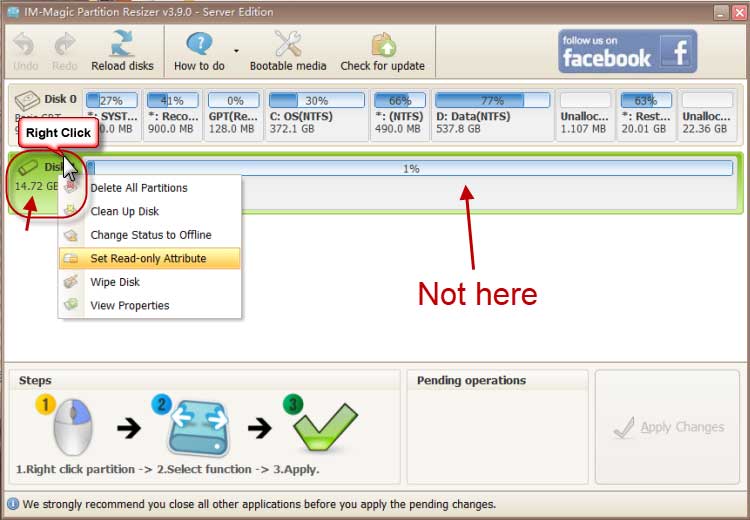
Step2. Confirm set the selected partition as readonly and click "Apply Changes" button.
Method2. Set Partition Readonly in My Computer
Now, follow the steps below to set readonly attribute for disk partition in My Computer on Windows 10 / 8 / 7:
Step1. Open My Computer (This PC on Windows 10). Right click the partition you want to set as read-only and select Properties option.
Step2. Click Security tab and then click Edit button
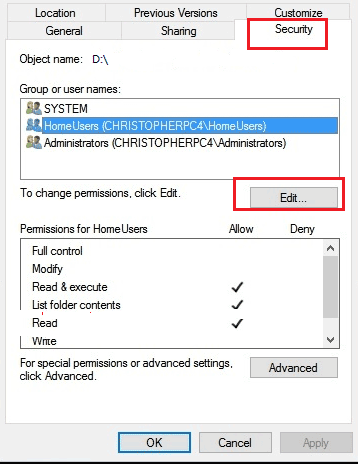
Step3. Only select the Read attribute and click OK button.

Method3: Diskpart to Set Readonly Attribute for Disk Partition
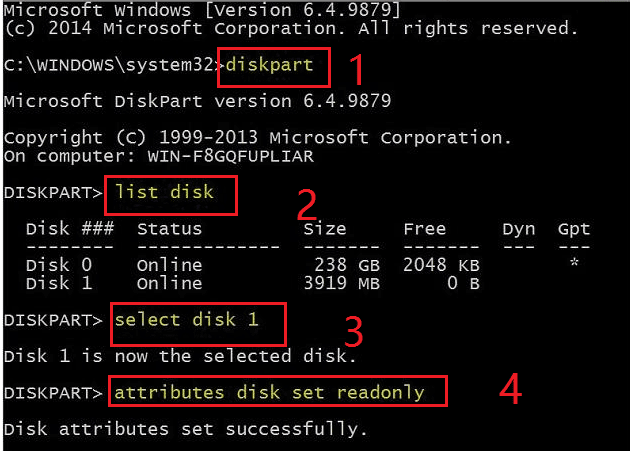
You can run Diskpart to set readonly attribute for a disk partition by following the steps below:
Step1. Open Command Line and type Diskpart
Step2. Type list disk
Step3. Type select disk
Step3. Type attributes disk set readonly
Once you set a partition as readonly, you can only read data from this partition. It will pop up alert message to prevent you from writing new data to the partition. Many people like to set a partition as readonly to protect important and private data from being unwanted modification.
Read-only vs. Write-protection
Many people are apt to confuse the read-only attribute and write-protection attribute. Well, they have some same point, but read-only and write-protection are two different terms.
When a partition of file is read-only, you can read data from the partition or read the read-only. You can also delete a read-only file or copy it to other place. However, you cannot modify any information on the read-only partition or file.
If a partition or file is write-protected, you can only read data from it. It will disable you to copy, delete or modify the write-protected partition.
Why Set a Partition As Readonly?
Simply say, you can set a partition readonly when you want to protect data stored on it to prevent unwanted modification due to mistake. When you set a partition as read-only, you are still able to copy files from this partition. Therefore, when you save files to a partition on your office’s computer, you can set the partition as read-only so that you can easily copy any file from this partition and backup it to your home’s computer without worrying that you may mistakenly modify any information on it.
Set Read-only Attribute on Windows XP
On Windows XP, you are not allowed to set a partition read-only unless you can professional software. However, you can set folder or file on Windows XP partition as read-only. It is easy to set a folder or file read-only by following the steps below on Windows XP:
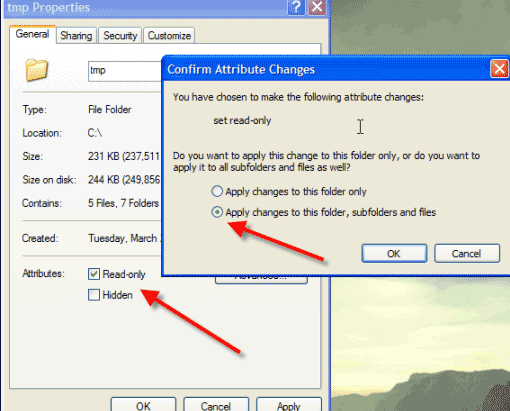
Step1. Right click the folder or file you want to set readonly and select Properties option.
Step2. Click General tab and select Read-only option and then click Apply button
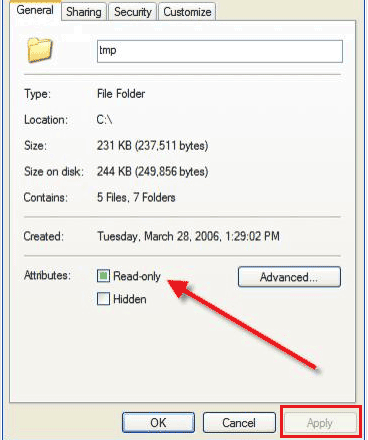
Step3. Confirm the change the attribute for the selected file or folder
Tip:
Please do not perform any operation on a system partition to set it as read-only. If you set a system partition as read-only, it probably causes system crash or other problem.
Download Proper Version of IM-Magic Partition Resizer
For Windows 11/10/8/7/Vista/XP/2000 ==> Download IM-Magic Partition Resizer Free
For Windows Server All versions ==> Download IM-Magic Partition Resizer Server
More Related Articles You May Like
- free to change drive letter on windows 10 8 7 vista xp - how can you reassign a new drive letter to disk partition on windows...Read more >>
- set active partition in windows - free to set a disk partition as active on windows xp, vista, 7, 8m 10...Read more >>
- change volume label of internal hard drive usb external - free to rename internal or removable disk with different methods...Read more >>
- convert usb flash drive from fat32 to ntfs - free solutions for usb flash drive converting to change its file system from fat32 to ntfs...Read more >>
- convert fat32 to ntfs - free to change disk partition from fat32 to ntfs under different Windows platform..Read more >>
- free to convert ntfs external hard drive to fat32 - how do you change an external hard drive from ntfs to fat32 for free...Read more >>
- windows cannot reformat ntfs drive to fat32 - free to convert hard drive partition from ntfs to fat32 when windows cannot format it to fat32...Read more >>
- command prompt does not work to convert ntfs to fat32 - how to convert ntfs to fat32 when command prompt failed to execute the task...Read more >>
- convert ntfs to fat32 windows server - all solutions for partition converting from ntfs to fat32 on windows server 2003 2008 2012...Read more >>
- freeware partition magic to convert file system ntfs to fat32 windows 7 - free download partition magic to convert file system from ntfs to fat32 in windows 7...Read more >>
Related Product
- IM-Magic Partition Resizer Server - Partition space redistributing software that works for Windows Server 2003-2022.