Merge C and D Drives When Separated by EFI, Recovery, or Reserved Partitions
IM-Magic Partition Resizer is a powerful tool that allows you to merge adjacent partitions even when EFI system partitions, MSR reserved partitions, or Recovery partitions sit between your C: and D: drives. This guide covers the five most common user scenarios with step-by-step instructions for both GPT and MBR disk layouts.
- GPT (GUID Partition Table) – Used on modern UEFI systems. Includes EFI system partition, MSR, and often a Recovery partition. Cases 1, 2, and 3 apply to GPT disks.
- MBR (Master Boot Record) – Used on older BIOS systems. Does not have EFI or MSR partitions, but may have a Recovery partition. Cases 4 and 5 apply to MBR disks.
- Back up all important data – Although IM-Magic is engineered for safe, non-destructive operations and offers better protection against power outages or system crashes than other partition tools, we strongly recommend that you back up all critical data as an additional safety measure. For optimal protection, prepare a larger disk and perform a full disk clone as a backup.
- Prepare a secondary disk – You will need another disk with sufficient unallocated space to temporarily back up your D: drive. This disk must be large enough to hold the entire contents of D:.
- Do NOT manually delete or move system partitions using Windows Disk Management – improper handling can make your system unbootable. IM-Magic handles this safely.
- The tool works by backing up D → deleting D → moving blocker(s) to the end of the disk → copying D back → merging C and D. This approach ensures a clean, obstruction-free path for all blocking partitions to be relocated.
Video: How to merge C EFI Recovery D or E with Partition Resizer
For Windows 11/10/8/7 => Download Partition Resizer Free [100% Free]
For Windows Server 2025-2003 => Download Partition Resizer Server [Trial]
General Logic – How It Works
Instead of a simple "merge" button, IM-Magic Partition Resizer uses a five-step orchestration: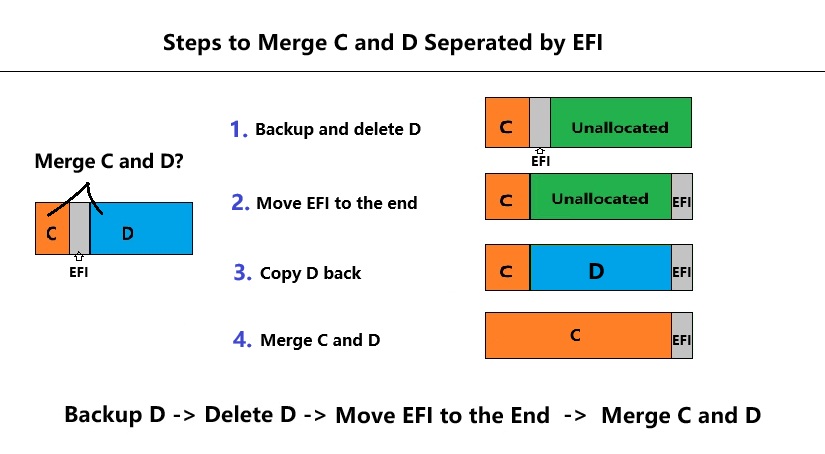
- Back up D: – Copy the entire D: drive to an external or secondary disk.
- Delete D: – Remove the D: partition, turning its space into unallocated space. This clears the path after all blocking partitions.
- Move blocker(s) to the end of the disk – With no partitions blocking the way, slide all intervening partitions (EFI, MSR, Recovery, etc.) all the way to the end of the disk. (If there are other partitions after the D drive, you may move the blocker to the position after the D drive instead of moving it to the end of disk, or you may also backup all drives after the blocker, and then move the blocker end of disk, and then later restore each partition later.)
- Copy D back – Restore the D: partition from the backup disk to the unallocated space (now located before the moved blockers).
- Merge C and D – Use the Merge Partition feature to combine C: and D: into a single drive.
All operations are done via drag-and-drop in the visual interface, and you can preview the new layout before clicking Apply.
📁 Case 1 – Layout: [C:] – [EFI] – [D:] GPT
Scenario: Your D: drive is immediately after the EFI system partition, which is right next to C:. The EFI partition blocks the merge.
Key approach: Back up D:, delete D:, move EFI to the end of the disk, copy D: back, then merge C: and D:.
Step-by-Step Solution:
- Back up D: to another disk – Right-click D: and select "Copy Partition". Select a target disk that has enough unallocated space to hold the entire D: drive. Click OK.
- Delete D: – Right-click D: and select "Delete Partition". The space previously occupied by D: will become unallocated. With no partitions remaining after the EFI, you can safely move the EFI partition all the way to the end of the disk. This is a critical step: the EFI partition can only be moved to the end of the disk if there are no other partitions blocking its path.
- Move the EFI partition to the end of the disk – Right-click the EFI partition and choose "Resize/Move". Drag the entire EFI partition to the right until it reaches the end of the disk. This ensures EFI no longer sits adjacent to C:. Click OK.
- Copy D: back to the original disk – On the backup disk, right-click the copied D: partition and select "Copy Partition". Select the original disk as the target and copy the partition into the unallocated space (which is now located before the moved EFI). Click OK, then click Apply Changes to execute the copy operation.
- Merge C: and D: – Right-click the C: drive and choose "Merge Partition". Select D: as the partition to merge. The software will automatically set C: as the destination drive that will hold all data from D:, effectively merging both into a single C: drive. All data will be safely transferred.
- Apply all changes – Click the big Apply button at the bottom-right corner to execute all pending operations. The system may reboot to complete the process.
📁 Case 2 – Layout: [C:] – [EFI] – [MSR Reserved] – [D:] GPT
Scenario: In addition to the EFI partition, there is a small MSR (Microsoft Reserved) partition (usually 16–128 MB) sitting between EFI and D:. Both partitions act as barriers.
Key approach: Back up D:, delete D:, move both EFI and MSR to the end of the disk (MSR first, then EFI), copy D: back, then merge C: and D:.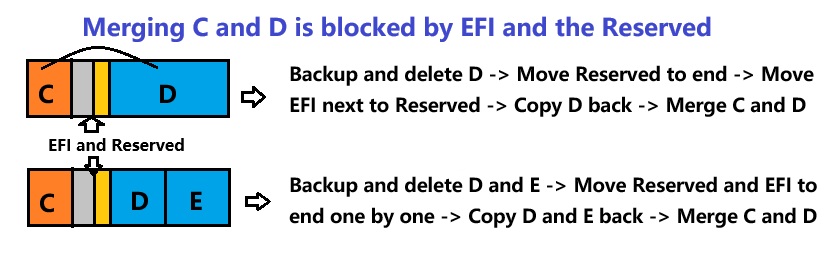
Step-by-Step Solution:
- Back up D: to another disk – Right-click D: and select "Copy Partition". Select a target disk with enough unallocated space for the entire D: drive. Click OK.
- Delete D: – Right-click D: and select "Delete Partition". The D: space becomes unallocated, leaving EFI and MSR as the only partitions after C:.
- Move the MSR partition to the end of the disk – Right-click the MSR partition and choose "Resize/Move". Drag it to the right until it reaches the end of the disk. Click OK.
- Move the EFI partition to the end of the disk – Right-click the EFI partition and choose "Resize/Move". Drag it to the right until it sits just before the MSR partition (now both are at the end). Click OK.
- Copy D: back to the original disk – On the backup disk, right-click the copied D: partition and select "Copy Partition". Select the original disk as the target and copy the partition into the unallocated space (now located before the moved EFI and MSR). Click OK, then click Apply Changes.
- Merge C: and D: – Right-click C: and choose "Merge Partition". Select D: as the partition to merge. The software will merge both into a single C: drive.
- Apply all changes – Click the big Apply button at the bottom-right corner.
📁 Case 3 – Layout: [C:] – [EFI] – [Recovery] – [D:] GPT
Scenario: A Recovery partition (used for Windows "Reset this PC") is positioned between EFI and D:. Moving it will not break normal system operation, but it may disable the built-in recovery function unless you recreate it later.
Key approach: Back up D:, delete D:, move both EFI and Recovery to the end of the disk (Recovery first, then EFI), copy D: back, then merge C: and D:.
Step-by-Step Solution:
- Back up D: to another disk – Right-click D: and select "Copy Partition". Select a target disk with enough unallocated space. Click OK.
- Delete D: – Right-click D: and select "Delete Partition". The D: space becomes unallocated, leaving EFI and Recovery as the only partitions after C:.
- Move the Recovery partition to the end of the disk – Right-click the Recovery partition and choose "Resize/Move". Drag it to the right until it reaches the end of the disk. Click OK.
- Move the EFI partition to the end of the disk – Right-click the EFI partition and choose "Resize/Move". Drag it to the right until it sits just before the Recovery partition (now both are at the end). Click OK.
- Copy D: back to the original disk – On the backup disk, right-click the copied D: partition and select "Copy Partition". Select the original disk as the target and copy the partition into the unallocated space (now located before the moved EFI and Recovery). Click OK, then click Apply Changes.
- Merge C: and D: – Right-click C: and choose "Merge Partition". Select D: as the partition to merge. The software will merge both into a single C: drive.
- Apply all changes – Click the big Apply button at the bottom-right corner.
📁 Case 4 – Layout: [C:] – [Recovery] – [D:] MBR
Scenario: A Recovery partition sits directly between C: and D:, with no EFI partition in between. This is common on older MBR-based systems or after certain Windows updates where the recovery environment is placed after the system drive.
Key approach: Back up D:, delete D:, move the Recovery partition to the end of the disk, copy D: back, then merge C: and D:.
Step-by-Step Solution:
- Back up D: to another disk – Right-click D: and select "Copy Partition". Select a target disk with enough unallocated space to hold the entire D: drive. Click OK.
- Delete D: – Right-click D: and select "Delete Partition". The space previously occupied by D: will become unallocated. With no partitions remaining after the Recovery partition, you can safely move it all the way to the end of the disk. This is a critical step: the Recovery partition can only be moved to the end of the disk if there are no other partitions blocking its path.
- Move the Recovery partition to the end of the disk – Right-click the Recovery partition and choose "Resize/Move". Drag the entire Recovery partition to the right until it reaches the end of the disk. This removes the barrier between C: and the unallocated space. Click OK.
- Copy D: back to the original disk – On the backup disk, right-click the copied D: partition and select "Copy Partition". Select the original disk as the target and copy the partition into the unallocated space (which is now located before the moved Recovery partition). Click OK, then click Apply Changes to execute the copy operation.
- Merge C: and D: – Right-click the C: drive and choose "Merge Partition". Select D: as the partition to merge. The software will automatically set C: as the destination drive that will hold all data from D:, effectively merging both into a single C: drive. All data will be safely transferred.
- Apply all changes – Click the big Apply button at the bottom-right corner to execute all pending operations. The system may reboot to complete the process.
📁 Case 5 – Layout: [C:] – [Recovery] – [D:] – [E:] MBR Universal
Scenario: This is a common MBR disk layout where you have three partitions: C: (system), D: (data), and E: (additional data or backup). A Recovery partition sits between C: and D:. You want to merge C: and D: while handling E: appropriately.
Key insight: This method works for any blocker – whether it's Recovery, EFI, MSR, or any other partition type. The blocker is treated as an obstacle that can be moved to either:
- Situation A: Keep E: at the end of the disk, move blocker before E: (simpler, fewer steps)
- Situation B: Keep blocker at the end of the disk, move E: before blocker (more steps, but keeps blocker at the end)
Situation A – Keep E: at the End of the Disk Simpler
Goal: Merge C: and D: while keeping E: at the end of the disk. The blocker (Recovery) is moved before E:.
Key approach: Back up D:, delete D:, move Recovery before E:, copy D: back, then merge C: and D:.
Step-by-Step Solution:
- Back up D: to another disk – Right-click D: and select "Copy Partition". Select a target disk with enough unallocated space to hold the entire D: drive. Click OK.
- Delete D: – Right-click D: and select "Delete Partition". The space previously occupied by D: will become unallocated. The layout becomes
[C:] – [Recovery] – [Unallocated] – [E:]. - Move the Recovery partition before E: – Right-click the Recovery partition and choose "Resize/Move". Drag the entire Recovery partition to the right until it sits immediately before E: (i.e., move it across the unallocated space). Click OK. The layout becomes
[C:] – [Unallocated] – [Recovery] – [E:]. - Copy D: back to the original disk – On the backup disk, right-click the copied D: partition and select "Copy Partition". Select the original disk as the target and copy the partition into the unallocated space (which is now located between C: and Recovery). Click OK, then click Apply Changes. The layout becomes
[C:] – [D:] – [Recovery] – [E:]. - Merge C: and D: – Right-click the C: drive and choose "Merge Partition". Select D: as the partition to merge. The software will merge both into a single C: drive. The layout becomes
[C:+D:] – [Recovery] – [E:]. - Apply all changes – Click the big Apply button at the bottom-right corner.
Situation B – Keep Blocker (Recovery) at the End of the Disk More Steps
Goal: Merge C: and D: while keeping the blocker (Recovery) at the very end of the disk. E: is moved before Recovery.
Key approach: Back up D: and E:, delete D: and E:, move Recovery to the end, copy D: back, copy E: back, then merge C: and D:.
Step-by-Step Solution:
- Back up D: and E: to another disk – Right-click D: and select "Copy Partition", then do the same for E:. Select a target disk with enough unallocated space to hold both D: and E: drives. Click OK for each.
- Delete D: and E: – Right-click D: and select "Delete Partition". Then right-click E: and select "Delete Partition". Both spaces become unallocated. The layout becomes
[C:] – [Recovery] – [Unallocated] – [Unallocated]. - Move the Recovery partition to the end of the disk – Right-click the Recovery partition and choose "Resize/Move". Drag the entire Recovery partition to the right until it reaches the very end of the disk (past all unallocated space). Click OK. The layout becomes
[C:] – [Unallocated] – [Unallocated] – [Recovery]. - Copy D: back to the original disk – On the backup disk, right-click the copied D: partition and select "Copy Partition". Select the original disk as the target and copy the partition into the first unallocated space (immediately after C:). Click OK.
- Copy E: back to the original disk – On the backup disk, right-click the copied E: partition and select "Copy Partition". Select the original disk as the target and copy the partition into the second unallocated space (between D: and Recovery). Click OK, then click Apply Changes. The layout becomes
[C:] – [D:] – [E:] – [Recovery]. - Merge C: and D: – Right-click the C: drive and choose "Merge Partition". Select D: as the partition to merge. The software will merge both into a single C: drive. The layout becomes
[C:+D:] – [E:] – [Recovery]. - Apply all changes – Click the big Apply button at the bottom-right corner.
[C:+D:] – [E:] – [Recovery].
The methods described in Case 5 are not limited to Recovery partitions. They work identically when the blocker is:
- EFI System Partition – on GPT/UEFI systems
- MSR Reserved Partition – on GPT systems
- Recovery Partition – on both GPT and MBR systems
- Any other partition – that sits between C: and D:
Simply substitute the blocker name in the steps above. The workflow remains: Back up → Delete → Move blocker → Copy back → Merge.
- MBR limitation: MBR disks support a maximum of 4 primary partitions or 3 primary + 1 extended (with logical drives). If you have more than 4 partitions, you may need to convert to GPT or use extended partitions.
- Recovery partition relocation: Moving the Recovery partition may break the Windows "Reset" feature. Create a recovery USB drive beforehand.
- Backup disk space: In Situation B, ensure your backup disk has enough space for both D: and E: drives.
- EFI/System partitions: If moving EFI, ensure you do not delete or corrupt it. IM-Magic handles this safely, but always have a Windows installation USB ready as a precaution.
📊 Method Comparison: Full Merge vs. Simple Extension
| Aspect | Full Merge (Backup → Delete → Move Blocker(s) → Restore → Merge) | Simple Extension (Shrink D → Move Blocker(s) → Extend C) |
|---|---|---|
| Result | C: and D: become one single drive (C:) | C: gains extra space, but D: remains as a separate drive |
| Data on D: | All data from D: is moved into C: | Data on D: stays intact (only space is reduced) |
| Backup required? | Yes – you need another disk to temporarily store D: (and E: if applicable) | No – D: remains untouched |
| Number of steps | 6+ steps (more complex) | 3 steps (simpler) |
| Best for | When you want to eliminate D: entirely and have one large C: | When you only need more space on C: but want to keep D: for data |
| Impact on E: (Case 5) | Situation A: E: at end, Recovery before E: Situation B: E: before Recovery, Recovery at end |
E: remains untouched in its original position |
🧩 The Universal Formula
Regardless of whether the blocker is EFI, MSR, Recovery, or any combination, the workflow for a full merge remains consistent:
For a simple extension (adding space to C: without removing D:), the formula is:
- Right-to-left order for moving: always move the rightmost blocking partition first, then move the leftmost one. This prevents overlap and maintains correct partition ordering. For example:
- Case 2: Move MSR first, then EFI
- Case 3: Move Recovery first, then EFI
- Case 4: Only Recovery needs to be moved
- Case 5 – Situation A: Move Recovery before E:
- Case 5 – Situation B: Move Recovery to end (after deleting D and E)
- Preview before Apply: IM-Magic shows you a live preview of the new partition layout. Double-check that C: and D: are adjacent and that all blockers are in their intended positions.
- Boot safety: The tool handles boot configuration automatically. After the operation, your system will restart normally with the new partition sizes.
- MBR vs. GPT: Cases 1–3 are for GPT disks (UEFI systems). Cases 4–5 are for MBR disks (BIOS systems). However, the methodology in Case 5 works universally for any blocker type on either disk format.
More Related Articles You May Like
Related Product
- IM-Magic Partition Resizer Server - Partition space redistributing software that works for Windows Server 2003-2025.