Free to Resize Partition on Windows 11 (3 Ways)
Description: Changing the partition size on Windows 11 computers is easy with professional free partition manager IM-Magic Partition Resizer Free. This process involves shrinking a large partition to free up space and then using that space to extend a smaller partition. The best part? It can be done without formatting or losing any of your data.
Table of Contents
- Part 1 - Resize Windows 11 partition with Partition Resizer Free (100% free) (Shrink, extend)
- Part 2 - Resize partition with disk management
- Part 3 - Resize partition with Windows 11 diskpart cmd
- Part 4 - How to resize partition bitlocker Windows 11
- Part 5 - Powershell to resize partition Windows 11
- Part 6 - Delete recovery partition Windows 11
The following table shows what can be done in Windows built-in tools Disk Management and Diskpart and what can be done with the free tool Partition Resizer. Resizing a Windows 11 partition is no different than in Windows 10, 8, or 7.
| Disk Management | Diskpart | Partition Resizer* | |
| Shrink FAT32 Partition | NO | NO |  |
| Extend FAT32 Partition | Yes, if unallocated space is available on the right |
Yes, if unallocated space is available on the right |
|
| Extend FAT32 C Drive | NO | NO | |
| Extend NTFS C Drive | Yes, if right unallocated space is available |
Yes, if right unallocated space is available |
|
| Move Unallocated Space or Partition | NO | NO | |
| Delete Recovery/OEM Partition | NO | YES | |
| Price | FREE | FREE | FREE |
| Download Win 11-7 (100% Free) Download Win Server (Free Demo) |
Note: Partition resizing always requires unallocated space. Whether you use Windows tools or third-party software, ensure unallocated space is available before resizing.
Part 1 – How to Resize Windows 11 Partition with IM-Magic Partition Resizer
IM-Magic Partition Resizer Free is a free partition tool to resize partition free on Windows 11/10/8/7 without data loss(100% data safety with roll-back algorithm to protect data&OS); no disk formatting; no re-installation of the operating system, etc. Follow the step-by-step guide below.
For Windows 11/10/8/7 => Download Partition Resizer Free [100% Free]
For Windows Server 2025-2003 => Download Partition Resizer Server [Free Demo]
Step-by-step Guide: (Includes shrinking and extending volume)
Note: Unallocated space is required to extend a volume.
Step 1: First, download and run IM-Magic Partition Resizer. Right-click the partition you need to resize and click on the 'Resize/Move' option. For example, resize a large volume if you need to change its size. Narrow the partition's border to shrink the volume, creating unallocated space for redistribution. 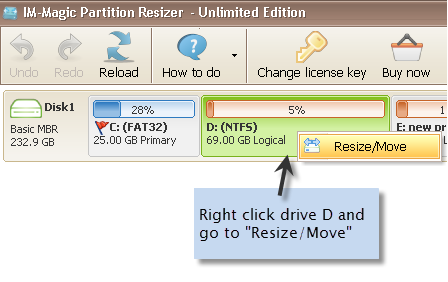
Step 2: Move the partition's border from left to right by shrinking the volume. 
Quick Tip: If your target is the C drive, you can shrink the D drive (or any other large volume) instead. Drag the border from the left side towards the right to create enough free space next to your C drive.
Step 3: Right-click the C volume that you want to extend to gain free space. Go to the 'Resize/Move' function, and move the border to the right to utilize the available free space. 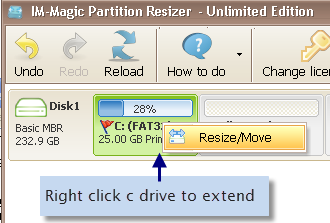
Step 4: Click the 'Apply' button to complete the task.
Note: To resize a volume on a Windows 11 computer, you may want to:
- 1. Enlarge a volume: You need unallocated space to extend a volume. Unallocated space can be created by shrinking another large volume that has free space using Partition Resizer Free.
- 2. Shrink a volume: Right-click a large volume and shrink it by moving its border to narrow the size, or enter the size number in the shrink volume window to reduce the volume size using Partition Resizer's free tool.
Besides shrinking, moving, extend partitions, Partition Resizer can also help merge partitions without losing data.
Video: Merge partitions without losing data
Also read: How to merge partitions
Part 2 - How to Resize Windows 11 Partition in Disk Management
Disk Management provided in Windows 11 is no more different than Windows 10 on partition management. Shrinking a partition creates unallocated space, while extending a partition requires deleting a contiguous partition next to it.
However, if you want to expand a partition by shrinking a volume, it simply won't work because Windows' built-in tools cannot move partitions or unallocated space. As a result, the created unallocated space cannot be redistributed to be contiguous with the drive you want to expand.
Note: It can only extend a volume which has NTFS file system with contiguous unallocated space, ie no recovery partition standing in-between. Or you need a third party tool to do this.
How to Shrink a Partition:
Step 1: Press the Windows + X keys together, then click on Disk Management.
Step 2: Right-click on the NTFS partition you want to shrink and select Shrink Volume.
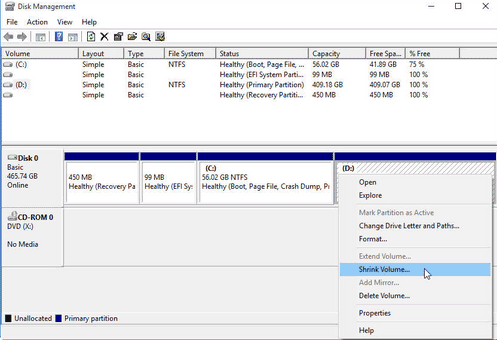
Step 3: Enter the amount of space to shrink, then click Shrink.
Note: The free space or unallocated space created after shrinking volume in Disk Management can only be used to create a new volume. It cannot be added to another drive except you delete the volume instead of shrinking a volume using Windows built-in tool Disk Management.
How to Extend a Partition:
Step 1: Move all necessary files from the contiguous partition on the right to another location.
Step 2: Right-click on the contiguous partition to the right and select Delete Volume. This will convert the space into unallocated space.
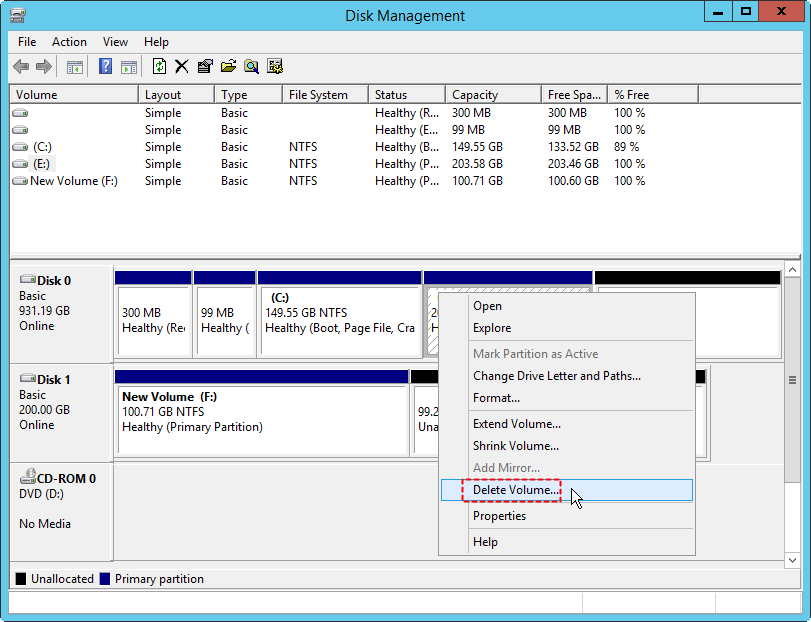
Step 3: Now, right-click on the partition you want to extend (on the left), then select Extend Volume. Follow the on-screen wizard to complete the process.
The following table shares what Disk Management can do and what it could not in Windows 11 computers.
| Disk Management | Partition Resizer* | |
| Shrink FAT32 Partition | NO | |
| Extend FAT32 Partition | Yes, if unallocated space is available on the right |
|
| Extend FAT32 C Drive | NO | |
| Extend NTFS C Drive | Yes, if right unallocated space is available |
|
| Move Unallocated Space or Partition | NO | |
| Delete Recovery/OEM Partition | NO | |
| Price | FREE | FREE |
| Download Win 11-7 (100% Free) Download Win Server (Free Demo) |
Part 3 - How to Resize a Partition Using DiskPart in Windows 11
Diskpart is a command-line tool used to manage disk partitions for advanced users. If you're not comfortable with command-line tools, consider using other methods. It functions similarly to Disk Management on a computer. It's better to use Disk Management, as it offers a user-friendly UI for easier operation.
Note: It can only extend a volume which has NTFS file system with contiguous unallocated space.
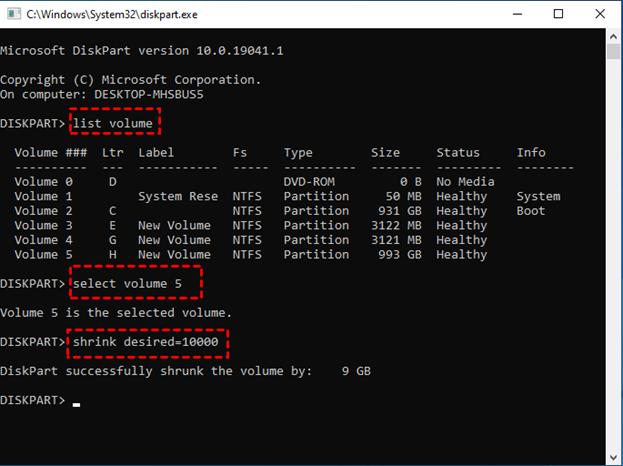
How to Shrink a Partition Using Diskpart:
Step 1: Open the search box, type diskpart, and click Run as Administrator.
Step 2: Type list volume and press Enter to display all the partitions on your computer.
Step 3: Select the partition you want to shrink by typing select volume x (replace x with the partition number) and pressing Enter.
Step 4: Type shrink desired=xxxx (replace xxxx with the amount of space to shrink, in MB), then press Enter.
Note: Diskpart cannot move unallocated space or partitions, so it cannot redistribute disk space by shrinking a volume. Deleting the volume on the right side will enable the 'Extend Volume' function for an NTFS partition.
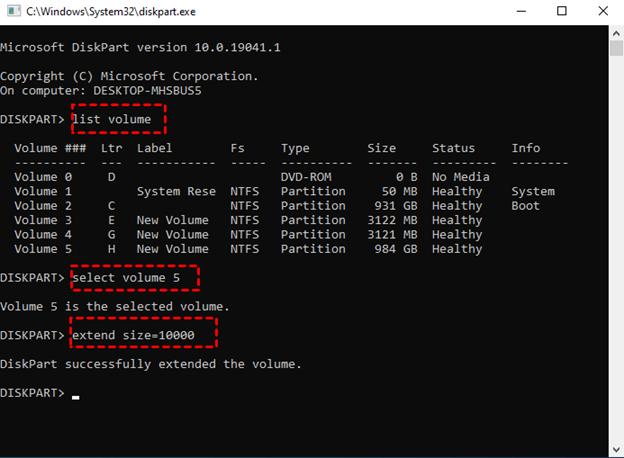
How to Extend a Partition:
Step 1: Open DiskPart as an administrator, just like in the previous section.
Step 2: Type list volume and press Enter to display the partitions on your computer.
Step 3: Select the partition you want to extend by typing select volume x (replace x with the partition number) and press Enter.
Step 4: Type extend size=xxxx (replace xxxx with the number of MB you want to add) and press Enter.
Part 4 - How to Resize Partition Windows 11 BitLocker
The Bitlocker encryption tech primarily locks BitLocker Partition. Full volume encryption with excellent capability also comes in standard with the Microsoft Windows version, which initiates the Windows Vista. It interacts with the OS appropriately and eliminates the risk of data loss.
Step-by-step guide:
You must first unlock the BitLocker to resize the partition. Follow the below process:
Method 1. Unlock Bitlocker drive via Settings
Step 1: Head over to Settings and enter 'encryption, and tap on "Manage BitLocker."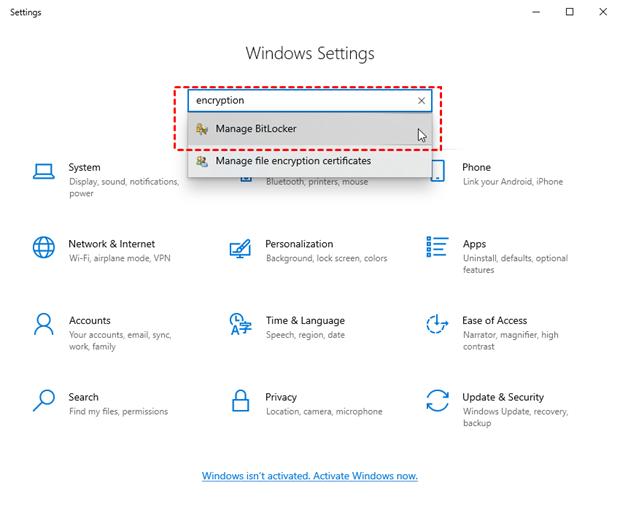
Step 2: You will notice a pop-up; opt for the drive; tap on "Turn off BitLocker."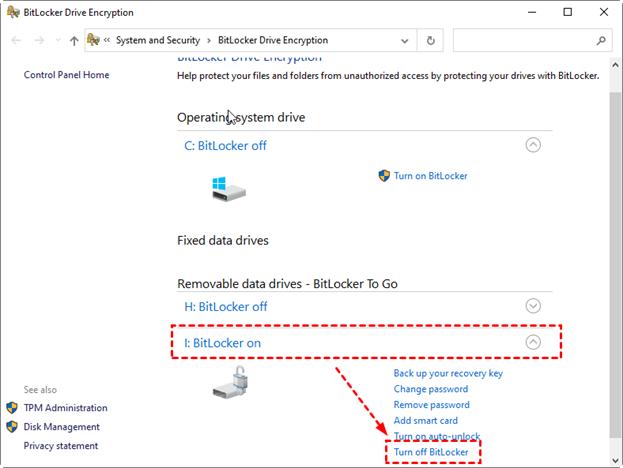
Step 3: Hit "Turn off BitLocker" to affirm now you have successfully unlocked the drive.
To resize the partition, follow the below steps:
Step 1: Right press 'This PC' on the device, go to 'Manage,' and tap on "Disk Management."
Step 2: Look for the partition that needs an extension—right-clicks it.
Step 3: Opt for "Extend Volume." Then go with the guide for adding volume to your target partition. For example, suppose your target partition is a C drive; consider rebooting your PC to finish the procedure.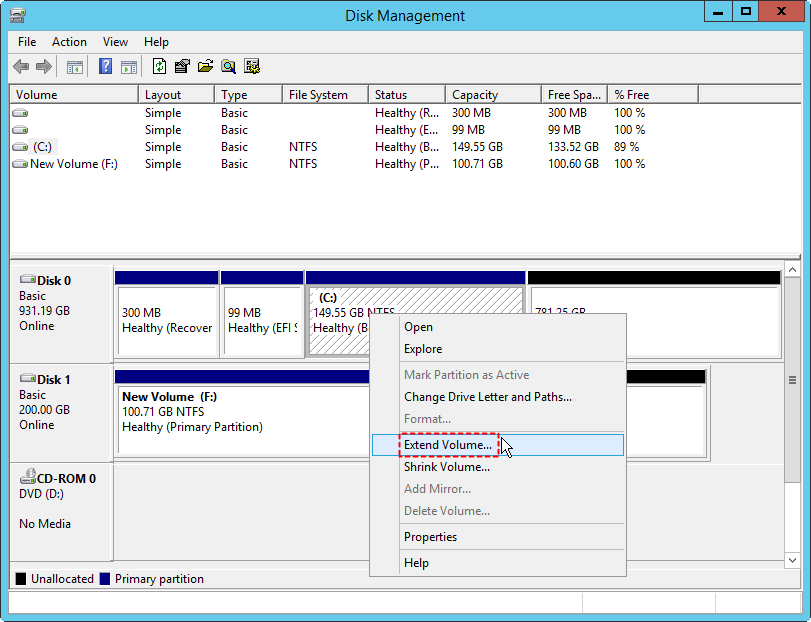
Part 5 - Resize Partition Windows 11 Powershell
The below step-by-step guide will acquaint you with the steps to use Powershell to resize partition free on Windows 11. Moreover, you can apply these same steps to Windows 8 and 10.
Step-by-step guide:
Extend a partition:-
Step 1: Press the 'Start' button and enter 'power.' Right tap on "Windows PowerShell." Choose to "Run as administrator."
Step 2: Type diskpart, list volume, and move further by clicking enter.
Step 3: To select your desired partition, type 'select volume #' and tap 'enter.'
Step 4: To extend the partition in megabytes, type extend size =# and hit 'enter.'
Step 5: Double press exit and click 'Enter' to exit Powershell and Diskpart. 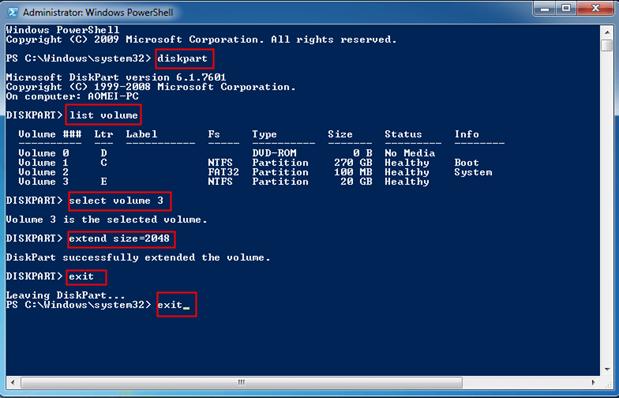
To shrink partition via Powershell:-
The steps are pretty similar to extending the partition through Powershell. Therefore, users are recommended to change the fourth step mentioned above with this step.
Step: Type shrink desired=# for shrinking the partition in terms of megabytes and then clicking enter.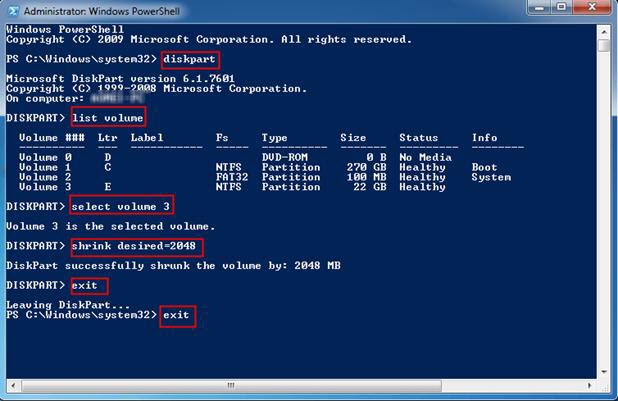
Additional Tip: You may not be able to shrink the partition in the presence of unmovable files on your disk. Shrinking it is only possible to the immovable point of the file. The command automatically reclaims the maximum space required if you fail to specify a particular size.
Frequently Asked Questions (FAQs):
Q1. What's the reason behind the dysfunction of Extend volume in C drive?
A: When you notice the extend volume feature greyed out on the PC, it reveals that your hard disk is devoid of unallocated space. Since you won't see unallocated space after the C partition drive, you cannot access "Extend Volume."
Q2. Can I shrink a partition without data loss?
A: You are not at risk of losing data while shrinking the partition. If the partition consists of unmovable files like the shadow copy storage area or the page file, the volume will begin shrinking to the point where you will find the location of the unmovable files. The consumed space with the remaining data is unable to shrink space.
Q3. What's the process of merging partitions in Windows 11?
A: The steps are as follows:
Step 1: Look for the two partitions which require merging; remove one partition.
Step 2: Right-press your system partition and choose the "Extend Volume" option.
Step 3: To merge the partitions, ensure you accept the default alternatives and follow the extended volume wizard.
Q4. Why I'm unable to delete a partition?
A: If you cannot remove a partition on Windows 11 with the help of the Disk Management utility since the delete partition feature is not there, then you can access the "Recovery Partition" or an "EFI System" partition.
Q5. Why is my C drive full?
A: Malware or virus issues can consume immense space in the system. Since most of your files are in the C drive, your C drive might contain a huge file you aren't aware of. For example, windows might be full of temporary downloads, cache, or junk in the C drive.
Conclusion:
The creation of partitions in Windows 11 has gained more significance currently. Many users set their whole drive like a partition keeping all their files in it. It might have certain benefits, but not to ignore; it carries the most significant risk. For example, if your system stops responding or crashes, you won't be able to operate your Windows 11 system.
That's why it's necessary to get familiar with different safe and secure methods to resize partition free on Windows 11. After reading the article, you would be able to relieve yourself from such errors and permanently get hold of data loss risk.
Background:
Many new PCs come with a single partition, which means your disk space may not be fully optimized. As users start to add more data or install programs, they often realize that they need more space for certain drives. That's when the need to resize partitions on Windows 11 becomes important.
Here are some common reasons why users need to resize partitions on their Windows 11 computers:
- Low Disk Space Warnings: If you're seeing warnings like "Low Disk Space", resizing partitions can help free up space by reallocating it from larger volumes without reinstalling Windows.
- Better Disk Space Management: Over time, disk space can get unevenly used. Resizing partitions lets you reorganize space for more efficient storage.
- Setting Up Dual-Boot Systems: Resizing partitions helps create space for installing multiple operating systems (e.g., Windows and Linux) on the same computer.
- Backup and Recovery: Users often resize partitions to create space for backup or recovery drives, ensuring data safety in case of a system failure.
- Gaming or Large Software: Large games or software can require a lot of space. Resizing partitions helps allocate space for these applications without affecting other files.
- Improving System Performance: A full partition can slow down your computer. Resizing partitions can help by freeing up space and improving performance.
- Post-Upgrade Needs: After upgrading to Windows 11, users may need to resize partitions to better organize space for new system files or apps.
The issues listed above can slow down your computer due to insufficient disk space. This guide walks you through how to resize partitions on Windows 11 safely, without risking data loss, to help you resolve these problems.