How to Fix the Windows 11 Extend Volume Greyed Out (6 Ways)
Description: Have you ever faced any error where the message of 'Windows 11 extend volume greyed out' pops on the screen, and you have no clue what to do next? Do not worry; we are here to guide you with five effective ways to fix the issue instantly in quick steps.
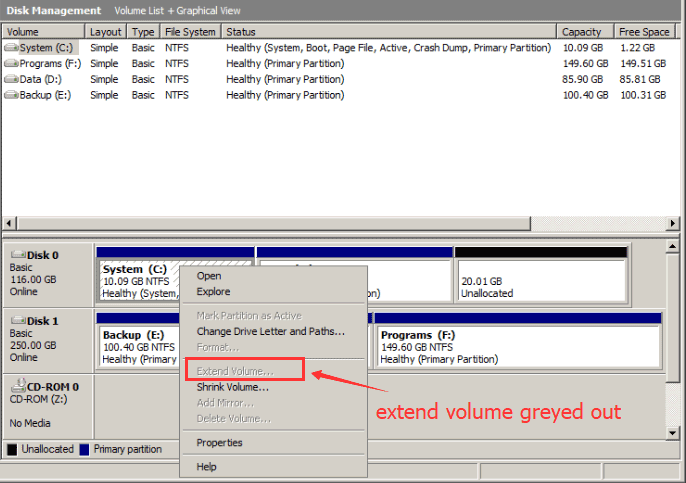
How can I fix the extended volume option greyed out in Windows 11?
Method 1 - Fix Extend Volume Greyed Out Windows 11 With IM-Magic Partition Resizer
Use Partition Resizer to create and move unallocated space to expand partition without data loss.
Video#1: Shrink E, move recovery, and extend C with free tool Partition Resizer
For Windows 11/10/8/7 => Download Partition Resizer Free [100% Free]
For Windows Server 2025-2003 => Download Partition Resizer Server [Free Demo]
Suppose you wish to fix the 'Windows 11 extend volume greyed out' issue but found that your data is on the verge of getting lost or deleted. So while you are working on removing or creating unallocated space on your hard drive, IM-Magic Partition Resizer which is a totally free tool seems like a magic application to work wonders for you. Even with zero technical knowledge, you can operate the software well.
The tool helps you with the following:
- Create unallocated space by shrinking any volume without losing data
- Move unallocated space adjacent to the partition you want to expand by moving the in-between partitions left or right
- Resizing, formatting, deleting, or moving partitions.
- Wiping any disk or partition along with no downtime availability for servers.
- Straightforward extension of C system drives to give you more space.
- Easy conversion of MBR to GPT.
- Safety of 100%, along with no data loss.
Step-by-step guide:
Step 1: First, you must download IM-Magic Partition Resizer freeware, then install it.
Step 2-1: Create unallocated space first. Now locate the volume you are looking to extend and tap on the drive given next to it. You will be able to observe the options of 'Resizing or Moving.' Tap on it.
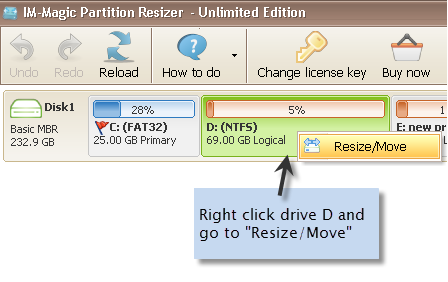
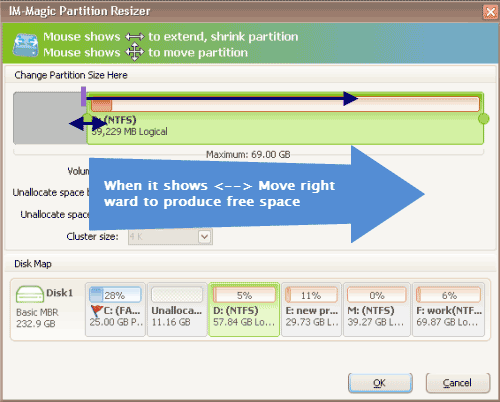
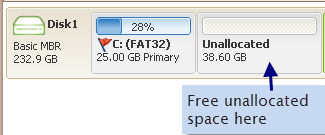
Step 2-2: Go ahead by shrinking a large partition. For that, you've to move your cursor. You'll reckon some free space available to be unallocated space.
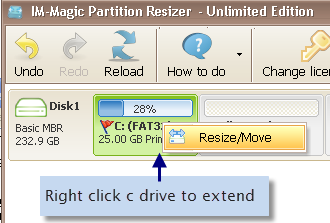
Step 2-3: Now, returning to the main UI, you must locate C and right-click it to 'Resize or Move.' To extend its borders, you must use the cursor.
Step 2-4: Make sure all the changes are applied.
If there is already unallocated space on your disk, when the extend volume is greyed out, following these steps to move the unallocated space contiguous to the partition you want to expand.
Step 3-1: Right click one partition that stands between the unallocated space and the partition you want to expand, move it right or left forward, and click OK to change the location of the unallocaed space.
Note: If there are several partitions standing in the way, move one by one using Partition Resizer, and then the location of the unallocated space will be changed accordingly.
When the unallocated space reaches the side of partition you want to expand, then you can extend it in Partition Resizer no matter it's at left or right side.
Also read: How to fix extend volume greyed out issue
Method 2 - Convert FAT to NTFS (Won't work on System C Drive)
Why? Windows built-in tools cannot expand a FAT32 volume C even there is contiguous unallocated space.
Solution: Use free tool IM-Magic Partition Resizer that can extend a fat32 c drive in this case.
Note: C drive cannot be converted from FAT32 OR FAT TO NTFS.
If, as a user, you find out that your partition is formatted in FAT or FAT32 format, you cannot expand it with Windows built-in tools. So, you may use a free tool Partition Resizer to expand it or you need to convert it to NTFS or reformat the whole partition in NTFS format. However, before proceeding with the steps, you must ensure that you have properly backed up the data on your partition.
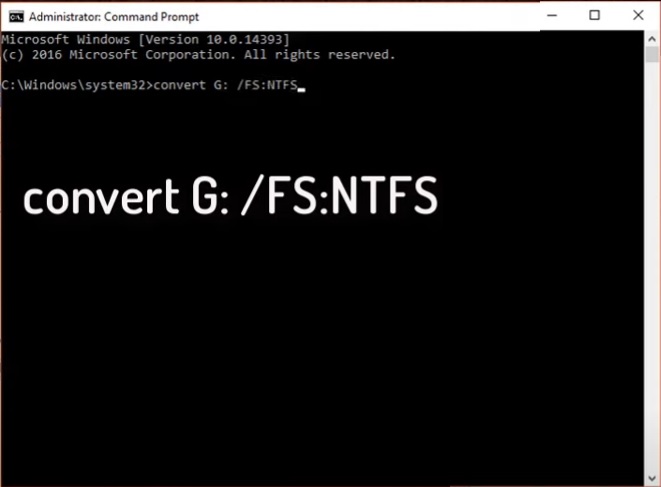
Convert FAT/FAT32 to NTFS using CMD (Non-OS)
Windows built-in command can help converting a non-OS drive to NTFS without losing data. It must be a non system partition.
Convert C Drive FAT32 to NTFS?
Note: There is no way to convert the c drive from FAT32 to NTFS without reinstalling the OS.
Solution: IM-Magic Partition Resizer can help expand the FAT32 C drive without losing data for free.
Step 1: Download Partition Resizer Free, install, and open it. To extend the C drive, first create unallocated space by shrinking another large volume. Right-click the large volume and choose "Resize/Move."
Step 2: Move the border of the large volume from left to right, creating unallocated space on the left side. You can also move the border left to create unallocated space on the right, depending on where the space is needed.

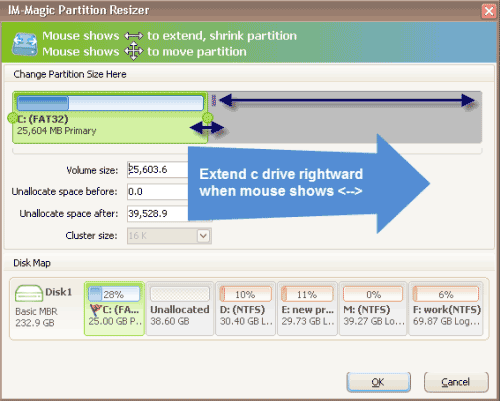
Step 3: Right-click the C drive (FAT32 format) and select "Resize/Move." Extend the right-side border of the C drive to claim the unallocated space you created in the previous steps.
Step 4: Drag the arrows to include the unallocated space in the C drive. Finally, click the "Apply" button to save the changes.
Format a NON OS Drive NTFS Step-by-step guide:
Step 1: You must start by right-clicking on the Disk Management Console partition, and then from the context menu, you must click the 'Format' option.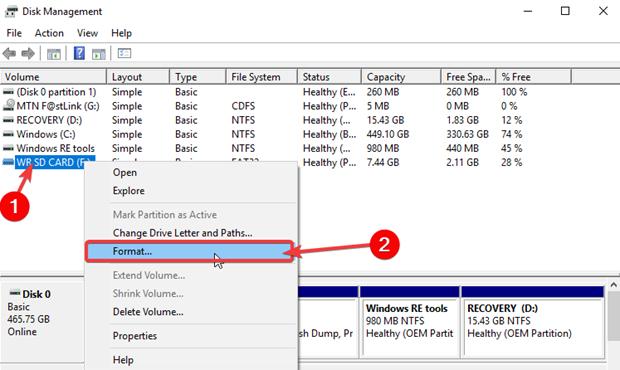
Step 2: You'll be able to observe a new window for the process of formatting. From there, make a selection of 'NTFS' given in the drop-down menu. You can search for the choice in the File system. Then you've to proceed by tapping the 'OK' option.
Step 3: Now, to give your confirmation on the action, you've to tap the 'OK' option.
After completing the process, you will notice the formatting of partitions in NTFS format. You can extend the partition and find out if your issue gets resolved. In case you find that your problem is persisting, move to the following method.
Method 3 - Recovery Partition Stands in the Way
If there is ever the recovery partition or system resevered partition stands between the c drive and the unallocated space, there is no way to expand the C drive and at this time only a third party free tool can help.
Option1: Delete the recovery partition using IM-Magic Partition Resizer
Method 4 - Remove Adjacent Volume
If you find out that 'Windows 11 extend volume greyed out,' you must move ahead with deleting the partition present on the RHS of the Volume you want to extend. As soon as you delete the volume, you will find that the data present also gets erased. So before moving ahead, make sure you have taken a backup of your important folders and files.
Step-by-step guide
Step 1: Go ahead with typing diskmgmt.msc in the Run dialog box by opening the Console for Disk Management.
Step 2: You will find volume up on the extendable partition's right side; right-click on the same. Then you've to go ahead with tapping on the 'Delete Volume' option given in the context menu.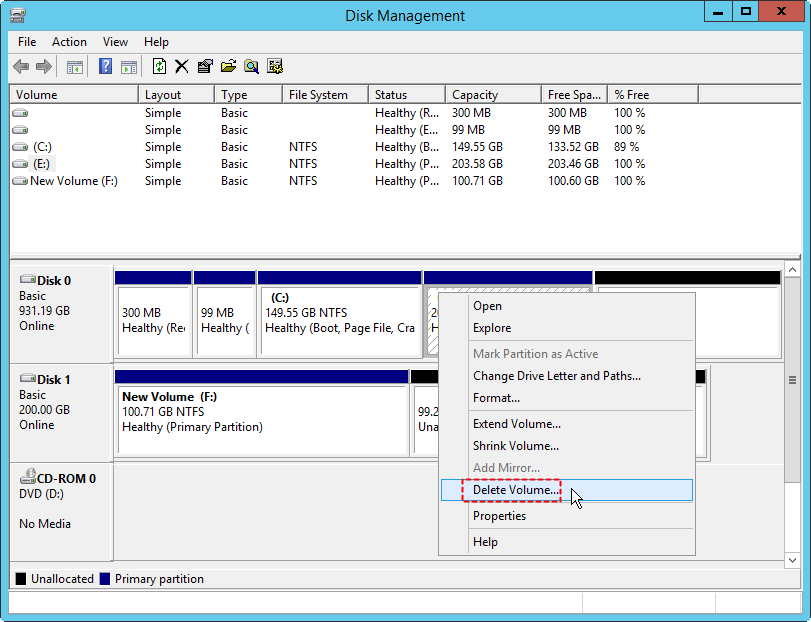
Step 3: You must tap on 'yes' to confirm the dialog box.
Step 4: You will see that deletion of volume is now confirmed and is present as 'Unallocated.' You must proceed with the volume you have to create an extension of by clicking on the option of 'Extend Volume' present in the context menu.
Step 5: You will see the wizard of Extend Volume facility has launched. You must click the 'Next'option to see the welcome screen.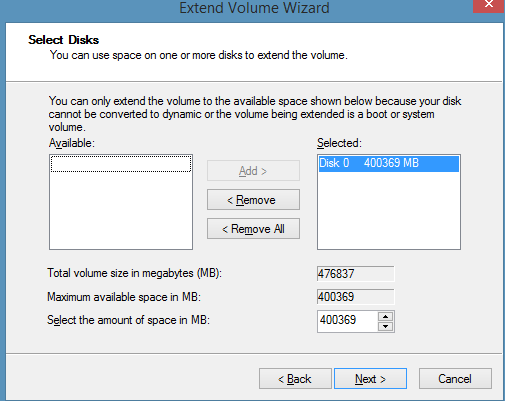
Step 6: As soon as the following screen appears, you must ensure that the selected category has unallocated space. Now you have to make an entry for the required space in MBs and proceed with clicking on the 'Next'option once you get done.
Step 7: You will see the final screen where you have to tap on the 'Finish' option.
Method 5 - Extend to another dynamic Disk by building raid array
Windows cannot make an extension of volume if there is unallocated space on the primary disk. However, if your disk is dynamic, you can create a partition that will look presentable in a single place but will have distribution across more than two disks. In case you cannot spare additional space on the disk of your current usage, you can also attach a separate one onto your computer to extend the partition.
Step-by-step guide
Step 1: You have to shut down your PC and go ahead with attaching a new hard drive. You can also attach a Virtual Hard Disk if you are working on a VM.
Step 2: As soon as you get done, you have to switch on your PC and type in diskmgmt.msc in the Run command by opening the console for Disk Management.
Step 3: You will notice that you have successfully attached the new hard drive to your PC. If you see any partitions pre-existing on your system, go ahead by deleting them so you have some unallocated space on your device.
Step 4: Now, on the disk of your choice, go ahead by right-clicking and tapping on the option of 'convert to dynamic disk.'
Step 5: You will see a pop-up window where you have to recheck whether you have selected the suitable disks and then tap on the 'OK' option.
Step 6: On the next screen, you must tap the 'convert' option.
Step 7: On the confirmation box, tap on 'Yes.'
Step 8: You will find that your disk converts to dynamic, and the option of 'extend volume' will appear in the expandable volume's context menu. Tap on it. 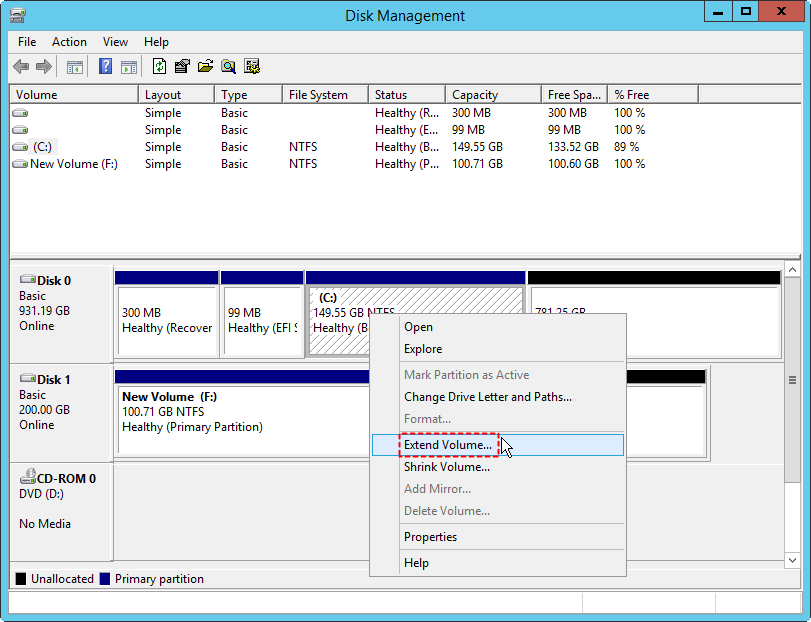
Step 9: You can see the wizard for the Extend Volume. On the welcome screen, tap on 'Yes.'
Step 10: Tap on the option of Available unallocated space on the next screen, then tap on the 'Add' option.
Step 11: Now, enter the space required in MB and tap on 'Next.'
Step 12: Tap on 'Finish' on the final screen to complete the task.
Why Extend Volume Greyed Out?
The disk management utility comes as a built-in feature for extending the volume to enlarge a partition when there is contiguous unallocated space at its right side. However, when Windows disk management right click function 'Extend volume' greyed out on your screen, you must know why.
For Basic Disks:
- Sometimes you have to ensure that the partition you are looking for enlarging is a partition other than an NTFS partition. It is so because, as per Microsoft, the feature of extending Volume in Disk Management works with an NTFS or RAW partition.
- The primary partition neither offers any unallocated space behind it nor is any continuous space at the back of the logical drive you want to expand.
- You may find that the MBR partition is not expanding beyond 2TB.
For Dynamic Disks:
- You will not find any continuous space that is unallocated and present at the back of the C drive.
- You'll not find any blank area unallocated on dynamic disks.
- You will also not find any unallocated space at the back of mirror volume, spanned Volume, striped, or even RAID Volume. In other cases, you will not be seeing any continuous area not allocated at the back of only a segment of the mentioned volumes.
Any reasons mentioned can work behind triggering the issue of 'Windows 11 extend volume greyed out. However, the great news is that we have come up with practical solutions to solve the problem instantly.
FAQs
What are the popular reasons for Windows 11 extend volume greyed out?
You may see:
- No support for particular partitions.
- No support for the File system.
- Restriction of 2TB on MBR disk.
Which is an easy way to solve the 'Windows 11 extend volume greyed out' issue?
IM-Magic Partition Resizer software can fix the issue quickly and instantly.
How should I add unallocated space to C drive when there is no extended volume?
You can apply the methods mentioned earlier. Use any one or all of them. But for a hassle-free experience, we will suggest you use effective software.
How can I convert MBR to GPT?
You can use the IM-Magic Partition Resizer to convert MBR to GPT easily.
What should I do if, after using the Convert FAT to NTFS method, I cannot fix the extended volume greyed issue?
We have mentioned many other options to try to fix the issue. You can try any of them. Or, if you have a limited time in hand, follow the steps mentioned under IM-Magic Partition Resizer.
Conclusion
To solve your issue of 'Windows 11 extend volume greyed out,' we have suggested five suitable methods. So feel free to apply any or all of them per your situation and feasibility. However, we think that using an able software like IM-Magic Partition Resizer can do your task in minutes and not drain you out of energy. Using this tool, you can delete any partition, making enough room even in the absence of allocated space. IM-Magic Partition Resizer also ensures you are not losing any data during or after the process is complete. So, you can blindly rely on it.