Can't Extend Volume or Extend Volume Not Available in Windows Server 2022? (3 Fixes)
Introduction
When trying to extend a volume on Windows Server 2022, you may encounter the frustrating issue of the "Extend Volume" option being greyed out in Disk Management. This can be caused by a variety of factors, including partition types, unallocated space availability, or the presence of recovery partitions. In this article, we will explore several common reasons for this issue and offer practical solutions to resolve it. Whether you are using built-in Windows tools or third-party software, this guide will help you extend your volumes effectively.
Related Terms: Right-adjacent unallocated space, NTFS partition, 2TB MBR disk (max 4 partitions), same disk (without RAID configuration)
Possible Causes for "Extend Volume" Being Greyed Out in Windows Server 2022
There are several reasons why the "Extend Volume" option may be unavailable or greyed out. Below are the most common causes:
- Unallocated Space Not Adjacent to the Volume: In order to extend a volume, Windows requires unallocated space to be immediately adjacent to the volume you want to expand. If unallocated space is not next to the volume (e.g., on the left side of the partition), the option to extend the volume will be unavailable.
- Recovery/EFI Partition Blocking the Extension: If there is a recovery partition or efi system partition located between the existing volume and the unallocated space, the "Extend Volume" option will be greyed out. Disk Management won't be able to move or resize the recovery partition to make space adjacent to the main volume.
- Partition Type Limitations: Certain partition types, such as FAT32, may not be extended using Disk Management. FAT32 volumes are limited in size and cannot be extended directly. The system may require converting the partition to NTFS before you can extend it.
- MBR Disk Limitations: If the disk is using the MBR (Master Boot Record) partition style, it may have reached its maximum number of partitions (4 primary partitions). In this case, you won't be able to extend an existing partition without first converting the disk to GPT (GUID Partition Table) format.
- Insufficient Disk Space: In some cases, there may simply not be enough unallocated space on the disk to extend the volume. You may need to shrink other volumes or delete unnecessary partitions to create enough space for expansion.
Solutions for Extending Volume in Windows Server 2022
Now that we've identified the common causes, let's explore some solutions to resolve the issue of a greyed-out "Extend Volume" option:
- Create Adjacent Unallocated Space: Ensure that there is unallocated space directly next to the partition you want to extend. If the unallocated space is not adjacent, consider using a third-party partition manager to move the partitions around.
- Remove or Move the Recovery Partition: If a recovery partition is blocking the extension, you can either delete the recovery partition (if it's not necessary) or move it using third-party partition tools that allow non-destructive resizing and relocation of partitions.
- Convert FAT32 to NTFS: If the volume is using the FAT32 file system, you must convert it to NTFS before you can extend it. You can do this using the Command Prompt with the following command: (It won't work on the system C drive.)
convert
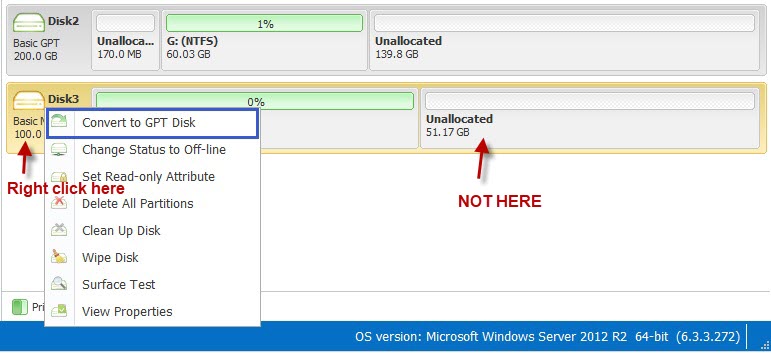
: /fs:ntfs - Convert MBR to GPT: If your disk is using MBR and has reached the partition limit, you will need to convert it to GPT. This can be done without data loss using third-party partition tools like IM-Magic Partition Resizer. If it's the OS disk, you may directly use command 'mbr2gpt' with this code: mbr2gpt /convert /disk:Disk1 /allowFullOS (Also read: how to convert disk from MBR to GPT)
- Use Third-Party Software: If Disk Management isn't helping, third-party tools like IM-Magic Partition Resizer allow you to move unallocated space, resize partitions, and perform other advanced operations like extending FAT32 volumes or converting MBR to GPT without data loss.
In the following table, we compare the functionality of different tools for extending volumes on Windows Server 2022:

Video: How to resize server partition without losing daa
Windows Server 2022 Can't Extend Volume Solutions [3 Fixes]
Here are 3 solutions for when you're unable to extend a volume on Server 2022, fixing the issue of 'Windows Server 2022 extend volume greyed out' instantly.
Solution 1: Creation of Adjoining Unallocated Space (Backup data first if needed)
Condition: Unallocated space is required on the right side of the drive you wish to extend.
Solution A: You need to delete a partition or free space to create adjoining unallocated space.
Steps to Use:
Step 1: Backup the data on the partition that needs to be deleted. You may copy the data from the partition to an alternative or external disk volume. (If it's free space, you can right-click and delete it directly.)
Step 2: In Disk Management, find the volume or partition on the right, then select 'Delete Volume'. 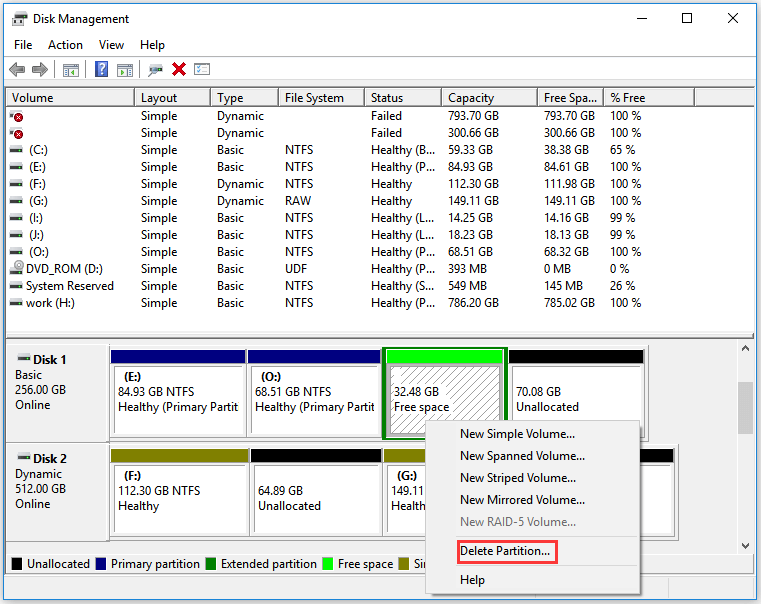
Step 3: Click 'Yes' to confirm.
After completing these steps, you will find the unallocated space on the right side of the target drive that you want to expand.
Note: If the unallocated space is not adjacent to the target drive, you need to move the in-between volumes using IM-Magic Partition Resizer Server, without data loss. Alternatively, you can continue deleting the in-between volumes to make all right space unallocated.
Solution B: Resize and move volumes without losing data to create unallocated space using IM-Magic Partition Resizer Server.
Step 1: Download Partition Resizer Server, install it, and open it. Create unallocated space by shrinking a large volume: Right-click the large volume and choose "Resize/Move."
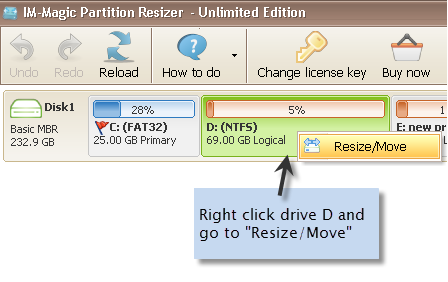
Step 2: Move the border of the large drive from left to right to create unallocated space on the left side, or move the border left to create unallocated space on the right side.

Step 3: Right-click the C drive and choose "Resize/Move." Extend its right-side border to claim the unallocated space.
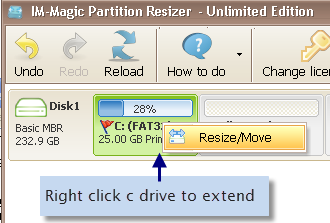
Step 4: Move the arrows to add the unallocated space to the C drive. Click the "Apply" button. 
Note: The following image shows how to safely move partitions without losing data using IM-Magic Partition Resizer.
Note: IM-Magic Partition Resizer Server can help shrink Server 2022 volumes without losing data, expand Server 2022 NTFS/FAT32 volumes, move volumes, and also help clone disks, migrate OS, convert dynamic disks, convert primary partitions, and repair possible disk errors.
Also read: How to extend volume on Server 2022
Solution 2: Deleting the Recovery Partition (Fix the problem without software)
When the 'Windows Server 2022 cannot extend volume' issue occurs, it’s possible that a recovery partition is located between the unallocated space and the volume needing extension. A recovery partition provides a restore option in case of system failure. However, deleting it will remove all the data stored on your PC, which is not recommended. To avoid this, you can use the command-line tool in Command Prompt or Windows PowerShell.
Before proceeding, create a bootable disc or USB to ensure Windows Recovery can be completed if needed. This will protect your PC against data loss or OS corruption.
Steps to Use:
Step 1: Right-click on the Start button and select (Admin) Windows PowerShell. Alternatively, in the Start menu, type cmd.exe and select 'Run as administrator.'
Step 2: On the UAC pop-up, click 'Yes.'
Step 3: Run the following commands sequentially:
- diskpart: Loads the DiskPart utility.
- list disk: Lists all disks on the PC.
- Select disk [number]: Select the disk containing the recovery partition to be erased. Replace [number] with the actual disk number.
- list partition: Lists all partitions on the selected disk.
- Select partition [number]: Select the recovery partition to delete. Replace [number] with the actual partition number.
- delete partition override: Deletes the recovery partition.
Solution 3: Using a Compatible Format (Expand volume on Windows Server 2022 without software)
To extend a volume using built-in Windows Server 2022 tools, the volume must be in the NTFS format. You can format the volume using Disk Management, but this process will erase your data. Therefore, it’s recommended to back up your data before proceeding.
Steps to Use:
- Step 1: Open Disk Management, right-click on the partition, and select the 'Format' option.
- Step 2: In the 'Format' dialog, change the File System to NTFS.
- Step 3: Click 'OK.'
Note: There is usually no way to change a boot drive, typically the C drive, from FAT32 to NTFS. However, you can use IM-Magic Partition Resizer to expand a FAT32 C drive by creating unallocated space, moving it adjacent to the C drive, and then expanding the C drive.
Reasons Windows Server 2022 Cannot Extend Volume in Disk Management
Sometimes, when using an SSD or hard drive, you may encounter the 'Extend Volume' option in Disk Management being unavailable. But why is the extend volume option greyed out or unavailable in Windows Server 2022? Let’s explore the reasons behind this issue:
No Unallocated Space, No Right-Side Unallocated Space, No Adjacent Right-Side Unallocated Space
How to create unallocated space on the same disk with Partition Resizer? And how to move unallocated space anywhere with Partition Resizer:
- Step 1: Shrink a large volume (no data loss).
- Step 2: Move unallocated space to the right side of the target drive (no data loss). Right-click on the in-between partition, select "Resize/Move Partition," and move the entire volume left or right.
Free Space Not OK, Convert It to Unallocated Space
The 'Extend Volume' option will be disabled if there is free space on the adjacent right side because free space is not the same as unallocated space.
Convert the free space to unallocated space by deleting it in Disk Management, Diskpart, or Partition Resizer.
Also read: How to convert free space to unallocated space
Not Supported File System (NTFS Supported, FAT32 or exFAT Not Supported)
If the target drive is a FAT32 drive, the 'Extend Volume' option will be disabled since only NTFS file system drives are supported.
Solution: Convert the FAT32 drive to NTFS using the convert ntfs command or a safe tool like Partition Resizer Server.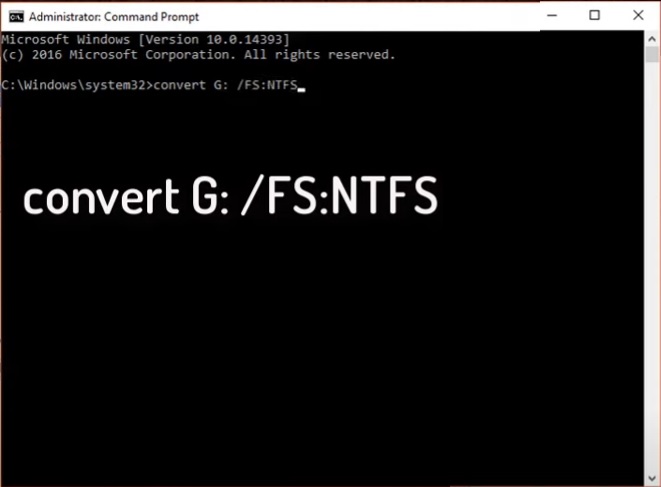
Note: The convert fs:ntfs command will not work on the boot drive (C:).
Also read: How to convert FAT32 to NTFS without losing data
GPT Disk Supported, MBR Disk Limited by Conditions
GPT disks are supported, but MBR disks have limitations: a maximum of 4 primary partitions and a 2TB disk capacity.
For a 4TB SSD or HDD initialized with MBR, the disk can only have partitions up to 2TB, leaving the remaining 2TB as unallocated space. This unallocated space cannot be added to any partition due to the MBR disk limit.
Solution: Convert Disk from MBR to GPT with Partition Resizer
Also read: Convert disk from MBR to GPT without losing data
Recovery Partition in the Way: Move It or Delete It?
When a recovery partition is located between the C: drive and unallocated space, it can make it impossible to extend the C: drive using Disk Management or DiskPart.
Solution 1: Move the Recovery Partition Safely and Extend the C: Drive Using Partition Resizer Server
- 1. Download and install Partition Resizer, then open it.
- 2. Right-click the recovery partition in Partition Resizer and select "Resize/Move Partition."
- 3. Move the recovery partition to the right by dragging the entire volume when the cursor shows cross arrows. This will ensure no data loss.
- 4. Right-click the C: drive and select "Resize/Move Partition."
- 5. Drag the C: drive’s border to the right to claim the unallocated space.
- 6. Click "Apply" to finalize the changes. This will extend the C: drive successfully.
Note: The same steps apply when expanding other partitions with volumes between them.
Also read: How to Move Partitions Without Losing Data
Solution 2: Delete the Recovery Partition Using Disk Management or DiskPart Command
Deleting the recovery partition or any other partition that stands between the target drive and unallocated space will enable the 'Extend Volume' option.
Also read: How to Delete Partition When 'Delete Volume' is Greyed Out
Other Information
Sometimes, when using an SSD or hard drive, the 'Extend Volume' option in Disk Management may be greyed out. But why does this happen in Windows Server 2022? Here are the possible reasons:
- No unallocated space is available on the disk.
- On an MBR disk, you cannot extend the C: drive (primary partition) by shrinking the D: drive (logical partition).
- The FAT32 file system cannot be extended, as only NTFS is supported for volume extension.
- MBR disks have a maximum partition size of 2TB. If you initialize a 4TB hard drive, the remaining 2TB will be left as unallocated space. This space cannot be used to create new volumes or extend existing ones due to MBR's limitations.
- No free space is available behind the partition you want to extend.
- FAT partitions cannot be extended in Windows.
- The partition size has reached the maximum limit (2TB) on the MBR disk.
- The unallocated space is not adjacent to the drive you want to extend, making it impossible to extend the volume.
The issues mentioned above are primarily caused by the limitations of Disk Management. Below, we offer tips to troubleshoot and resolve these problems effectively.
Final Words
We hope you can resolve the 'Windows Server 2022 Extend Volume Greyed Out' issue using our suggested solutions. You can create adjoining unallocated space, move or delete the recovery partition, or use a compatible format to extend your partition. Be sure to back up your data before applying any of these solutions to avoid data loss. Ultimately, the choice of solution is yours, depending on your comfort level and technical expertise.
More Related Articles You May Like
Related Product
- IM-Magic Partition Resizer Server - Partition space redistributing software that works for Windows Server 2003-2025.