Convert Free Space Unallocated Space in Windows 11/10 Server
Background: In the world of computing, unallocated space is a term used to refer to areas of hard drive storage that have not been assigned to any specific file or partition. These areas can be thought of as "blank" or "free" space, and are typically located at the end of a hard drive after all partitions have been created.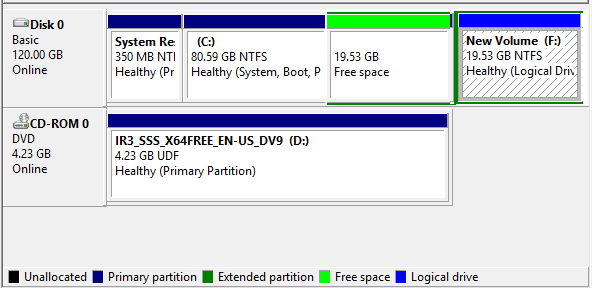
Guide: How to change free space to unallocated space using a free tool
Note: Deleting stand-alone free space with the free tool IM-Magic Partition Resizer will directly change it to unallocated space. If the free space comes from another partition, you can shrink it using the free tool, and it will also be changed to free space if it's a logical drive or unallocated space. Delete the free space to make it unallocated space. After that, you can use the free tool Partition Resizer to add it to any drive.
This following video set an example that you may convert free space from d drive to unallocated space and then add the unallocated space to c boot drive.
For Windows 11/10/8/7 => Download Partition Resizer Free [100% Free]
For Windows Server 2025-2003 => Download Partition Resizer Server [Trial]
In fact you may use this freeware to free convert any free space from a volume to unallocated space and then add the space to another drive on the same disk. You may extend the limit of same disk to a different disk with raid.
Converting free space to unallocated space is a common task for computer users who need to resize or create new partitions on their hard drives. This process involves freeing up space from an existing partition or volume, and then marking it as unallocated so that it can be used for a new partition or volume.
Convert without Software
- How to delete free space to make it unallocated space without software
- Unable to delete free space? Delete it with free tool
How to delete free space to make it unallocated space? (Disk Management)
To delete free space and make it unallocated space, you can follow these steps:
Case#1: No free space? Shrink a volume to produce free space/unallocated space based on the following situations.
Logical drive: Shrinking a logical drive would produce free space on the disk.
Primary drive: Shrinking a primary drive would produce unallocated space on the disk, then no need for a converting here.
Option: You may convert the partition from logical to primary before the shrinking with free tool Partition Resizer which can help change partition from logical to primary without losing data.
Also read: how to convert logical partition to primary
No converting logical to primary? Try deleting the free space.
Case#2: Delete free space if it's produced from a logical drive after shrinking
- Press the Windows key + X on your keyboard to open the Power User menu.
- Select "Disk Management" from the list of options.
- Locate the partition or volume that you want to delete free space from in the Disk Management window.
- Right-click on the partition or volume and select "Shrink Volume."
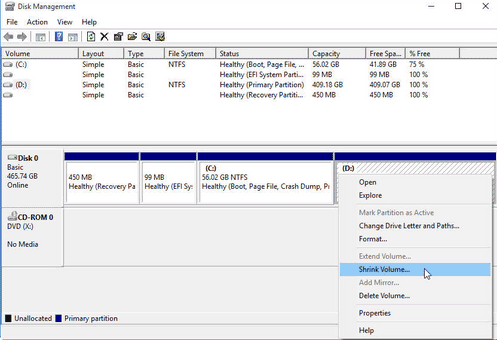
- In the "Shrink" window, enter the amount of space you want to shrink the volume by. (This will create free/unallocated space.)
- Click on the "Shrink" button and wait for the process to complete.
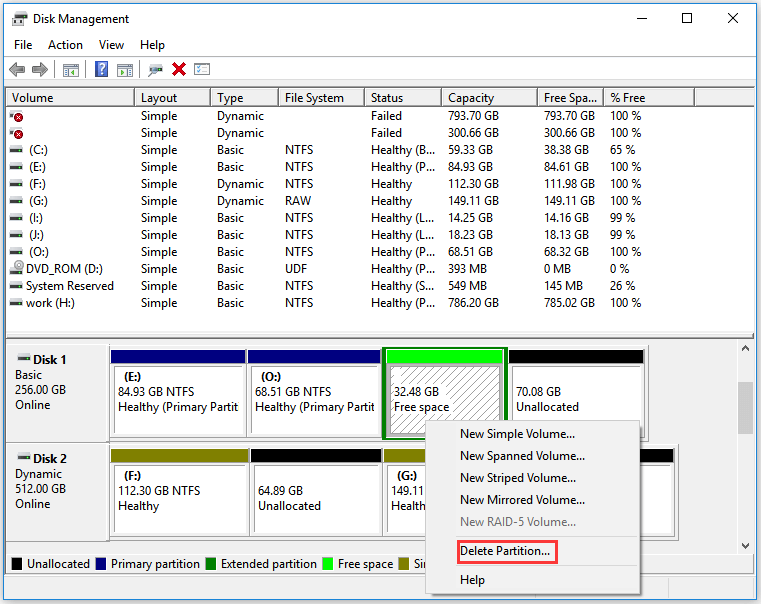
- Once the shrinking process is complete, if it's free space after the shrinking volume, right-click on the free space and select "Delete Volume." (If delete volume is disabled in Disk Management, delete it with free tool Partition Resizer, or create new volume with the free space and then delete volume is enabled for this new volume in Disk Management)
- Confirm that you want to delete the volume, and the space will now be unallocated.
Note that deleting a volume or partition will permanently erase all data on it, so make sure to back up any important files before proceeding with these steps.
Delete Volume/Partition Greyed Out in Disk Management Fixes
When delete volume or delete partition option is disabled in Disk Management, here are the fixes.
Fix#1 - Create New Volume with the free space and delete it
- 1, Right click the free space and go to option Create Volume to make a new partition based on the free space
- 2, Right click the new volume, and go to option Delete Volume, and then the whole new volume will turn to unallocated spaces
Fix#2 - Delete free space with free tool Partition Resizer
- 1, Download and install free tool Partition Resizer
- 2, Right click the free space in the Partition Resizer, and then delete it, and the space will become unallocated space
Also read: delete volume greyed out in Disk Management fixes
Video - how to expand volume with free space and unallocated space?
More Information
Part 1: Back Up Your Data
Before attempting any type of hard drive partitioning or resizing, it is important to back up any important data that you have on your computer. While the process of converting free space to unallocated space is generally safe, there is always a small risk of data loss or corruption, and having a backup can help ensure that your data remains safe.
Part 2: Identify the Free Space
The next step in converting free space to unallocated space is to identify the free space on your hard drive. This can be done using a variety of tools, including the built-in Disk Management utility in Windows.
To access Disk Management in Windows 10, right-click on the Start button and select "Disk Management" from the menu. This will open the Disk Management console, which will display a list of all of the drives and partitions on your computer.
Look for any partitions or volumes that have unallocated space adjacent to them. This space will be displayed as a black bar labeled "Unallocated" in the Disk Management console.
Part 3: Shrink a Partition
Once you have identified the free space on your hard drive, the next step is to shrink an existing partition or volume to free up space. This can be done using the Disk Management utility in Windows.
To shrink a partition in Windows 10, right-click on the partition you want to shrink and select "Shrink Volume" from the context menu. This will open the Shrink window, which will display the total size of the partition and the amount of space that can be shrunk.
Enter the amount of space you want to shrink the partition by, and then click the "Shrink" button. This will free up space on the hard drive and create a new section of unallocated space.
Part 4: Mark the Free Space as Unallocated
After shrinking a partition or volume to create free space, the next step is to mark that space as unallocated. This can be done using the Disk Management utility in Windows.
To mark free space as unallocated in Windows 10, right-click on the black bar labeled "Free Space" and then delete the whole space which will then make it "Unallocated" and select "New Simple Volume" from the context menu. This will open the New Simple Volume Wizard, which will guide you through the process of creating a new partition or volume.
Follow the prompts in the wizard to specify the size and format of the new partition, and then click the "Finish" button to create the new partition. The free space will now be marked as unallocated and ready to be used for a new partition or volume.
Part 5: Create a New Partition
The final step in converting free space to unallocated space is to create a new partition or volume using the unallocated space. This can be done using the Disk Management utility in Windows.
To create a new partition in Windows 11/10, right-click on the black bar labeled "Unallocated" and select "New Simple Volume" from the context menu. This will open the New Simple Volume Wizard, which will start a new volume creating.
Also read: 8 ways to free up disk space
Last updated on 2026/06/7
More Related Articles You May Like
Related Product
- IM-Magic Partition Resizer Server - Partition space redistributing software that works for Windows Server 2003-2025.