How to Run Disk Cleanup on Windows Server 2008/2012/2016, Server 2019/2022
Summary
Cleaning up C Drive in Windows Server becomes crucial to avoid many issues. To eradicate these issues, you need to use disk cleanup server 2016 2019 2022. You can also check out other suggested ways to deal with the issue effectively. By moving apps, you can also lead with system optimization to an extent, thereby resulting in its performance.

Updated on 2026/06/05
by Andrew Wright
Table of Contents
Introduction: Install/Run Disk Cleanup on Windows Server 2008/2012/2016/2019/2022
How to Run/Install Disk Cleanup on Windows Server 2012/2016/2019/2022
Disk Cleanup is a built-in utility in Windows operating systems, including Windows Server, which helps to free up disk space by deleting unnecessary files. The utility can be used to remove temporary files, system files, and other types of files that are taking up valuable space on a hard drive. This can help to improve the performance of a server, as well as free up space for other applications and data. In this article, we will explain how to install Disk Cleanup on Windows Server.
Prerequisites:
Before installing Disk Cleanup on Windows Server, make sure that you have the following:
- Administrative privileges on the server: You need to be logged in as an administrator in order to install Disk Cleanup on the server.
- Windows Server installation media: You will need the installation media for the version of Windows Server that you are running in order to install the required components.
Installing Disk Cleanup on Windows Server:
The process of installing Disk Cleanup on Windows Server is straightforward and involves the following steps:
Step1:Open Server Manager: To open the Server Manager, click the Start button and then click on the Server Manager icon.
Step2: Add Roles and Features: In the Server Manager, click on the "Add Roles and Features" option. This will launch the Add Roles and Features wizard.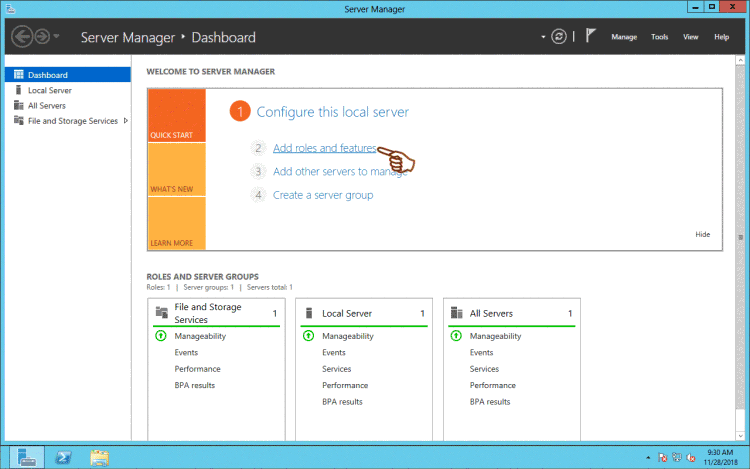
Step3: Select Installation Type: In the Add Roles and Features wizard, choose the "Role-based or Feature-based Installation" option and click Next.
Step4: Select Server: Choose the server on which you want to install Disk Cleanup and click Next.
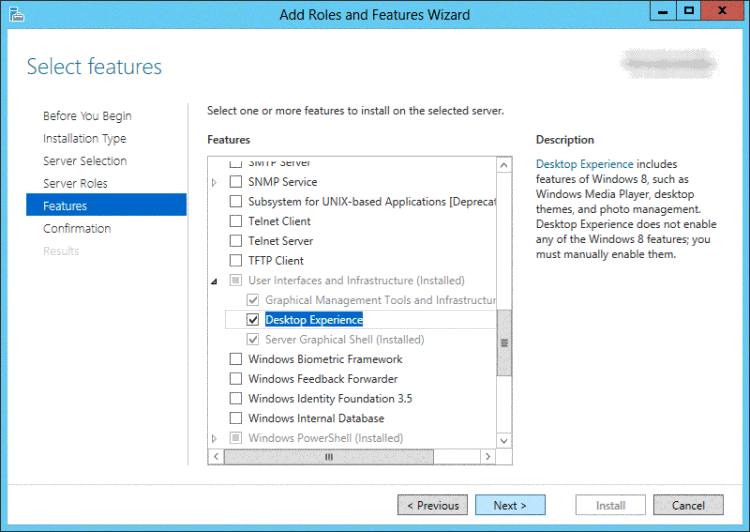
Step5: Select Features: In the Features section, scroll down and select the "Desktop Experience" option. This will install the required components for Disk Cleanup, including Windows Media Player and Themes.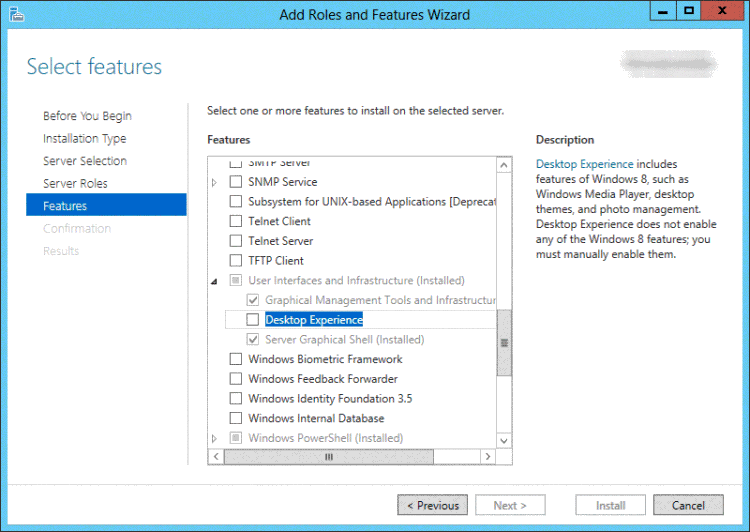

Step6: Confirm Installation: Review the features that will be installed and click Next.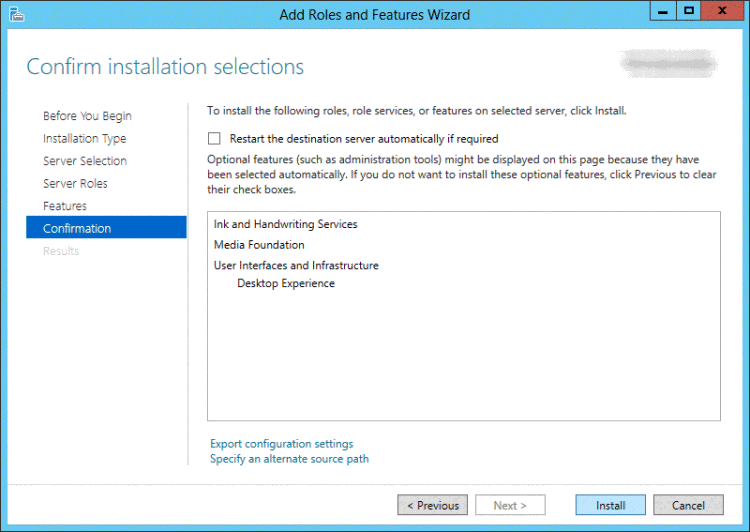
Step7: Install: The installation process will begin and may take several minutes to complete.
Step8: Restart Server: After the installation is complete, restart the server to apply the changes.
Also read: how to enable disk cleanup on server 2016/2019/2022
Using Disk Cleanup on Windows Server:
Once Disk Cleanup is installed on the server, you can use it to free up disk space. To use Disk Cleanup, follow these steps:
Step1: Open Disk Cleanup: To open Disk Cleanup, click the Start button and type "cleanmgr" in the search box. Click on the Disk Cleanup utility to launch it.
Step2: Select Drive: In Disk Cleanup, select the drive that you want to clean up and click OK.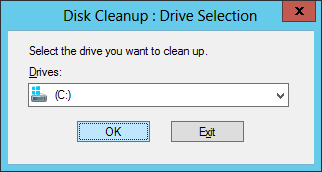
Step3: Analyze Files: Disk Cleanup will analyze the drive and display a list of files that can be safely deleted.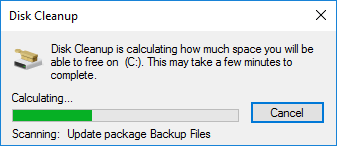
Step4: Delete Files: Select the files that you want to delete and click OK. Disk Cleanup will then delete the selected files and free up disk space.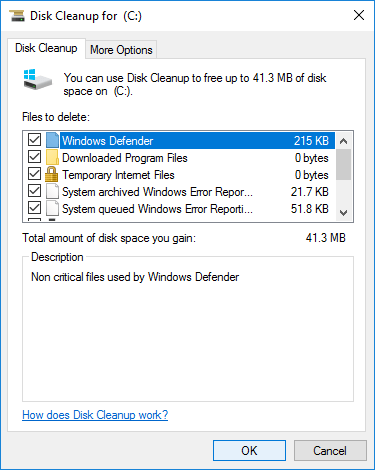
Or you may run Disk Cleanup Wizard with the following steps.
Cleanup Using Disk Cleanup Wizard
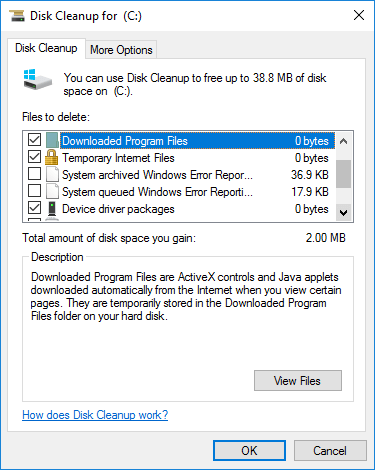
If you are looking for an option that works for disk cleanup servers 2016 2019 2022, then you can try Disk Cleanup Utility. It is an excellent option in Windows that assists in cleaning your C drive effortlessly. It helps delete all the temporary or residual files you do not require now and provides extra space for saving new data.
Steps to Use:
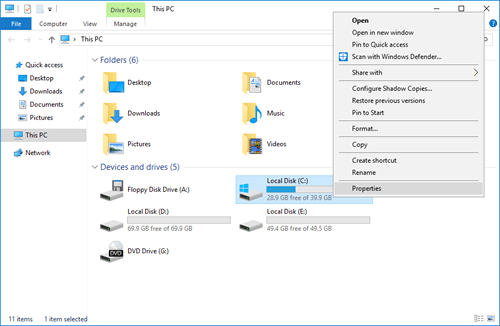
Step 1: Start by simultaneously tapping on the ‘Windows+E’ keys to open File explorer. Then make a right tap on C drive and tap on ‘Properties.’
Step 2: From the pop-up window, tap the ‘Disk Cleanup’ feature.
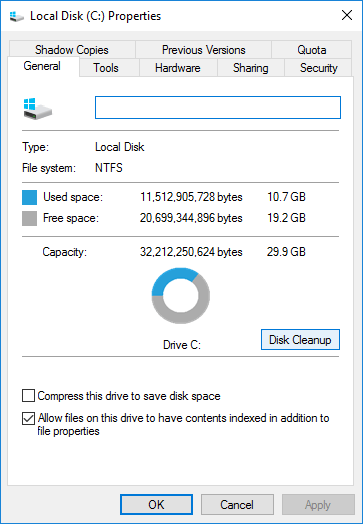
Step 3: Wait until the utility for Server 2016 Disk Cleanup appears on the screen for scanning the junk along with files that are not needed.
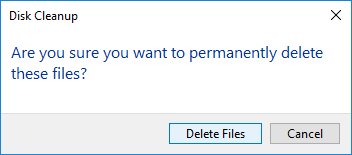
Step 4: Now tap on the check boxes near the files you want to delete and tap on the ‘Ok’ option.
Step 5: Tap on the ‘Delete File’ option from the pop-up window to give confirmation and delete the files.
It's important to note that before running Disk Cleanup on a server, it's a good idea to back up important data, as Disk Cleanup may delete files that are important to the functioning of the server. Additionally, you should be careful when selecting files to delete, as some system files may be necessary for the proper functioning of the server.
Run Disk Cleanup using Cleanmgr command on Windows Server
If you want to erase any files that are not required but taking up space on your PC, then apart from using disk cleanup server 2016 2019 2022, you can use the MGR command. Using the command line switches, you can do the configuration of cleanmgr.exe. It will let you schedule the task for running at a particular time by utilizing a tool for Scheduled Tasks.
Steps to Use:
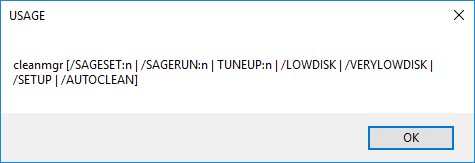
Step 1: Start by tapping on the ‘Windows+R’ keys to open the ‘Run’ dialog and typing ‘cleanmgr.exe/?’ and then move ahead by tapping the Enter key.
As soon as you do that, you will be able to see switches for the Disk Cleanup. It includes;
/D DRIVELETTER
/SAGEST:n
?SAGERUN;n
/TUNEUP;n
/LOWDISK
/VERYLOWDISK
/SETUP
/AUTOCLEAN
Step 2: Now, you can use the cleanmgr command to clean up the disk. For this, tap on the ‘Windows+R’ keys to open Run. Then type ‘cleanmgr.exe/d c’ and tap on the Enter key. Do this without using quotes.
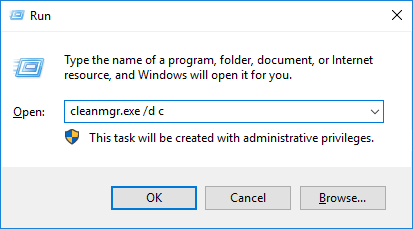
You will notice that specific files will be selected as a default feature. If you want to change the files, tap on the checkboxes and the ‘Ok’ button.
Step 3: Then run the following command;
Cleanmgr.exe /low disk /dc
Whenever your disk drive runs low on space /LOWDISK is used, once Disk Cleanup gets launched as a default feature, all checkboxes are already marked.
Step 4: Now go ahead by typing and running the command:
Cleanmgr.exe /verylowdisk /dc
This command works the same as the /LOWDISK switch; however, it works for the automatic cleanup of the files. You will not see any confirmation, but you can see free space via a dialog box indication.
Additional 4 Ways of Cleaning C Drive on Windows Servers
Besides using native ways to clean up your C drive to create additional space, we suggest ways to clear the clutter. Check them out below.
#1 Emptying Windows Temp along with User Temp temporary Files Locations
If you want to create extra space in C Drive to promote disk cleanup server 2016 2019 2022 try this method. You can empty TEMP, which stands for locations of temporary files, safely as;
- Using C:\Windows\Temp
- C:\Users\%USEPROFILE%\AppData\Local\Temp
In the folder location below, you can find updated installations for old Windows, which takes up a lot of space on your disk.
C:\Users\%USEPROFILE%\AppData\Local\Temp
You can use a PowerShell snippet to clean up the temporary files for IIS IUSR, and it covers everything two days older.
#2 Turning Off Hibernation
You can see a file by the name of ‘hiberfil.sys’, which is used for hibernation in the C drive of Windows Server. It gets created when you enter hibernation mode. During this mode, the Windows server gets saved in its current state. However, it leaves you with little to no space in the C drive, which results in the need for a disk cleanup server 2016 2019 2022. If you turn off the hibernation mode, it also assists you with saving some extra space on your device.
Steps to Use:
Step 1: Start by opening CMD. Go ahead with tapping on the ‘Win + R’ keys and tap on the ‘Enter’ key.
Step 2: Once cmd opens, type ‘powercfg.exe /hibernateoff’ in the CMD Window and tap on Enter.
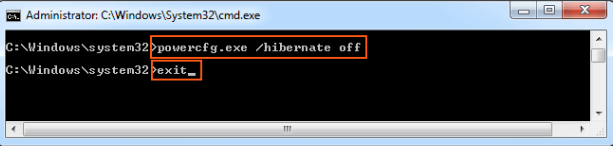
As soon as you enter the command, you will notice hibernation turning off on your device.
#3 Removing Apps That Are Not Useful
You can clear data from your C drive by keeping apps that are not useful at bay. Sometimes, large apps need to be removed to create space on disk and run your Pc efficiently.
Steps to Use:
Step 1: Start by opening the Control panel. If you cannot find it, look for it using the taskbar search bar.
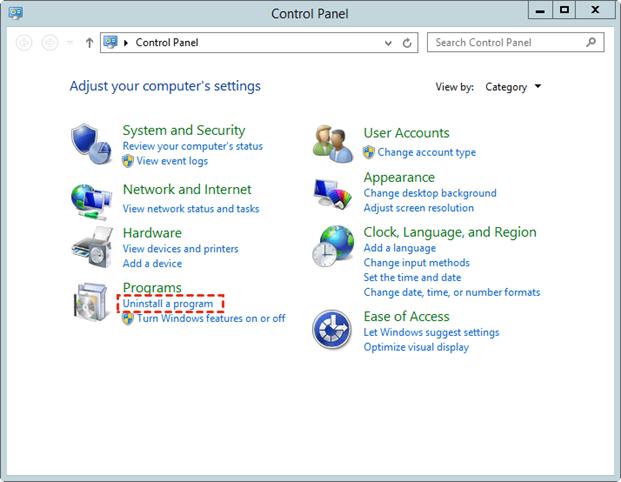
Step 2: Using the Control Panel, locate the Programs section and tap ‘Uninstall a program.’
Step 3: Remove useless apps by uninstalling them.
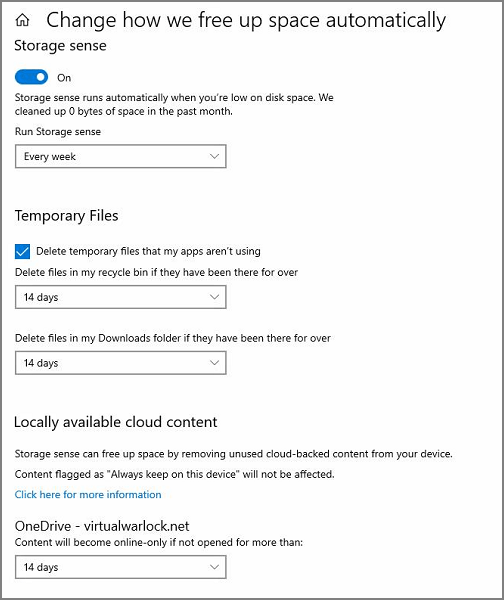
#4 Turning On Storage Sense
If you cannot carry out disk cleanup server 2016 2019 2022 all by yourself, you can use the storage sens feature. Once you enable storage sense in your Windows server, you will be able to wipe out files and data that are not required anymore in an intuitive way.
Steps to Use:
Step 1: Complete the launching of apps for Windows settings.
Step 2: Go toward the System menu and then the storage section.
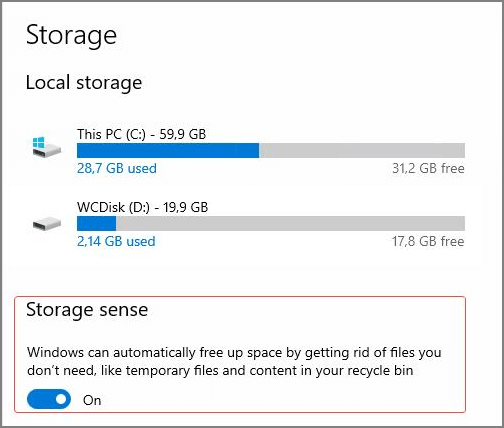
Step 3: Now, use the Storage sense slider by toggling it.
Step 4: Now make the configuration of the storage sense. You can use the settings given beforehand or customize them as per your use.
Also read: 7 ways to free up disk space on server 2022
Add 50+GB space to c drive on Windows Server without formatting or losing data
Data Safety: This disk space expanding relies on a 3rd party software that can safely redistribute disk space on the same disk without formatting or repartitioning disk. It can also help add extra space to c drive or any drive from another disk using the RAID array.
#1 Same Disk: Shrinking partitions, moving partitions, extending partitions without losing data.
#2 Another Disk: RAID array shall be applied, initialize the new disk as unallocated space in Disk Management, and then add unallocated space to any drive without rebuilding RAID.
Example: Shrink D Volume, and extend c drive using Partition Resizer
Video Tutorial to Extend Boot Partitions with Partition Resizer
For Windows 11/10/8/7 => Download IM-Magic Partition Resizer Free (100% Free)
For Windows Server => Download IM-Magic Partition Resizer Server (Free Demo)
Step1: Download, install and open the IM-Magic Partition Resizer Server Edition
Step2: Choose the big D drive that has a lot of free space and shrink it for producing unallocated space which is vital in the disk space management.
- 1, Right click the D volume in the software, and choose the option "Resize/Move Partition"
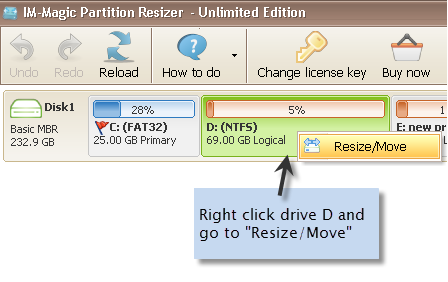
- 2, Shrink d drive right forward to produce the unallocated space, which will be created just at the right side of the C drive.
 Shrink partitions with IM-Magic Partition Resizer Server
The unallocated space is now available. 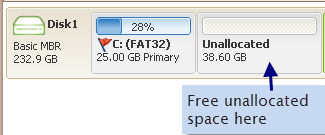
Note: If the unallocated space is not close to c drive, you need to right click the partition that stands in the way, and go to RESIZE/MOVE PARTITION in Partition Resizer to safely move the whole partition right forward.
Also read: how to move unallcoated space without losing data
Step3: Right click on the c partition and click “Resize/Move”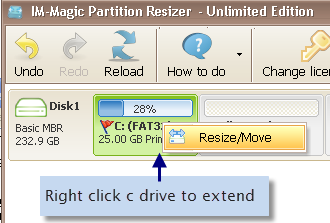
Step4: Now extend the boot partition by dragging the cursor over the bar showing the storage space to get the unallocated space added to the c drive.
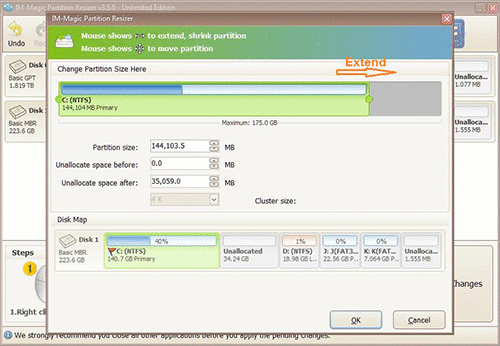 Extend c partition with IM-Magic Partition Resizer Unlimited
Step5: Click APPLY button in the software to get every step applied and get volume extended.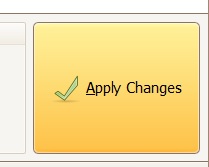
Background
While using your windows system, you may often see several warnings indicating insufficient disk space. In this situation, you need to reclaim abundant space, so your Pc does not show notifications and runs smoothly. You can also add some free space in your C drive after you are done with the cleanup. To help you with the issue, you need a native ‘Disk Cleanup’ utility on your PC. You can use this disk cleanup server 2016 2019 2022 as per your Windows PC.
The facility is capable of removing files and junk that are not needed anymore in a safe manner. For example, you can run the cleanmgr command or use the suitable wizard for disk cleanup to serve your purpose. We have also mentioned additional ways to create space on your PC.
Conclusion:
Installing Disk Cleanup on Windows Server is a simple process that can help free up disk space and improve the overall performance of the server. By removing unnecessary files, Disk Cleanup can help to optimize the server and ensure that it runs smoothly and efficiently. Additionally, by freeing up disk space, Disk Cleanup can help to ensure that there is enough space available for other applications and data.
Also read: how to expand c volume server 2022
Related Product
- IM-Magic Partition Resizer Server - Partition space redistributing software that works for Windows Server 2003-2025.