How to shrink C drive on Windows Server 2008 r2
Video Tutorial to Shrink/Extend Partitions on Windows server
Summary
Want to divide C drive into two partitions? Or want to manage your disk partition in a better way? You can shrink your C drive with this effective partition tool easily on Windows server 2008 r2.
Table of Contents
How to shrink c drive on Windows server 2008 r2
Whenever you buy a new computer or laptop, you often get a single partition C drive. Some people are content with what they get, but others want to create further partitions in order to easily access or store their data as they prefer.
There are many tools and ways to work your way around and shrink C drive and make other partitions, but most of them can’t deliver. None other than Windows Disk Management fails to shrink C drive properly and create new partitions. In order to reduce system volume size following problems may occur.
Server 2008 cannot shrink volume in Disk Management
Windows has delivered an incredible tool to be used by various users known as Disk Management. Disk Management can deal with various disk operations like extending, deleting, merging or shrinking partitions.
But sometimes there are "Read Only Access" written over the disk and the disk management fails to shrink C drive or to create new partitions. The error may be temporary and after a reboot, it may be all well. But for some people, the error persists even after multiple tries especially for Windows Server 2008. Which displays the error like this "Disk Management cannot shrink the Volume".
Shrink Volume Grayed out Server 2008
Another very delicate error which occurs during shrinking C drive on Server 2008 r2 is you cannot even start shrinking process because the concerning option is greyed out. Which means you are not authorised to access it. There could be many reasons for this problem, not enough space. The file format is other than NTFS or Virtual memory is present over the partition you wish to shrink.
Shrink Volume with IM-Magic Partition Resizer SERVER edition
IM-Magic Partition Resizer is an incredible tool when it comes to handling various disk operations which include merging, extending, disk cleanup, formatting and shrinking disk volumes. You name it and it will deliver to you.
One of the most fundamental operations which IM-Magic Partition Resizer SERVER edition can comfortably handle is to shrink C drive without any hassle and smoothly. You can easily shrink C drive Windows Server 2008 r2.
Here are various steps by which you can quickly shrink the C drive and create multiple partitions out of it:
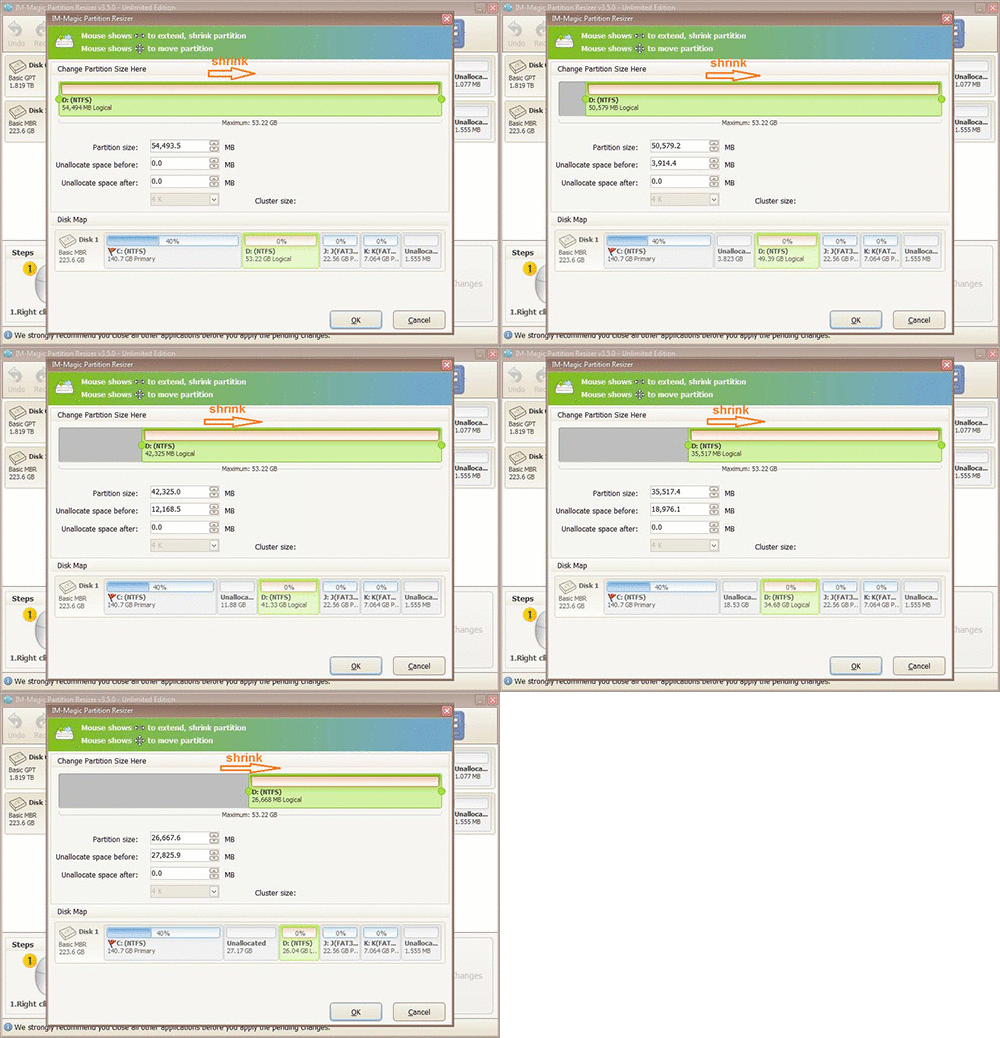
1.First of all, launch the IM magic Partition Resizer and wait for the program to load the disk map.
2.After a complete disk map is displayed, now right click on the C partition, and go to “Resize/Move Partition” option.
3.When the Resize/move screen appears, gently hold down your mouse over the selected partition and where two-sided arrows appear, start shrinking by narrowing its edge.

Steps to resize your disk partition
4.After you have done the above, the shrink volume which you cut out from the C drive will appear as "Unallocated Space".
5.Right-click the Partition and click Resize/move, and then, you can create this volume as a new partition OR merge this partition with already present Partition.
Related Product
- IM-Magic Partition Resizer Server - Partition space redistributing software that works for Windows Server 2003-2025.

