Shrink C Drive (Create Partition or Add Space to Another) in Windows 11/10/8/7 or Server
Summary
Need to shrink your C drive and create a new partition?
Want to split your C drive into two separate volumes?
Or shrink one volume to extend another?
Now, let me introduce a completely free tool that lets you safely shrink your C drive (boot volume) in Windows 11/10/8/7—without any cost!

Updated on 2026/06/02
by Andrew Wright
Table of Contents
1. Shrink C Drive Add Space to Another Drive with Partition Resizer
Shrinking the C drive or any other partition is safe when using IM-Magic Partition Resizer, a free tool specifically designed for Windows disk partition management. In addition to shrinking, it allows you to move and extend partitions without data loss. This free software also supports upgrading to a larger disk by cloning all data and disk properties, converting disks from MBR to GPT, and securely wiping data to ensure privacy etc.
Video: How to shrink the C drive add space to another partition
Example#1: Shrink C, Add space to D
(Simple steps: right click C, choose 'Resize/Move', narrow C drive border to shrink, right click partition to extend if the unallocated space is adjacent to the partition)
Example#2: Shrink C, Move Recovery/EFI or any in-between drive, Add space to F (C, Recovery, E, F)
(Simple steps: right click C, choose 'Resize/Move', narrow C drive border to shrink, right click in-between partition(recovery and E) to move the location of the partition and the unallocated space will be changed, and then right click the partition to extend if the unallocated space is adjacent)
For Windows 11/10/8/7 => Download Partition Resizer Free [100% Free]
For Windows Server 2025-2003 => Download Partition Resizer Server [Free Demo]
2. Shrink C Drive Create D or E with Partition Resizer
Video: How to shrink C drive and create D drive
Note: If you want to shrink the C drive and add it to D or other drives, you may right click partition, choose RESIZE/Move and then add the unallocated space to any drive.
Step by step guide:
Step 1: Download and install the software
Step2: Right click c drive and choose RESIZE/MOVE PARTITION 
Step 3: Move the border of c drive leftward to shrink it
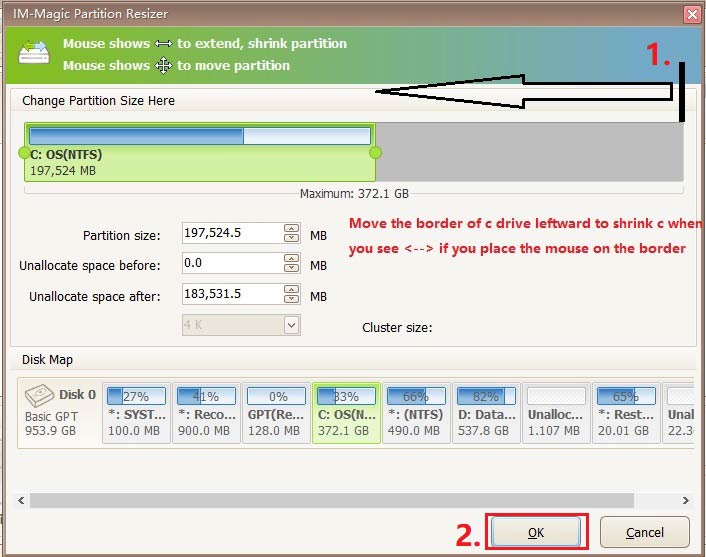
Then the unallocated space will be created here after shrinking the C drive. (Note: It won't be created until you click the APPLY CHANGES button in the software) Resize partitions with partition manage tool
Step 4: Click APPLY to make the changes.
3. Shrink C Drive Using Disk Management
Steps:
- Press Win+X, select Disk Management
- Right-click C drive, choose Shrink Volume
- Enter shrink size (MB), click Shrink
What size to enter when shrinking volume in Disk Management?
The number is caculated based on MB, one 1024MB = 1GB. If you want to shrink 100GB, enter 102400MB, if you want to shrink 50GB, enter 51200 in the shrnk volume window.
50GB, enter 51200; 100GB, enter 102400; 200GB, enter 204800; 400GB, enter 409,600 ...
When Shrink Volume C Won't Work in Disk Management:
- No contiguous space: Fragmented files block shrinkage
- Unmovable files (page file, hibernation)
- Minimum space: Windows update reserve
- RAW/Unsupported FS
- Encryption active (e.g., BitLocker)
For these, use IM-Magic Partition Resizer instead.
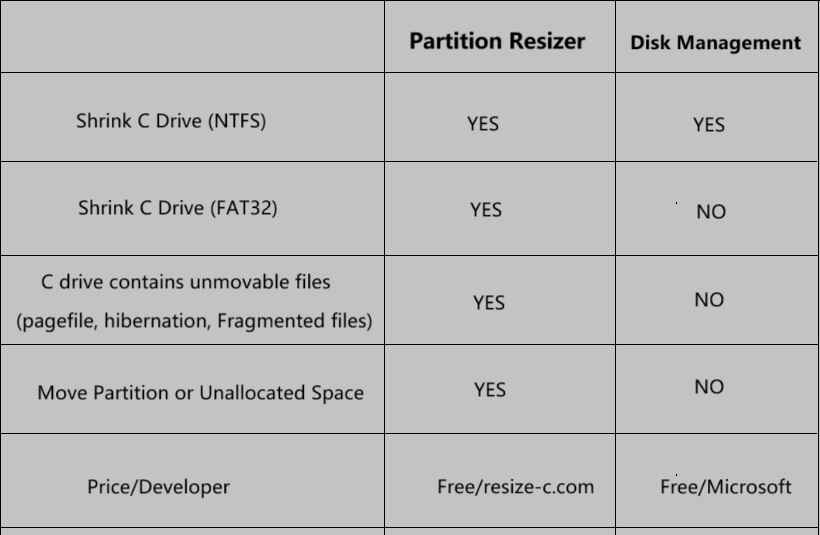
4. Partition Resizer VS Disk Management on Shrinking the C Drive
This following image shows what can and cannot be done using Disk Management.
For Windows 11/10/8/7 => Download Partition Resizer Free [100% Free]
For Windows Server 2025-2003 => Download Partition Resizer Server [Free Demo]
Diskpart Shrink C Drive
Diskpart can help shrink the C drive almost the same as the conditions using Disk Management. Free space, no unmovable files, such as the pagefile/hibernation, not encrypted, NTFS only, not dynamic or raid...
Follow these steps to reduce the size of your C: drive using DiskPart in Windows:
Steps to Shrink C: Drive with DiskPart
1. Open Command Prompt as Administrator
- Press Win + X and select "Command Prompt (Admin)" or "Windows Terminal (Admin)".
- Type
diskpartand press Enter.
2. Select the C: Drive
- Type the following commands one by one, pressing Enter after each:
list volume               (Find your C: drive volume number)
select volume X           (Replace "X" with your C: drive's volume number)
3. Shrink the Drive
- To check the maximum available shrink space:
shrink querymax- To shrink by a specific size (e.g., 10,000 MB ≈ 10GB):
shrink desired=10000(Replace 10000 with your desired size in MB.)
4. Exit DiskPart
- Type:
exitAlternative: Shrink via Disk Management (Easier), or free tool Partition Resizer with UI and extends limits on Windows built-in tools.
Also read: Shrink volume using Diskpart
FAQ
How to shrink system partition without reinstalling for free
If you had lost all hope regarding shrinking C drive and making new partitions and was ready to reinstall Windows just for this basic problem, Stop! Right there; you don't need to do this. IM-Magic Partition Resizer is here to help. It will shrink down the size of C drive and create enough space for you to make new partitions.
Step#1 Launch the IM-Magic Partition Resizer and allow it to load the disk map.
Step#2 Once all the available disks are available to choose from, right click on the C drive and select “Move/Resize”.
Step#3 When the new window appears, scroll the mouse over to the left and choose how much space you want to shrink on C drive.
Step#4 Once decided to leave the pointer there, and a new Window saying "Are you sure to proceed?" will pop up, click Yes and save the changes.
You have successfully shrunk C drive. The new unallocated space can now be used to create further partitions as you please!
Shrink C Drive and Add Space to Another Disk
RAID array is required if you want to shrink disk space from C drive and add it to another disk.
More details here: how to add disk to RAID
Related Product
- IM-Magic Partition Resizer Server - Partition space redistributing software that works for Windows Server 2003-2025.