Shrink Partition with CMD Diskpart and Can't Shrink Partition Fixes
Summary
If you want to repartition your partitions, you may need to shrink the partitions. This page is about how to shrink partition with CMD diskpart for totally free.

Updated on 2026/06/02
by Andrew Wright
Table of Contents
1. How to Shrink Partition using Diskpart
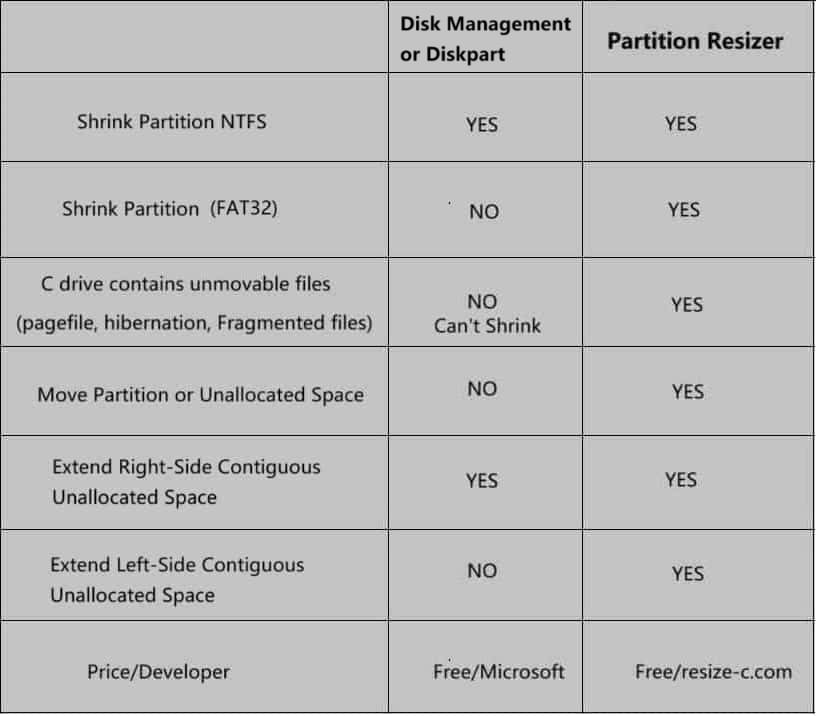
Here is a comparison table between CMD DiskPart and Partition Resizer. While DiskPart can shrink volumes, it has several limitations. See the table below for more details.
Finding DiskPart difficult to use and limited in functionality? Try the free tool Partition Resizer, which offers an easy-to-use interface and can shrink partitions beyond the limitations of DiskPart on Windows 11, 10, Server 2019, 2022, 2025, and more.
CMD Diskpart VS Partition Resizer on Shrinking Partition
Note: Shrinking partition won't lose data no matter using Windows built-in tools Disk Management or Diskpart, or a third party tool Partition Resizer which offers more user-friendly UI and easy to use options to help manage disk partitions. Shrinking, moving, resizing a partition are totally data and OS untouched using Partition Resizer. What's more, it can also help convert, clone, format, repair hard disks and more.
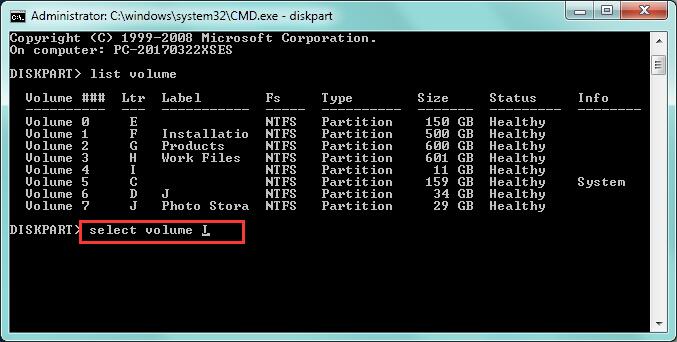
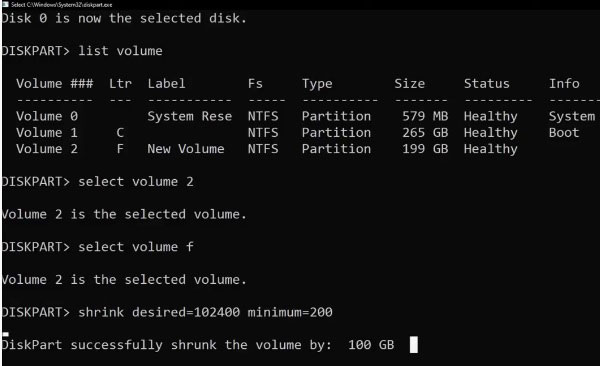
Shrink Volume using Diskpart
cmd(Admin)diskpartlist volumeselect volume Xshrink desired=10240
Note: When Diskpart cannot shrink a partition, try the free tool Partition Resizer, which offers more flexibility with a user-friendly interface.
Video - how to shrink volume using cmd
2. Common DiskPart Shrink Errors
Possible error messages when cannot shrink volume using Diskpart:
- "There is not enough usable free space"
- Volume lacks sufficient free space
- Fix: Free up space or defrag (defrag /x C:) - "Virtual Disk Service error:
The volume cannot be shrunk because the file system does not support it."
- Non-NTFS file system (e.g., FAT32/exFAT)
- Fix: Convert to NTFS (convert X: /fs:ntfs) or use a free tool like Partition Resizer.
Warning: Converting the system drive (C:) may fail, and FAT32 conversion erases data. For safety, use Partition Resizer. - "The volume cannot be shrunk because unmovable files are present"
- System files (pagefile/hibernation) block shrinking
- Fix: Disable hibernation (powercfg -h off) or move pagefile - "DiskPart has encountered an error: The parameter is incorrect"
- Invalid shrink size specified
- Fix: Use smaller value (check max available bytes first) - "The specified shrink size is too big and will cause the volume to be smaller than the minimum volume size"
- Requested size exceeds reclaimable space
- Fix: Runshrink querymaxto check limits - "This operation is not supported on dynamic disks"
- Dynamic/RAID volumes can't be shrunk
- Fix: Convert to basic disk (backs up data first!) - "The system cannot find the file specified"
- Corrupted filesystem
- Fix: Runchkdsk /fandsfc /scannow
shrink querymax before shrinking.
Partition Management shrink note:
You cannot shrink a volume beyond the point where any unmovable files are located. See the "defrag" event in the Application log for detailed information about the operation when it has completed.
Diskpart Shrink Volume Won't Work Causes
- 1. Low free space - Delete files or defrag, or use free tool Partition Resizer to move space from one drive to another
- 2. Unmovable files -
powercfg -h off,defrag /x /v C: - 3. Filesystem limits - Convert FAT32 to NTFS (Won't work on C drive since system C drive cannot be changed from fat32 to ntfs. Use free tool Partition Resizer to help move space from one partition to another without losing data)
- 4. Disk errors -
chkdsk /f /r,sfc /scannow - 5. Dynamic disk - Convert to basic disk
- 6. Max shrink limit - Use
shrink desired=with smaller MB - 7. Encryption - Disable BitLocker/AV
- 8. Read-only disk -
attributes disk clear readonly - 9. System partition - Use bootable tools
- 10. Windows bug - Try Safe Mode
Quick Fixes
defrag /x /v C:powercfg -h offchkdsk /f- Disk Management GUI
shrink desired=10240- Or use free tool Partition Resizer
Diskpart Unable to Shrink Partition? Try Free Partition Resizer
Using the IM-Magic Partition Resizer Free Edition to shrink partition guarantees against any data loss. While there are so many software programs out there promising the same thing, this does what it says. To use IM-Magic, first get it installed on your computer, then launch the software. All your partitions will be shown, then click on the particular one to shrink and click ‘Resize/Move’. Then drag the arrows to the desired place you want to shrink the disk to.
Video1: Shrink D/E to extend C
Also read: How to shrink D extend C
Video2: Shrink C extend D or E
For Windows 11/10/8/7 => Download Partition Resizer Free [100% Free]
For Windows Server 2025-2003 => Download Partition Resizer Server [Free Demo]
Also read: how to shrink C extend another drive
[Guide] Steps to extend volume without data loss
This step by step guide will show you the right way to extend any volume.
Step-1 Download, install, and launch the program.
Step-2 Right click the large volume to produce unallocated free space.
 Steps to resize your partition when you can not extend volume
Step-3 Then right click c and drag the border to acquire the free space.
 Steps to resize your partition when you can not extend volume
Step-4 Apply the changes.
FAQs
Question: Does Diskpart shrink delete data?
No, using Diskpart to shrink a volume does not delete existing data on the partition. However, if the disk volume contains unmovable files—usually created by the operating system—it may not be possible to shrink the volume using Windows' built-in tools. Always back up your data before performing disk operations to prevent accidental loss.
Partition Resizer is a free tool that can shrink a volume without data loss more easily, thanks to its user-friendly interface. Additionally, it offers free partition copying and disk cloning features.
Question: How to partition a disk without losing data in Windows 11/10?
You can partition a disk without losing data in Windows 11/10 using built-in tools like Disk Management or Diskpart. Here’s how:
- Right-click the Start button and select Disk Management.
- Right-click the volume you want to shrink and choose Shrink Volume.
- Enter the amount of space to shrink and click Shrink.
- After shrinking, you’ll see unallocated space. Right-click it and select New Simple Volume.
- Follow the wizard to create a new partition and assign it a drive letter.
This method does not affect the data on the existing partition, but backing up data beforehand is still recommended. If it's not easy to follow the Diskpart or Disk Management, try free tool Partition Resizer.
Other related articles that you may want to read
How to shrink D and extend c drive, or Shrink D extend c on Windows Server
More Related Articles You May Like
- Extend disk partition windows server 2008 r2
- Shrink C drive add space to another
- Unable to shrink c drive Windows 11
- can't shrink c drive wth all free space
- shrink volume is too low windows 11
- unmovable files shrink partition windows 11
- shrink partition diskpart
- shrink partition disk management
- increase shrink volume
- shrink c drive beyond limit
- Shink D extend C
- Shrink volume greyed out disk management
- Shrink partition
- Shrink partition windows 11
Related Product
- IM-Magic Partition Resizer Server - Partition space redistributing software that works for Windows Server 2003-2025.