How to Shrink D/E/F and Extend C Drive for Free
Summary
Have a large D drive but a small C volume? It can be frustrating when your C drive keeps shrinking while there’s still plenty of free space on D or E. This article provides a solution to resize large D/E/F (or any big drive) and safely expand the C drive without reinstalling Windows.
 Updated on 11/09/2026
by Andrew Wright
Extending a volume requires unallocated space, which must be created first. This guide focuses on a large D partition, but it also applies to large E/F/G drives — you can shrink any drive and redistribute the unallocated space to the C system partition. The following image displays the cases.
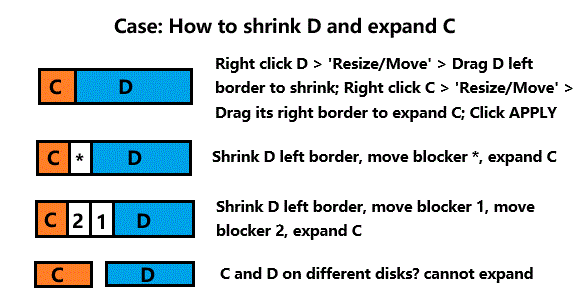
Table of Contents
Shrink D/E/F/G and Expand C Drive in Windows 11/10/8/7 with Freeware
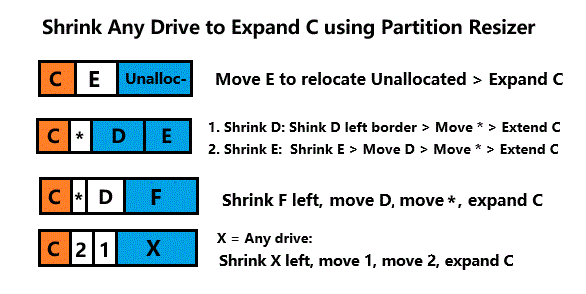
Need to shrink a drive to extend C? When your system partition runs out of space, the safest way to extend C by shrinking another drive is with a partition manager. This guide explains how to shrink D/E/F/G to expand C without losing data.
One recommended tool is the freeware IM-Magic Partition Resizer Free. It lets you shrink a drive to extend C, move partitions, merge unallocated space, and more — 100% free for Windows XP–11 users. It also offers 'Migrate OS' and 'Copy Partition' for full disk backup, adding an extra layer of safety.
For Windows 11/10/8/7: Download Partition Resizer Free [100% Free]
For Windows Server 2025-2003: Download Partition Resizer Server [Trial]
Step 1: Download and install IM-Magic Partition Resizer Free. Run the program.
Step 2: Right-click the D drive, choose “Resize/Move Partition,” and adjust the size to shrink the partition by dragging its border.
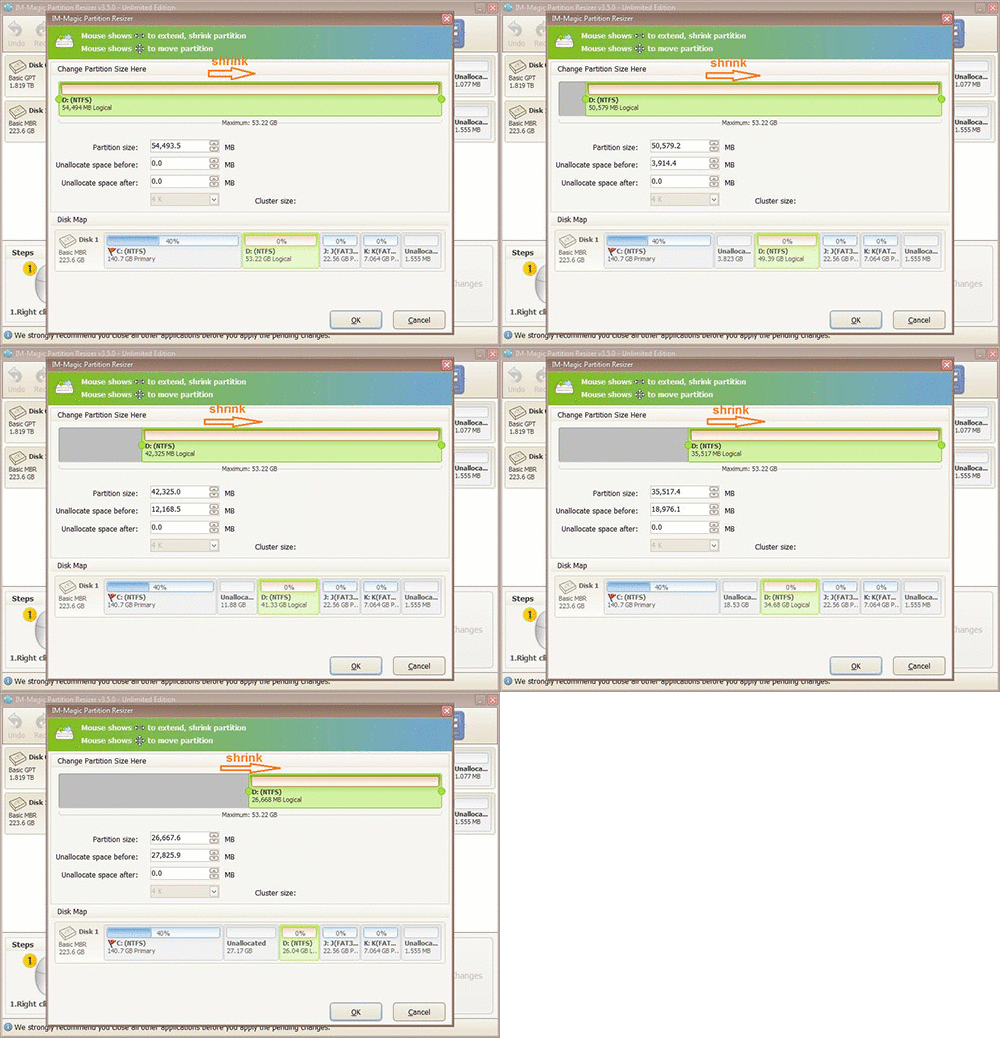
Note: If there are any blocker partitions in the way, just move them one by one, starting with the one that is adjacent to unallocated to repostion the unallocated.
If you want to move a volume, right click it when it has adjacent unallocated, choose RESIZE/Move, in the next window, hover your mouse in the middle of the partition, when the cursor shows cross arrows, drag it and release to reposition the unallocated and click OK. 
Step 3: When the unallocated if next to the C drive, right click C, choose 'Resize/Move', drag its border into the unallocated space to expand, then click OK.
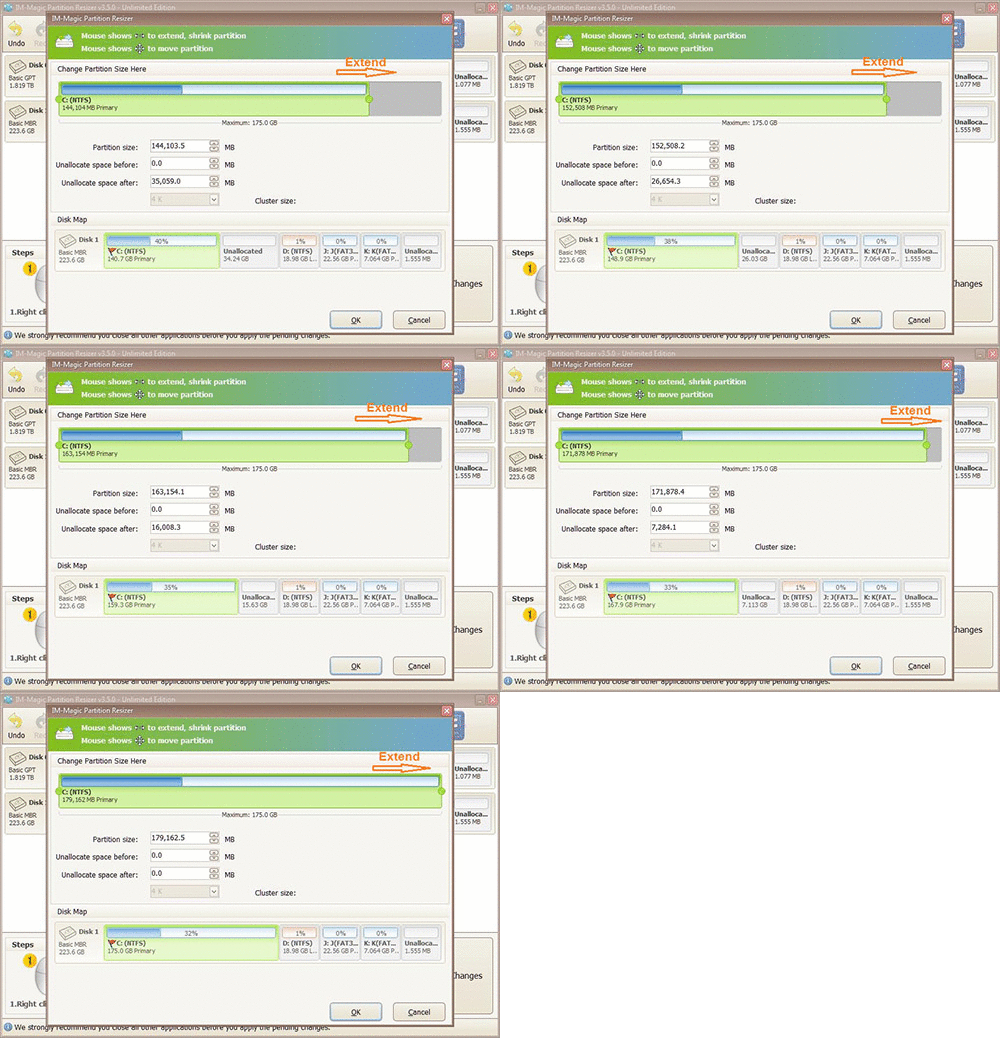
Step 4: Click APPLY CHANGES. After these steps, your C drive will be successfully extended.
Note: Data and the operating system remain untouched during resizing. The tool also protects against power surges or unexpected events during resizing.
How to Shrink D and Extend C Drive with Disk Management without Software
Note: Shrinking a volume to expand another drive using Disk Management won't work directly. Disk Management can only shrink a volume without data loss. If you want to expand another volume, you need to move the blocking partition using Partition Resizer to relocate the unallocated space to the right side of the target drive, since Disk Management can only extend a volume with contiguous unallocated space on its right.
Disk Management is a built-in Windows tool to resize disk partitions. You can use Disk Management to resize partitions only when there is unallocated space adjacent to the NTFS C drive.
The “Extend Volume” option will be grayed out if the C partition has no unallocated space next to it or if the C drive is FAT32.
Follow these steps to shrink the D partition and extend the C drive using Disk Management:
Step 1: Right-click the 'Start' icon in the bottom-left corner of your PC and
choose “Disk Management” (Admin privileges required).

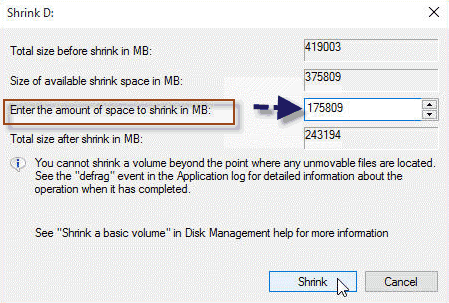
Step 2: Select the D drive (adjacent to the C drive), right-click it, and choose Shrink Volume. Enter the desired size to shrink the D drive. Note: If you delete the drive instead, this will free up all space, but make sure to move your data first.
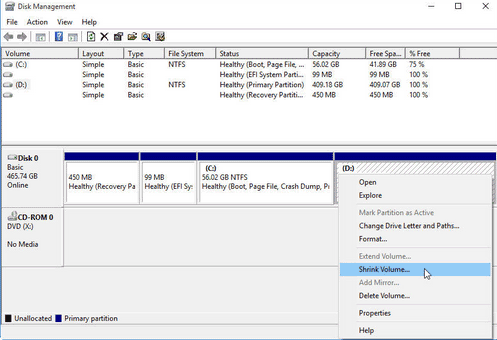
You can enter the volume size to shrink D. Once completed, unallocated space will be created.
Step 3: After shrinking D, unallocated space will appear. However it’s adjacent to C, so you can't now extend the C drive now.
If the unallocated space isn’t next to C, use freeware Partition Resizer Free to move the space to the right of the C drive.
Alternatively, deleting the D volume entirely ensures the unallocated space can be used to extend C drive in Disk Management.
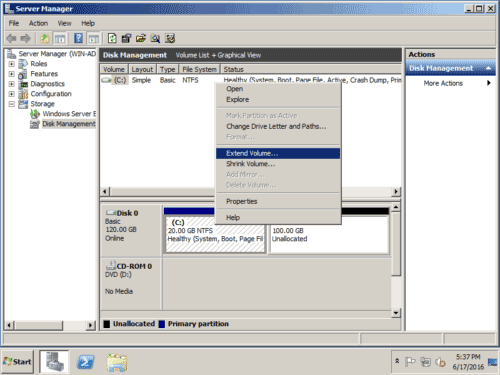
If extending C drive isn’t available using Disk Management, try using the freeware Partition Resizer Free.
Shrink D Drive and Extend C in Server 2012/2016/2019/2022/2025
If you’re using a Windows Server system, the Free edition won’t work. Use IM-Magic Partition Resizer Server or Partition Resizer Unlimited, which support all Windows systems.
Also read: How to shrink D extend C drive in Windows Server
Shrink Space from Another Disk
Shrinking space from another disk and extend the c drive shall be based on RAID array.
If no RAID is available, all large volumes must be on the same disk as the C drive. Follow this video guide to learn how to build a RAID array.
Shink c drive without losing data? See this guide too: How to shrink c drive for free
| Disk Management | Diskpart (No UI) |
Partition Resizer (Easy UI) |
|
| Shrink Partition |  |
|
|
| Shrink FAT32 Partition | NO | NO | |
| Move partition/unallocated space | NO | NO | |
| Extend FAT32 partition | YES if unallocated space is on the right |
|
|
| Extend FAT32 C Drive | NO | NO | |
| Extend NTFS C Drive with Adjacent Unallocated Space | |
|
|
| Backup Disk/Partition | NO | NO | |
| Add Space from Another Disk | RAID REQUIRED (Cannot move partition) |
RAID REQUIRED (Cannot move partition) |
RAID REQUIRED |
| Move Recovery Partition | NO | NO | |
| Delete Recovery/OEM Partition | NO | |
|
| Migrate OS to Larger Disk | NO | NO | |
| Price | FREE | FREE | FREE |
|
Download for Win 11-7 (100% Free) Download for Server (Free Demo) |
Related Product
- IM-Magic Partition Resizer Server - Partition space redistributing software that works for Windows Server 2003-2025.