Shrink Volume Disk Management and Free Alternative
Summary
How to Shrink a Volume Using Disk Management: You can shrink a volume under certain conditions, such as splitting a partition into two. Additionally, we provide a free Disk Management alternative for shrinking volumes when the built-in tool fails.

Updated on 2026/06/02
by Andrew Wright
Table of Contents
- 1. Shrink Volume Instruction using Disk Management (Shrink volume add space to another)
- 2. Shrink Volume caculator
- 3. Shrink Volume Greyed Out Causes and Fixes
Basic Knowledge - What can and cannot do in Disk Management
| Disk Management or Diskpart | Partition Resizer* | |
| Shrink NTFS partition |  |
|
| Shrink FAT32 partition | NO | |
| Shrink partition, create partition | |
|
| Shrink partition, extend another | NO | |
| Shrink Volume contains unmovable files (pagefile, hibernation file, usually on the C drive), insufficient free space | NO | |
| Move Partition/Unallocated Space | NO | |
| Extend partition (unallocated space is contiguous on the right side) | |
|
| Extend partition (unallocated space is contiguous on the left side) | NO | |
| Extend FAT32 C drive | NO | |
| Price | FREE | FREE |
| Download Win 11-7 (100% Free) Download Win Server (Free Demo) |
Note: Partition Resizer is a free Windows disk management tool with an easy-to-use interface. It safely resizes partitions without data loss. Additionally, it supports moving partitions, converting disks, cloning disks, and more.
1. How to Shrink a Drive (C, D, E, etc.) Using Shrink Volume
Step 1: Open Disk Management
Methods to open Disk Management in Windows 11/10:
- Run Dialog: Press
Win + R, typediskmgmt.msc, then press Enter - Start Menu: Search for "Disk Management" (or right-click the Start icon and select 'Disk Management')
- Win + X: Right-click Start > Disk Management (or go to Computer Management > Storage)
- Command Line: Run
diskmgmt.mscin Command Prompt or PowerShell - Task Manager: File > Run new task > enter
diskmgmt.msc
Step 2: Right-click the partition you want to shrink and select 'Shrink Volume'
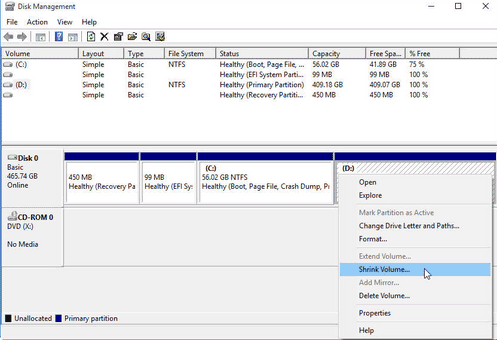
Common Issue: The Shrink Volume option may be greyed out if:
- The drive isn't NTFS formatted
- The drive (especially C:) contains unmovable files (pagefile, hibernation files)
- There's insufficient free space
- The drive is encrypted or locked
Solution: Use IM-Magic Partition Resizer (free) when Shrink Volume is unavailable in Disk Management.
Step 3: Enter the amount of space to shrink (in MB) and click 'Shrink'
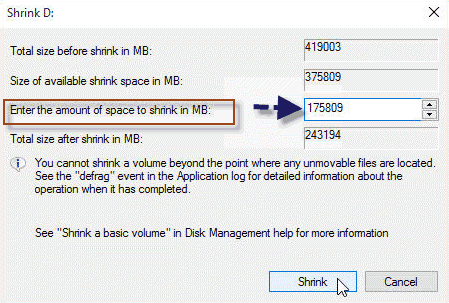
Important Note: The default value shows the maximum shrinkable space. For best results, enter a slightly smaller number than the maximum, especially if you've encountered shrink errors before.
2. Shrink Volume Caculator
Shrink Volume size caculation is based on MB. One 1GB equals 1024MB. So if you want to shrink a volume to its exact size, you may use numbers like the following. Note: Partition Resizer offers more flexible size caculation that you may simply drag the partition border to shrink the partition and it provides numbers that you can enter to shrink partition size too.
Size Calculation Guide:
- 1024MB = 1GB
- To shrink 10GB: Enter 10240
- To shrink 100GB: Enter 102400
- For other sizes: Calculate 1024 × desired GB
The system will use your entered value to create unallocated space.
Shrink Partition to Add Space and Extend Another in Disk Management
Common user inquiries and scenarios for using the Shrink Volume option in Disk Management.
Quick Navigation:
- Is it safe to shrink a volume without losing data?
- Can you shrink a volume and extend another partition in Disk Management?
#A. Is it safe to shrink a volume in Disk Management?
Answer: Yes, shrinking a volume in Disk Management is safe and does not cause data loss. It creates unallocated space that can be used to create a new partition.
Steps to shrink a volume:
- Step 1: Right-click the Start icon and select Disk Management.
- Step 2: Right-click the partition you want to shrink and select Shrink Volume.
- Step 3: Enter the amount of space to shrink (in MB) and click Shrink.
#B. Can you shrink a volume and extend another partition in Disk Management?
Answer: No, Disk Management has strict limitations:
- Adjacent Space Requirement: You can only extend a partition if the unallocated space is immediately to its right.
- Shrink Creates Right-Side Space: When you shrink a partition (e.g., D:), the unallocated space appears to its right.
Example Scenario (C:, D:, E: drives):
- Shrink D: → Creates layout: C: | D: | [Unallocated] | E:
- In Disk Management:
- You can only extend D: (adjacent to unallocated space)
- Cannot extend C: or E: (space is non-adjacent or not to its right.)
Workaround: Use third-party tools like IM-Magic Partition Resizer to move partitions and merge non-contiguous space.
Alternative Solution: Use IM-Magic Partition Resizer Free for advanced partition management:
- ✅ Safely shrink, move, and extend partitions without data loss.
- ✅ Clone disks to upgrade to a larger drive.
- ✅ Convert between MBR and GPT disk styles.
- ✅ Securely wipe data for privacy protection.
Example#1: Shrink D, Extend C
Detailed steps on this page: How to shrink D extend C
Video: How to shrink the C drive add space to another partition
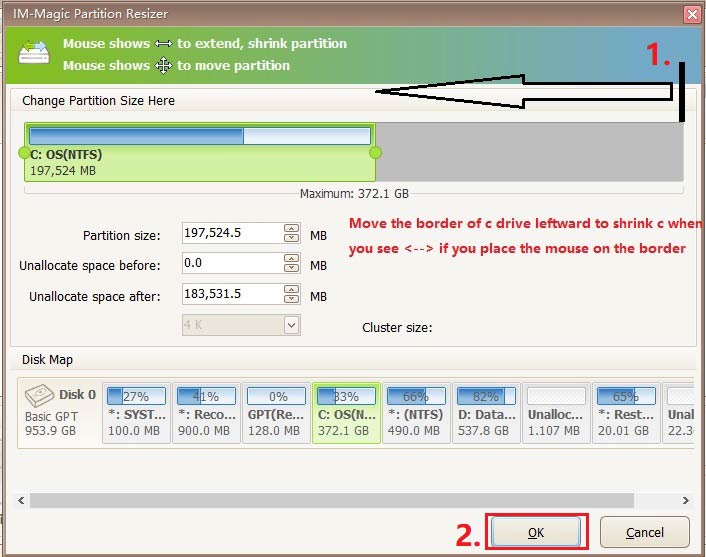
Example#2: Shrink C, Add space to D
(Simple steps: right click C, choose 'Resize/Move', narrow C drive border to shrink, right click partition to extend if the unallocated space is adjacent to the partition)
Example#3: Shrink C, Move Recovery/EFI or any in-between drive, Add space to F (C, Recovery, E, F)
(Simple steps: right click C, choose 'Resize/Move', narrow C drive border to shrink, right click in-between partition(recovery and E) to move the location of the partition and the unallocated space will be changed, and then right click the partition to extend if the unallocated space is adjacent)
For Windows 11/10/8/7 => Download Partition Resizer Free [100% Free]
For Windows Server 2025-2003 => Download Partition Resizer Server [Trial]
3. Shrink Volume Disabled in Disk Management Causes and Fixes
Why can't I shrink my partition? Common reasons explained:
- Wrong file system type: Some older drives use FAT32 format which doesn't allow shrinking. Most modern drives use NTFS which does. (Partition Resizer can help shrink FAT32 without losing data)
- Disk type issue: Your disk might be set as "Dynamic" instead of "Basic" in Disk Management (basic disks are easier to work with).
- System files in the way: Windows puts important files at the end of your drive that can't be moved, like hibernation files or system restore points. (Partition Resizer can help shrink partition even when it contains unmovable files)
- Disk errors: If your drive has problems, Windows won't let you shrink it until they're fixed.
- Already at minimum size: Some partitions can't be made any smaller because they're holding essential files.
How to fix these issues (step-by-step for beginners):
Note: Eaiser fix is to use the free alternative Partition Resizer which offers more flexibilities and easier to use UI. What's sepcial? Partition Resizer can help move partition to change the location of the unallocated space wthout losing data.
- Check your file system:
- Right-click the drive in File Explorer > Properties
- If it says "FAT32", you'll need to convert it to NTFS:
- Open Command Prompt as administrator (search "cmd", right-click > Run as administrator)
- Type:
convert X: /fs:ntfs(replace X with your drive letter) - Press Enter and wait for completion
- Clear space-hogging files:
- Disable hibernation: Search for "Command Prompt", right-click > Run as administrator, type
powercfg -h off - Run Disk Cleanup: Right-click the drive > Properties > Disk Cleanup > Clean up system files
- Disable hibernation: Search for "Command Prompt", right-click > Run as administrator, type
- Check for disk errors:
- Open Command Prompt as administrator
- Type:
chkdsk X: /f /r(replace X with your drive letter) - Press Y if asked to schedule a scan for next restart
- Restart your computer
- When all else fails:
- Try a free partition manager like MiniTool Partition Wizard or EaseUS Partition Master
- As a last resort, back up your data and reformat the drive (this erases everything!)
Pro tip: Always create a backup before making changes to your partitions, just in case something goes wrong.
More Related Articles You May Like
- Shrink C extend D Server 2022
- Shrink c extend E server 2019
- Shrink C drive add space to another
- You cannot shrink a volume beyond the point
- Shrink volume extend another drive
- shrink partition diskpart
- shrink partition disk management
- increase shrink volume
- shrink c drive beyond limit
- Shink D extend C
- Shrink volume greyed out disk management
- Shrink partition
Related Product
- IM-Magic Partition Resizer Server - Partition space redistributing software that works for Windows Server 2003-2025.