How to Extend Volume on Windows Server 2012 R2 Without Losing Data - 5 Ways
Summary
You want to extend a volume on Windows Server 2012 R2 without losing data. The Disk Management tool has the capability to resize partitions, but it has limitations. We will show you the best methods to extend a volume in Windows Server 2012 R2 without data loss.

Updated on 2026-03-6
by Andrew Wright
5 Ways to Extend Volume on Windows Server 2012 (Including R2)
You want to extend a volume on Windows Server 2012 R2 without losing data. The Disk Management tool has the capability to resize partitions, but it has limitations. These limitations prevent it from being used for resizing beyond a certain point.
There are several ways to safely extend the volume in Windows Server 2012 R2, including:
#1 Disk Management Console:
The Disk Management Console is a built-in tool that allows you to extend volumes in Windows Server 2012 R2. Follow these steps to use Disk Management to extend a volume, given the following conditions:
- There is unallocated space adjacent to the right side of the drive you want to expand.
- The file system is NTFS; FAT32 cannot be extended without reinstalling the OS.
- The disk is limited to 2TB if it's an MBR disk.
- Only primary partitions can be extended.
- There are no recovery partitions blocking the way; otherwise, you’ll need a tool like IM-Magic Partition Resizer to move or delete it.
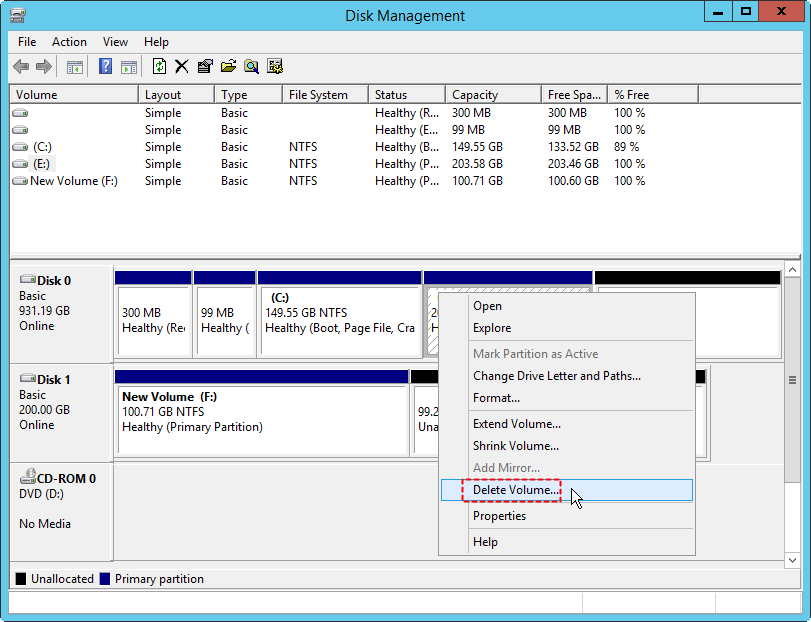
The best method to extend a partition is by deleting the adjacent volume on the right to create unallocated space.
Then, proceed with the following steps:
- Open the Disk Management Console by right-clicking the Start menu and selecting Disk Management.
- Right-click on the volume you want to extend and select "Extend Volume".
- In the Extend Volume Wizard, select the additional space you want to allocate to the volume.
- Follow the wizard's prompts to complete the process.
Also read: Fixes for "Extend Volume" Grayed Out in Server 2012 Disk Management
#2 Command Prompt:
The Command Prompt is another method to extend a volume in Windows Server 2012 R2. Follow these steps:
- Open the Command Prompt as an administrator.
- Type "diskpart" and press Enter.
- Type "list volume" and press Enter to display a list of volumes on your server.
- Type "select volume x" (where "x" is the number of the volume you want to extend) and press Enter.
- Type "extend" and press Enter to extend the volume.
Note: Extending a volume can only be enabled if the partition has right-side adjacent unallocated space, with no recovery partition or OEM partition in between, as well as other specific terms and conditions. If your volume cannot be expanded, try using third-party software.
#3 Third-Party Partition Software:
Third-party partition software, such as IM-Magic Partition Resizer, can also be used to extend volumes in Windows Server 2012 R2. It offers more advanced features than Disk Management and supports a wide range of disk management tasks.
Resize disk space with IM-Magic Partition Resizer Server
IM-Magic Partition Resizer software helps resize partitions with simple steps. A free trial is available for download from their website. The tool performs various disk-related tasks, including expanding disk space.
IM-Magic Partition Resizer allows you to move unallocated space, enabling easy volume extension. Follow these steps to resolve your issue:

- Download, install, and open IM-Magic Partition Resizer.
- Right-click the drive you want to shrink if you don’t have unallocated space.
- Select "Resize/Move Partition".
- Drag the border to the right to shrink the drive, creating unallocated space on the right side of the drive you want to extend.
 Steps to shrink a volume in Windows Server
 - To extend the drive, right-click the drive and select "Resize/Move Partition".
- Drag the extender until you reach the size you want to add.
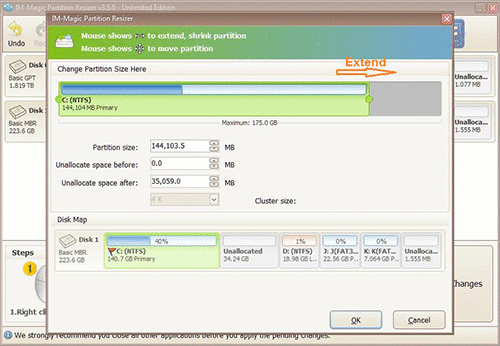 Steps to extend a volume in Windows Server 2011
 - Click "Apply Changes" and then click "OK".
If you already have unallocated space, you can right-click on the adjoining drive, select "Resize/Move Partition", and then move the drive to the right. This shifts the unallocated space next to the target drive that you want to extend.
The tool takes just a few seconds to resize the disk without affecting or removing any files. Its rollback feature ensures your data is secure. The tool is available for all versions of Windows and supports both NTFS and FAT file systems.
#4 Storage Spaces:
Windows Server 2012 R2 includes Storage Spaces, a feature that allows you to pool physical disks and create virtual disks. If you need to extend a volume that is part of a Storage Spaces pool, you can add more physical disks to the pool and then extend the virtual disk.
To extend a volume on Windows Server 2012 R2 using Storage Spaces, follow these steps:
- Verify the health of your storage space: Before making any changes, check the health of your Storage Spaces to ensure they are functioning correctly. Open the Storage Spaces control panel by typing "Storage Spaces" in the Start menu search bar. Check the status of each storage space, and if any issues arise, resolve them before proceeding.
- Add new disks: To extend a volume by adding more disks, open the Storage Spaces control panel and select "Add drives" for the storage space you want to expand. Follow the prompts to add the new disks.
- Create a virtual disk: After adding the new disks, create a new virtual disk that includes them. Select "Create a virtual disk" in the Storage Spaces control panel and follow the prompts.
- Extend the volume: Once the virtual disk is created, open the Disk Management console by right-clicking "Computer" in the Start menu and selecting "Manage". In the Computer Management window, choose "Disk Management" under Storage. Right-click the volume you want to extend and select "Extend Volume". Follow the prompts, selecting the new virtual disk as the source of additional space.
- Verify the volume size: After extending the volume, check the new size by right-clicking the volume in Disk Management, selecting "Properties", and checking the "Volumes" tab for the updated size.
Note: The process for extending a volume with Storage Spaces may vary depending on your configuration. Consult Microsoft's documentation or your vendor's support for assistance if needed.
Also read: How to manage disk storage on Windows Server 2012
#5 Hardware RAID:
If your server uses a hardware RAID controller, you may be able to extend the volume by adding more disks to the RAID array. The process depends on your RAID controller, so refer to the documentation for specific instructions.
To extend a volume on Windows Server 2012 with hardware RAID, follow these general steps:
- Backup your data: Before modifying your RAID configuration or disk partitions, back up your data to prevent data loss or corruption.
- Check RAID status: Verify that your RAID array is healthy and functioning properly. Refer to your RAID controller's documentation for instructions.
- Add new disks to the RAID: If you're extending a volume by adding more disks to the RAID, follow the instructions in your RAID controller's documentation to add the new disks.
- Expand the RAID array: After adding the disks, expand the RAID array to include them. Refer to your RAID controller's documentation for details.
- Extend the volume: Once the RAID array is expanded, you can extend the volume using the Disk Management console or the diskpart command in the command prompt.
Here are the steps to extend a volume using Disk Management:
- Open Disk Management by right-clicking on "Computer" in the Start menu, selecting "Manage", and then clicking on "Disk Management".
- Locate the volume you want to extend, right-click it, and select "Extend Volume".
- Follow the wizard to select the additional space you want to add to the volume. You can choose to use all the unallocated space on the disk or specify a custom amount.
- Once the wizard completes, the volume will be extended.
If you encounter any issues or are unsure of the steps, consult your RAID controller's documentation or contact the vendor's support for assistance.
Related Product
- IM-Magic Partition Resizer Server - Partition space redistributing software that works for Windows Server 2003-2025.