How to resize partition server 2019 with cmd diskpart
Summary
If you need to extend your C drive or resize your partitions on the hard drive on Windows server 2019, you can find best solutions here to repartition your disk with cmd diskpart or other useful partition tools.

Last updated on 2026/06/02
by Andrew Wright
Table of Contents
Resize Partition on Server 2019 with CMD Diskpart
You can shrink or extend a volume on Server 2019 using Diskpart to change the partition size without losing data or formatting the disk.
Extending a volume requires adjacent unallocated space, which may necessitate deleting the adjacent partition. Only deleting the right-side adjacent volume will enable the volume extension with Diskpart.
Shrinking a volume is safe with Diskpart; however, the unallocated space created after shrinking may not be adjacent to another volume for extension. Diskpart or Disk Management cannot move unallocated space. (Only third-party tools can assist in moving the unallocated space.)
Resizing a partition using the diskpart command in Windows Server 2019 can be done by following these steps:
Note: Before resizing a partition, it is recommended to backup your data to prevent data loss.
- Open the Command Prompt as an administrator.
- Type "diskpart" and press enter.
- Type "list volume" and press enter to show the list of volumes/partitions.
- Identify the partition you want to resize and note the volume number.
- Type "select volume X" where X is the volume number of the partition you want to resize.
- Type "extend [size=X]" to increase the partition size by X number of MB, or "shrink [size=X]" to decrease the partition size by X number of MB.
Note: If you don't specify a size, diskpart will use all available space.
If the command is successful, you will see a message indicating that the partition has been resized.
Type "exit" to close the diskpart utility.
Close the Command Prompt.
Your partition should now be resized. You can confirm the new partition size by using the "list volume" command in diskpart.
| Diskpart [FREE] | Partition Resizer*[FREE] | |
| Shrink ntfs partition |  |
|
| Shrink fat32 partition(any drive) | NO | |
| Extend ntfs C drive | YES when right unallocated space is available |
|
| Extend fat32 partition | YES when unallocated space at right side |
|
| Extend fat32 C drive | NO | |
| Move unallocated space or partition | NO | |
| Price | FREE | FREE |
| Download Win 11-7 (100% Free) Download Win Server (Free Demo) |
Note: Partition resizing always requires unallocated space. Whether you use Windows tools or third-party software, ensure unallocated space is available before resizing.
How can IM-Magic Partition Resizer Server Edition help?
IM-Magic Partition Resizer Server Edition is a partition tool that can help redistribute disk space from one to another without losing data including the c drive, fat32 drives.
Video Tutorial to Resize Partitions with Partition Tool
When diskpart cmd cannot help resize partitions, it's the time for Partition Resizer to play a magic on your disks.
The above video shows how to shrink a volume and then redistribute the disk space from one to another without losing data using 3rd party tool Partition Resizer.
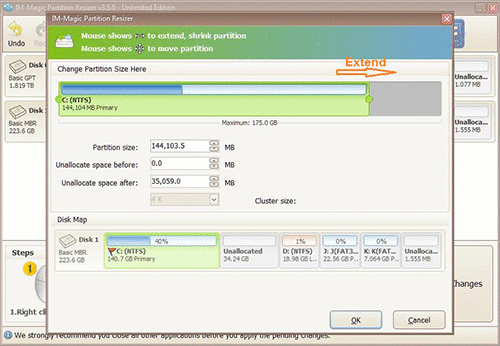
[Guide] Steps to extend volume without data loss
This step by step guide will show you the right way to extend any volume using IM-Magic Partition Resizer Unlimited edition;
Step-1 Download install, and launch the program.
Step-2 click the large volume to produce unallocated free space.
 Steps to resize your partition when you can not extend volume
Step-3 Then right click c and drag the border to acquire the free space.
 Steps to resize your partition when you can not extend volume
Step-4 Apply the changes.
In the end, using IM-Magic Partition Resizer Server edition is a great idea and it can give you amazing results. You just have to figure out which is the right option and adjust as well as adapt everything to your own needs. There are always challenges, but if you do this right the outcome can be amazing!
Related Product
- IM-Magic Partition Resizer Server - Partition space redistributing software that works for Windows Server 2003-2025.