Shrink Volume in Windows 11 – Complete Guide
If you need to shrink volume in Windows 11 to create free space or set up another partition, you have several options. Windows provides built-in tools like Disk Management and DiskPart, but they come with limitations. In such cases, third-party tools like Partition Resizer (Free) offer more flexibility.
Method 1: Shrink Volume with Partition Resizer (Free Tool)
Partition Resizer is a free third-party partition manager that allows flexible shrinking and resizing. Unlike Windows tools, it can move partition or unallocated space without losing data and also shrink beyond unmovable files. (If you want to move unallocated space, you need to move a partition to change the location of the unallocated space. Right-click the partition which is next to the unallocated space, choose RESIZE/MOVE and then move the partition.)
- Download and install Partition Resizer.
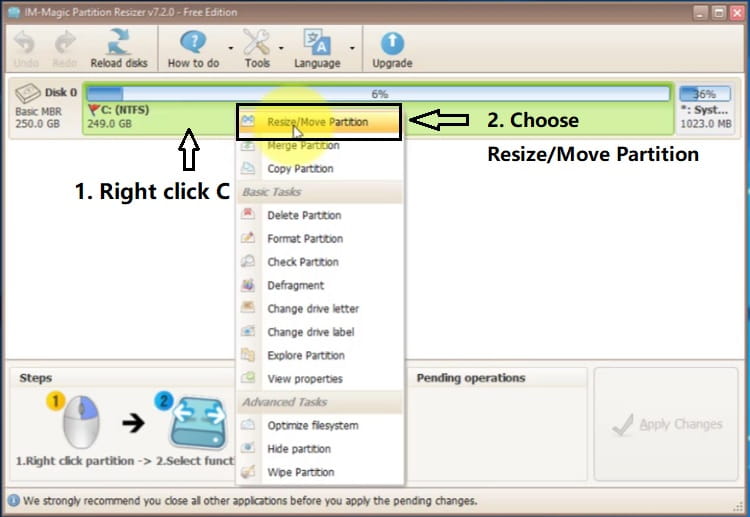
- Launch the tool → right-click the partition → choose Resize/Move. (The followng image displays a shrinking of C drive as an example. If you want to shrink another partition instead of the C, just right click the partition you want to shrink, choose RESIZE/Move)
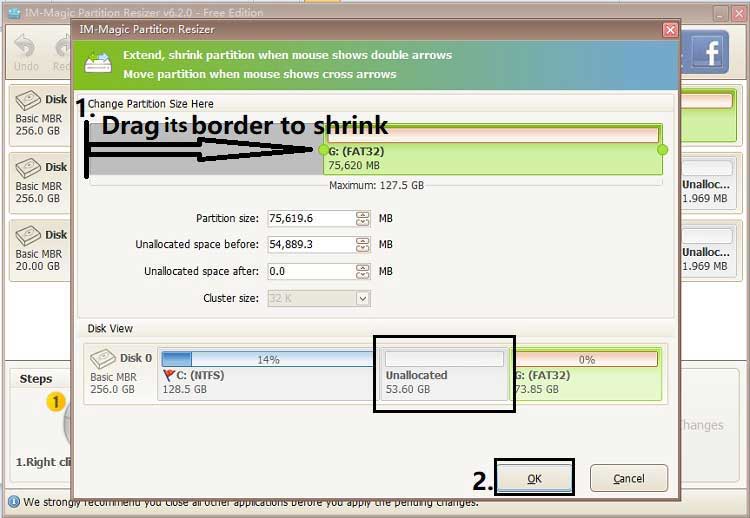
- Drag the slider or manually enter the new size → click OK, and then click Apply.
- Do remember to click OK, and then click APPLY changes, or you may wait the end to click APPLY CHANGES if you want to move and extend another partition. (The following displays several examples of shrinking a partition and extending another. You may learn how to use the software from the following videos.)
This method is useful when Disk Management or DiskPart cannot shrink the volume due to system file placement.
For Windows 11/10/8/7 => Download Partition Resizer Free [100% Free]
For Windows Server 2025-2003 => Download Partition Resizer Server [Trial]
Shrink C Drive Windows 11 with Partition Resizer
Shrinking the system partition (C:) is often needed to create space for another operating system or a new data partition. Partition Resizer makes this simple:
Video: Shrink C, Extend E or F
- Launch Partition Resizer → right-click the C drive → choose Resize/Move.
- Drag the slider to shrink the C drive and free up unallocated space.
- Click Apply to confirm the changes.
Shrink D Drive Windows 11 with Partition Resizer
To shrink the D drive and free space for another partition:
- Right-click the D drive in Partition Resizer → select Resize/Move.
- Adjust the slider or input the size you want to shrink.
- The freed space will become unallocated, ready for creating or extending partitions.
Video: Shrink D, Extend C
Shrink E Drive Windows 11 with Partition Resizer
The same process applies to the E drive or any other data partition:
- Right-click the E drive → select Resize/Move.
- Shrink the drive to release unallocated space, click OK.
- Use the free space to create a new partition or expand another one. If you want to move a in-between partition, right click the partition instead of the unallocated space, choose RESIZE/MOVE PARTITION option, and then move the whole partition when the mouse shows cross arrows, click OK. (IT WON'T BE APPLIED UNTIL YOU FINALLY CLICKED THE APPLY CHANGES BUTTON IN THE END. ) If you have moved the unallocated space contiguous to the partition you want to expand, then right click the partition, choose RESIZE/MOVE, and then expand the partition with the unallocated space by dragging its border, and then click OK.
- Finally, click APPLY CHANGES to apply all the steps.
Video: shrink F, move E and recovery, extend C
Move D Drive and Extend C Drive Windows 11
One common challenge in Windows 11 is extending the C drive when the free space is not adjacent. For example, if you shrink the D drive, the unallocated space may appear after D instead of next to C. Partition Resizer solves this by allowing you to move D:
- Right-click D drive → select Resize/Move.
- Drag the partition to change its location, so the unallocated space moves next to the C drive.
- Once the free space is adjacent to C, right-click C drive → choose Resize/Move → extend it into the unallocated space.
When EFI or Recovery Partition Blocks Shrinking/Extending
In many Windows 11 setups, a small EFI partition or Recovery partition may sit between C and the unallocated space. This prevents Disk Management and DiskPart from extending C drive. Partition Resizer can solve this by:
- Identifying the EFI or Recovery partition that blocks the unallocated space.
- Using the Move Partition feature to relocate EFI/Recovery partitions.
- Once the unallocated space is contiguous with C drive, extend the C drive without data loss.
This flexibility makes Partition Resizer the ideal solution when Windows built-in tools fail due to partition alignment issues.
Besides shrinking a volume without losing data, Partition Resizer offers many other functions such as disk cloning, partition copying, converting a disk to GPT, resizing any partition without data loss, moving partitions, and expanding partitions when there is adjacent unallocated space—whether on the left or right side. Moreover, it can help shrink partitions safely, move partitions to change the location of unallocated space, and make the space contiguous to the partition you want to expand.
With these functions, Partition Resizer makes it simple to manage disk space and overcome the limitations of Windows built-in tools like Disk Management and DiskPart.
More guide after shrinking a drive
Method 2: Shrink Volume Using Disk Management
Disk Management is the default graphical tool in Windows 11 for resizing partitions.
- Press Win + X → choose Disk Management.
- Right-click the partition you want to shrink → choose Shrink Volume.
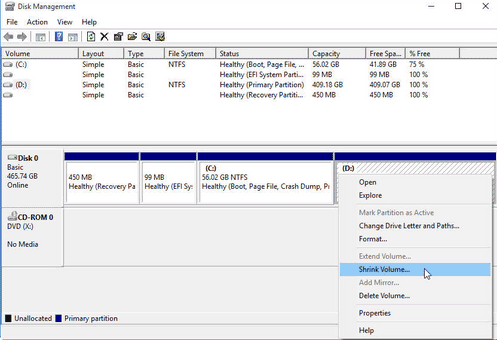
- Enter the amount of space to shrink and confirm.
Disk Management is simple, but sometimes it cannot shrink beyond unmovable files like system restore points, page file, or hibernation data.
Method 3: Shrink Volume Using DiskPart (Command Line)
DiskPart is a command-line utility that gives more direct control over partition management.
- Press Win + R, type cmd, then run as Administrator.
- Type
diskpartand press Enter. - Run
list volumeto view partitions. - Use
select volume X(replace X with the target volume). - Type
shrink desired=SIZE(SIZE in MB).
DiskPart can sometimes bypass certain GUI restrictions but still faces limitations if unmovable files block shrinking.
Comparison: Disk Management vs DiskPart vs Partition Resizer
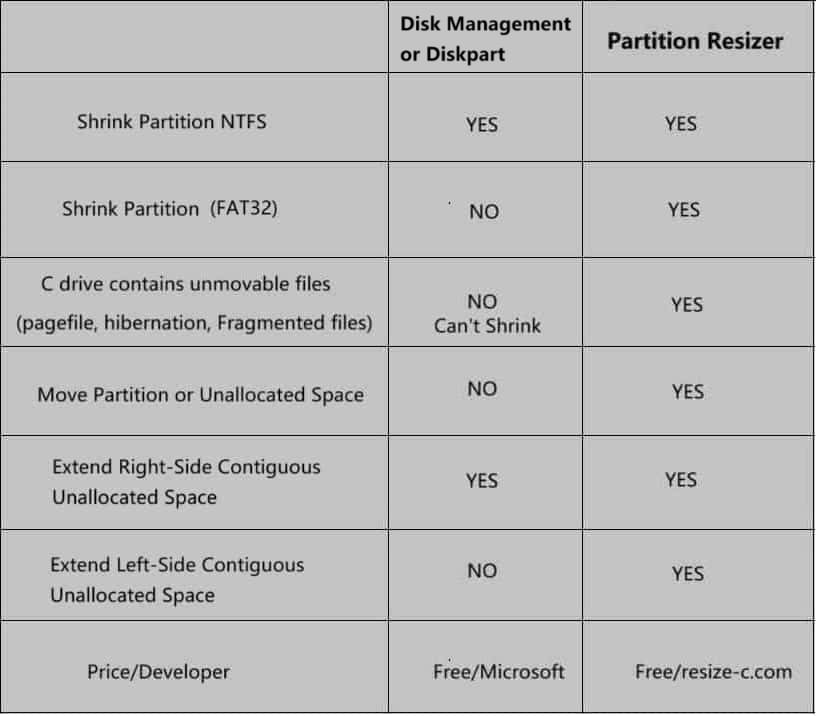
| Feature | Disk Management | DiskPart | Partition Resizer |
|---|---|---|---|
| Ease of Use | Beginner-friendly GUI | Command-line, advanced | Intuitive GUI |
| Can Shrink Beyond Unmovable Files | No | No | Yes |
| Availability | Built-in | Built-in | Free Download |
| Risk of Data Loss | Low | Medium (command mistakes possible) | Low |
For Windows 11/10/8/7 => Download Partition Resizer Free [100% Free]
For Windows Server 2025-2003 => Download Partition Resizer Server [Trial]
FAQ – Shrink Volume Windows 11
Why can’t I shrink my volume in Windows 11?
Windows tools cannot shrink beyond unmovable files such as hibernation file, page file, or system restore data.
Is DiskPart safer than Disk Management?
DiskPart is powerful but riskier because it requires command accuracy. Mistakes may cause data loss.
When should I use Partition Resizer?
Use Partition Resizer when Windows built-in tools cannot shrink the volume enough due to unmovable files.
Does shrinking a volume delete data?
Normally, shrinking a volume keeps your data safe, but always back up important files before resizing.
More Related Articles You May Like
Related Product
- IM-Magic Partition Resizer Server - Partition space redistributing software that works for Windows Server 2003-2025.