Unable to Extend C drive on Windows Server 2019
Summary
This article will show you the best way to extend your C Drive on Windows server 2019. While doing so, it will explain the reasons why the Disk Management is unable to extend it.

Updated on 2026/06/02
by Andrew Wright
Table of Contents
- Windows Server 2019 Extend Volume at Disk Management
- Reasons You Are Unable to Extend C-Drive
- How to Extend C-Drive When “Extend Volume” Function Doesn't Work
- How to Extend Partitions with IM-Magic Partition Resizer Server Edition
- Benefits of IM-Magic Partition Resizer
- Frequently Asked Questions (FAQs)
Windows Server 2019 Extend Volume at Disk Management
Windows Server 2019 is one of the most recent server solutions developed by Microsoft, featuring advanced tools for better data management. Storage on the server is often divided into partitions, with the C Drive reserved for system files, programs, and software installations. Due to its limited size, it is common for the C Drive to run out of space, affecting server performance and functionality.
Disk Management, a built-in Windows tool, allows users to manage storage by shrinking, extending, or formatting volumes. However, there are cases where the tool fails to extend the C Drive, requiring alternative solutions.
Reasons You Are Unable to Extend C-Drive
The inability to extend the C Drive using Disk Management often stems from the following reasons:
- Partition Format Mismatch: The C Drive is typically formatted as NTFS, but if the adjacent unallocated space or another partition uses FAT32, the extend option may be unavailable. It cannot be changed in Windows. Only a third party tool can help extend c drive in this case.
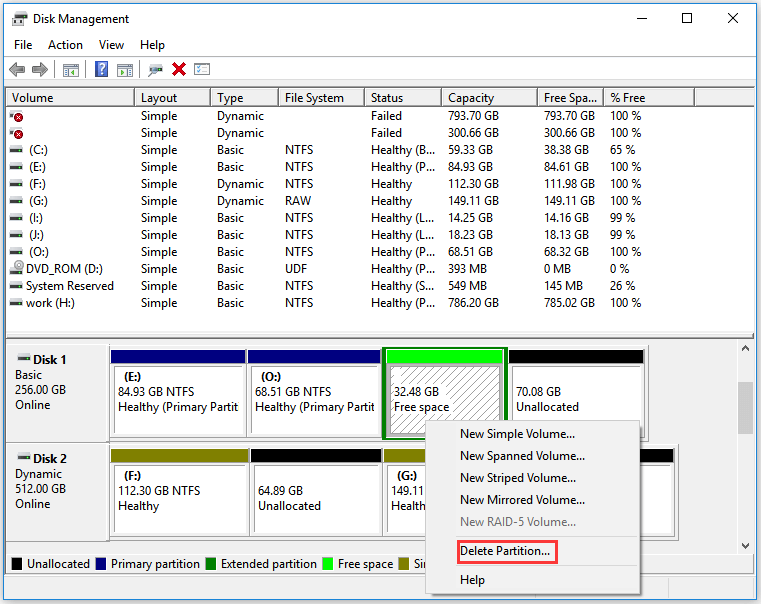
- Non-Adjacent Unallocated Space: For Disk Management to extend a volume, unallocated space must be immediately next to the volume (on the right side). If the free space is on the left or non-adjacent, the extend option will be greyed out. Disk Management or Windows built-in tools cannot move the adjacent spaces, your only option is to delete the adjacent volume to c drive or use a third party tool to move the non-adjacent unallocated space to c drive using a third party tool.
- The recovery/OEM partitioin stands in the way: For Disk Management, it's not working on the recovery partition or OEM partition. You need to use Diskpart to delete them, or you may use a third party tool to move the location or delete them with a third party tool.
In order to enable to the Extend volume option in Server 2019 for c drive, you may delete the right side adjacent volume to enable the extend volume option.
If it's still not working, try a third party tool to help extend the server c drive.
How to Extend C-Drive When “Extend Volume” Function Doesn't Work
When Disk Management fails, third-party tools are the best alternative. Choosing the right tool is critical to avoid data loss, slow performance, or compatibility issues. IM-Magic Partition Resizer Server Edition stands out as a reliable, user-friendly solution for managing partitions.
With IM-Magic Partition Resizer Server, you can safely resize your partitions without losing data or backing up files beforehand. This software is particularly useful for servers and supports various Windows Server editions, including Windows Server 2019.
How to Extend Partitions with IM-Magic Partition Resizer Server Edition
Note: Unallcoated spaces is required for extending a volume no matter with Windows built-in tools or a third party tool. So the first step is to create unallocated space from the same disk, and then move the unallocated space to the right side of the c drive to start extending.
Video Tutorial to Resize Partitions with Partition Tool
Follow these steps to extend your C Drive safely:
- Download and Install: Download IM-Magic Partition Resizer Server and install it on your server.
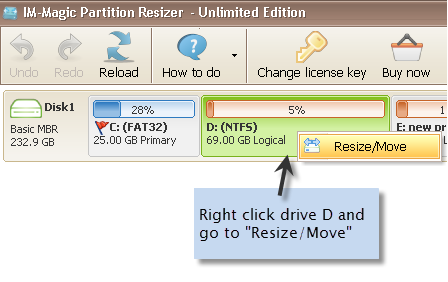
- Shrink a Volume: Right-click on a large partition (e.g., D Drive) and choose the option to shrink it, creating unallocated space.
 Extend Partition with Partition Manager
Steps to resize your disk partition- Extend the C Drive: Right-click on the C Drive and drag its border to merge the unallocated space.
- Apply Changes: Confirm your changes by clicking "Apply."
These simple steps ensure that your partitions are resized without data loss.
Benefits of IM-Magic Partition Resizer
- Data Safety: No risk of losing files during partition resizing.
- Ease of Use: Intuitive interface suitable for beginners and professionals alike.
- Compatibility: Works with all major Windows Server editions.
- Time-Saving: No need for lengthy backups or advanced configurations.
- Cost-Effective: Free edition available for personal use; affordable server edition for businesses.
Frequently Asked Questions (FAQs)
Q: Is it safe to use IM-Magic Partition Resizer on live servers?
A: Yes, IM-Magic Partition Resizer is designed for live server environments and ensures data integrity during the process.
Q: Can I resize partitions formatted in FAT32?
A: Yes, the tool supports both NTFS and FAT32 formats, ensuring flexibility for various use cases.
Q: Do I need to restart my server after resizing partitions?
A: In most cases, a restart is not required, but the software will notify you if it's necessary for specific actions.
Related Product
- IM-Magic Partition Resizer Server - Partition space redistributing software that works for Windows Server 2003-2025.