How to Move/Delete Recovery Partition on Server 2022, 2019, 2016
Table of Contents
- 1. Move recovery partition to the end of the disk or left side of the C drive on Server 2022
- 2 Delete recovery partition (on the left/right side of the C drive)
- 3. How to back up the C drive and its recovery partition (OS migration backup to another disk)
- 4. Scenarios:
Part 1: Move Recovery Partition on Server 2022/2019
Conditions: Unallocated space on the same disk is required to move the recovery partition.
Key: Shrink a large partition to create unallocated space, and then use Partition Resizer to move the unallocated space and any partition, including the recovery partition. (The unallocated space produced by shrinking a partition can be moved to the C drive using Partition Resizer.)
Caution: Moving the recovery partition may cause Windows RE (Recovery Environment) to fail in the future. We strongly recommend that you back up your OS and recovery partition to another disk using Partition Resizer. This tool can help migrate the OS and other data, including the recovery partition, to another disk as a backup. (For details on migrating the OS and recovery partition, see Part 3.)
Here is an example of how you can shrink a volume, then move the unallocated space and the recovery partition to expand the C drive.
Video: How to resize a partition and move the recovery partition to expand the C drive
Download Partition Resizer Server
Part 2: Delete Recovery Partition on Server 2022
Here are two methods to remove the recovery partition:
Method #1: Delete Server 2022 Recovery Partition with Partition Resizer
If the recovery partition is directly behind the C drive, it will block extending the C drive. Disk Management, the built-in Windows utility, cannot delete the recovery partition. In this case, you need Partition Resizer Server, a Windows disk management tool.
Step 1: Download, install, and open this server partition management tool.
Step 2: Right-click the recovery partition once the software loads all disk information, and select the "Delete Partition" option. 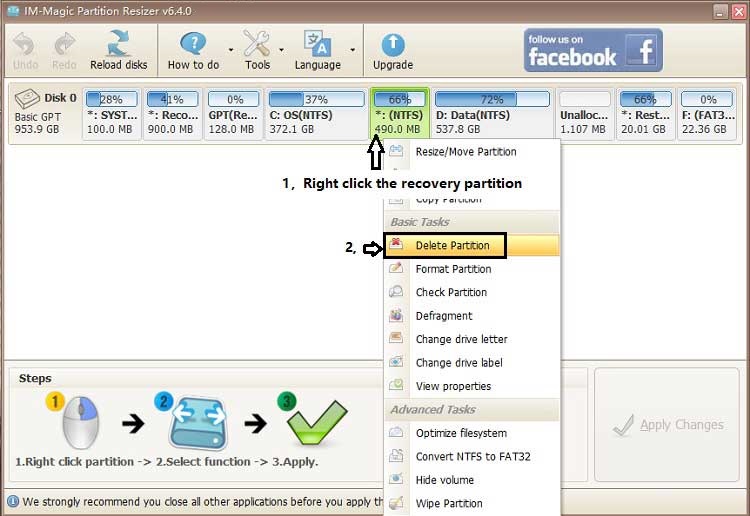
Step 3: Confirm the deletion of the recovery partition.
Step 4: Click the "APPLY CHANGES" button in the software to delete the partition.
Video: How to delete the recovery/reserved partition
Also read: How to delete a recovery partition
Method #2: Delete Server 2022 Recovery Partition Using Diskpart
To delete the recovery partition on Windows Server 2022 using the Diskpart command-line tool, follow these steps:
Note: Before proceeding, ensure you have a complete backup of any important data on the server. Deleting partitions can result in data loss if not done correctly. 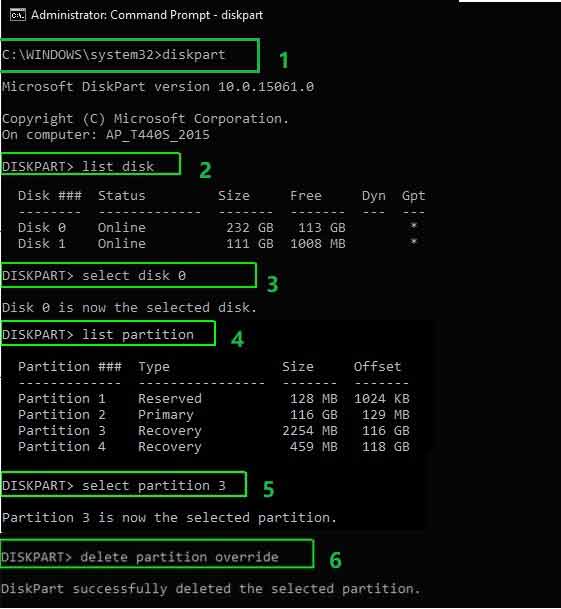
- Open an elevated Command Prompt by right-clicking the Start button and selecting "Command Prompt (Admin)" or "Windows PowerShell (Admin)."
- In the Command Prompt window, type diskpart and press Enter to launch the Diskpart utility. You may be prompted for administrator permissions, so allow the access if requested.
- Once you're in the Diskpart utility, type list disk and press Enter to view a list of available disks on your server.
- Identify the disk number associated with the disk that contains the recovery partition you want to delete. Take note of the disk number.
- Type select disk X (replace X with the appropriate disk number) and press Enter to select the disk that contains the recovery partition.
- Type list partition and press Enter to view a list of partitions on the selected disk.
- Identify the partition number associated with the recovery partition you want to delete. Take note of the partition number.
- Type select partition X (replace X with the appropriate partition number) and press Enter to select the recovery partition.
- Finally, type delete partition override and press Enter to delete the selected partition. The "override" parameter is used to force the deletion without additional confirmation prompts.
Once the partition is deleted, exit the Diskpart utility by typing exit and pressing Enter.
Please exercise caution while using Diskpart, as any mistakes can result in data loss. Make sure you have selected the correct disk and partition before executing the "delete partition" command. It's always recommended to have a backup of important data before making any changes to disk partitions.
Failed? Or multiple recovery partitions? Try this method.
Note: If there are multiple Windows recovery partitions on your disk, especially after upgrading your Windows OS from a previous version, you might have several recovery partitions, some of which may stop working. Here's what you can do:
1. Locate the current recovery partition by using reagentc /info in the Command Prompt window.
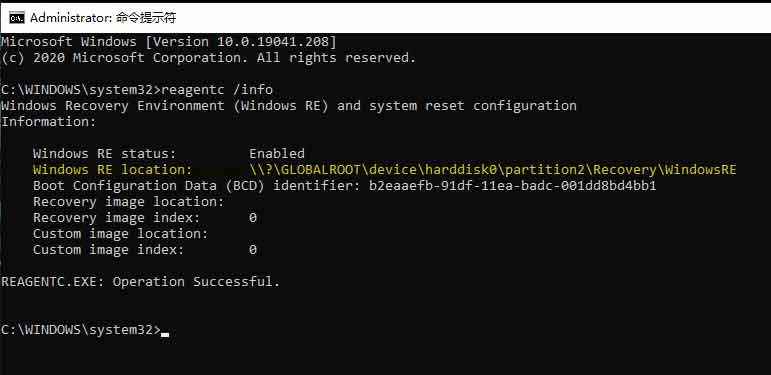
Windows RE location: \?\GLOBALROOT\device\harddisk0\partition2\Recovery\WindowsRE
In this case, partition2 is the recovery partition.
Alternatively, you can use the following commands to identify your recovery partition:
diskpart
list disk
select disk 0
list partition
Once you identify the recovery partition, use the following commands:
diskpart
list disk
select disk # (replace # with the disk number that contains your recovery partition)
list volume (to list all partitions on this disk)
select volume #
delete volume
Not easy to follow? Try the third-party tool IM-Magic Partition Resizer, which can help delete the recovery partition.
Part 3: How to Backup the C Drive and the Recovery Partition on Server 2022, 2019, 2016
Cause: Deleting or moving the recovery partition may cause the recovery partition to stop functioning, or Windows RE may be disabled.
Solution: Backup both the C drive and the recovery partition to another disk as a backup.
Preparation: An empty disk with no partitions.
Guide: How to Backup the C Drive and Its Recovery Partition to Another Disk
Option 1: Backup the C drive and recovery partition only.
Option 2: Backup the entire disk, including the C drive, recovery partition, and other volumes.
Here are the steps:
Step 1: Insert the external backup disk into your PC (either external or internal disk is fine).
Step 2: Download, install Partition Resizer Server, open it, and go to the top toolbar. Click Tools > Migrate OS Wizard.
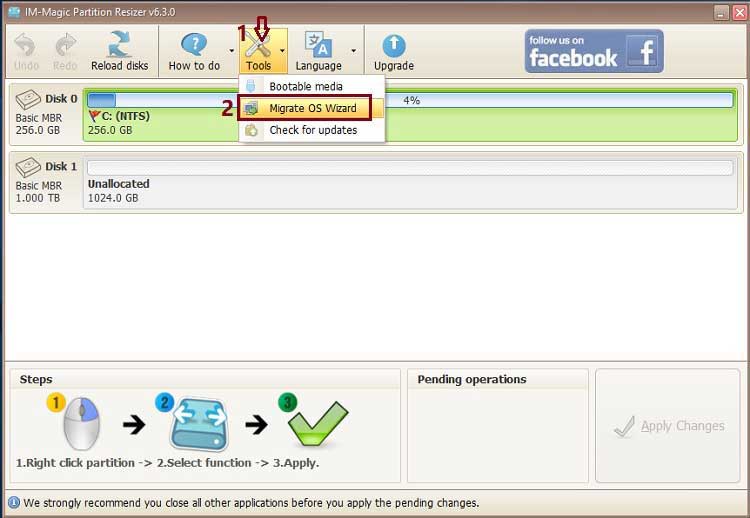
Step 3: Choose the backup disk and click NEXT.
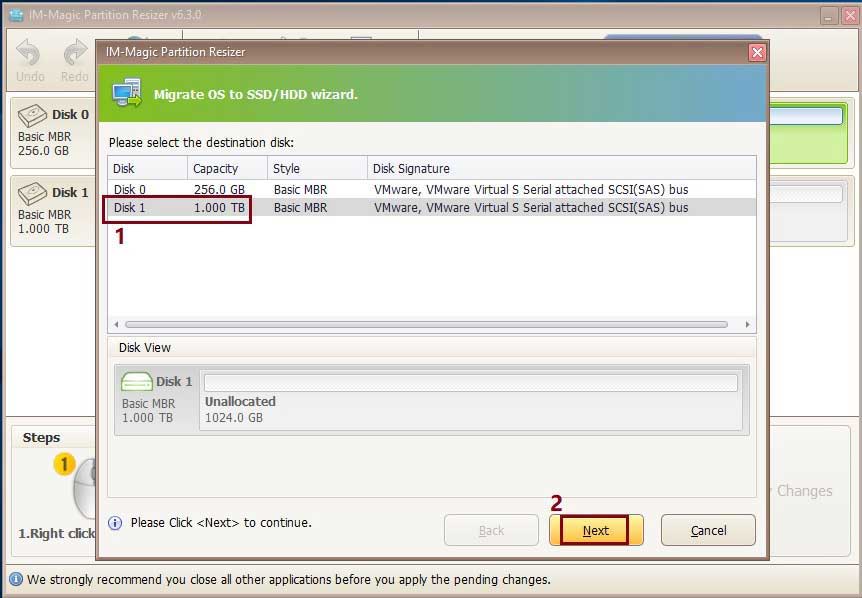
Note:
OPTION 1: SELECT BOTH THE C DRIVE AND THE RECOVERY PARTITION TO BACKUP.
OPTION 2: SELECT ALL VOLUMES, INCLUDING THE C DRIVE AND THE RECOVERY PARTITION, TO BACKUP.
(Disconnect the backup disk and keep the old disk in the PC once the backup is complete after Step 3.)
Step 4: Confirm the disk cloning by clicking APPLY CHANGES.
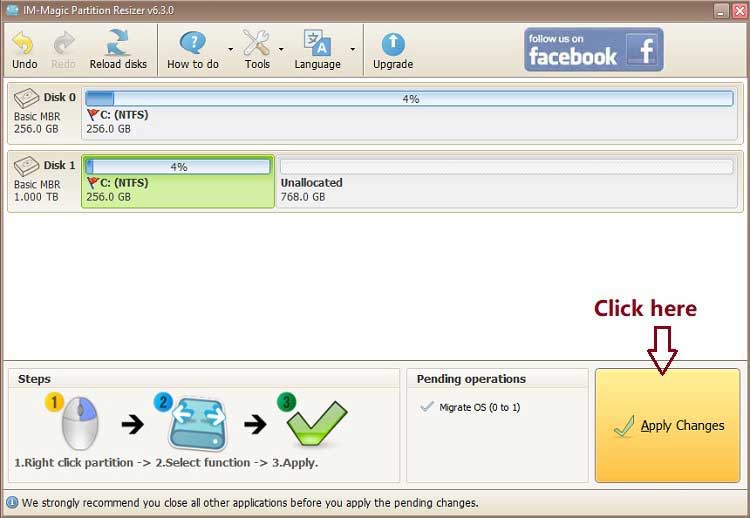
Note: If you disconnect the backup disk and keep the old disk in the PC, you don't need to do anything further.
Also read: How to clone the C drive on Server 2022
Scenarios:
#1 Recovery Partition Blocking Volume Extension on Server 2022
In some cases, the recovery partition is placed immediately next to the C drive, which prevents the C drive from being extended. The recovery partition is typically created by the manufacturer to store system recovery files. When attempting to extend the C drive using disk management tools, the recovery partition may appear as an immovable barrier, restricting the extension.
To resolve this issue, you have a few options:
-
Delete the recovery partition: If you have already created a system backup or recovery media and no longer require the recovery partition, you can delete it. However, exercise caution as this can result in the loss of the recovery functionality. Only proceed with this option if you have an alternative recovery solution in place. (We strongly recommend preparing a disk, and then cloning the C drive and its recovery partition to another disk as a backup.)
-
Reinstall the operating system: If you're comfortable reinstalling the operating system, you can choose to perform a clean installation. During the installation process, you can manually partition the hard drive and allocate more space to the C drive.
Also read: How to install Server 2022 without a recovery partition
Remember to back up your important data before making any changes to the partitions, as there is always a risk of data loss. Additionally, if you're uncertain about performing these tasks yourself, it may be advisable to seek assistance from a professional or consult the manufacturer's support for guidance specific to your system.
Can you resize the recovery partition?
The recovery partition cannot be resized, and it's very small, typically around 500MB, which does not provide enough unallocated space for extending the C drive.
Note: Neither the disk management tools nor Diskpart will allow you to delete, resize, or move the recovery partition. A third-party tool like Partition Resizer Server can handle tasks such as deleting or moving the recovery partition.
Scenario #2: "Delete Partition" Greyed Out on Recovery Partition in Disk Management on Server 2022
If the "Delete Partition" option is greyed out in Disk Management on your Windows Server 2022 system, it could be due to one or more of the following reasons:
- Insufficient permissions: Make sure you are logged in as an administrator or have sufficient permissions to perform disk management tasks. Without appropriate privileges, certain actions may be restricted.
- System or boot partition: The recovery partition may be marked as a system or boot partition. Windows does not allow you to delete these partitions using Disk Management, as doing so could render the system unbootable.
- Active partition: If the recovery partition is marked as active, you won't be able to delete it using Disk Management. The active partition is necessary for booting the system.
- Virtual Disk Service (VDS) limitations: In some cases, the Virtual Disk Service (VDS) may encounter limitations that prevent the deletion of partitions through Disk Management. This can occur due to various reasons, such as disk errors or incompatible disk configurations.
To overcome these limitations and delete the recovery partition, you can try the following alternative methods:
-
Command Prompt: Launch Command Prompt as an administrator and use the Diskpart command-line tool to manage partitions. Be cautious when using this tool, as it can cause data loss if not used correctly. Follow these steps:
a. Open Command Prompt as an administrator.
b. Type diskpart and press Enter to launch the Diskpart tool.
c. Use the list disk command to identify the disk containing the recovery partition.
d. Select the disk by typing select disk <disk number> (replace <disk number> with the appropriate value).
e. Use the list partition command to view the partitions on the selected disk.
f. Select the recovery partition by typing select partition <partition number> (replace <partition number> with the appropriate value).
g. Finally, type delete partition override and press Enter to force the deletion of the partition. -
Third-party partition management software: If the above method doesn't work or if you prefer a more user-friendly interface, you can use third-party partition management software such as IM-Magic Partition Resizer Server, which can back up your disk, migrate the OS, delete the recovery partition, and more.
Before making any changes to your disk partitions, it's crucial to back up your data to prevent data loss. Deleting partitions can result in permanent data deletion, so exercise caution and double-check that you're selecting the correct partition for deletion.
FAQs
Question: Can I delete the recovery partition on Server 2016? Is it safe to delete the recovery partition on Server 2022? Can I delete Windows recovery partitions?
Answer: If you have made a safe backup of both the OS disk and the recovery partition, then it is safe to delete the recovery partition. Additionally, if your OS was upgraded from an older version of Windows, and the old recovery partition is already disabled and non-functional, you can safely delete these recovery partitions.
Question: How do I delete a recovery partition in Windows Server?
Answer: You can delete a recovery partition in Windows Server using the Diskpart command-line tool or a reliable disk partition management software such as Partition Resizer Server.
More Related Articles You May Like
Related Product
- IM-Magic Partition Resizer Server - Partition space redistributing software that works for Windows Server 2003-2025.