How To Resize Partition Using Powershell or Partition Manager
Summary
Want to better manage the partition without data loss? This article is about how to resize partition powershell partition manage freeware.

Updated on 2026/06/02
by Andrew Wright
Table of Contents
Running out of space on a partition can disrupt your system. Fortunately, PowerShell provides a powerful way to resize partitions, and for more user-friendly handling, you can use IM-Magic Partition Resizer. This guide walks you through both methods.
How to Resize Partition with PowerShell
PowerShell offers various commands to manage and resize partitions. Below are detailed guides for common scenarios:
Example: Resizing a Partition with PowerShell
To resize a partition with PowerShell:
- Open PowerShell as Administrator by searching for "PowerShell" in the Start menu, right-clicking, and selecting Run as Administrator.
- Enter
diskpartand press Enter. - Use the command
list volumeto identify the partition you wish to resize. - Select the volume using
Select Volume #(replace#with the volume number). - Resize it by typing
extend size=xxxx(replacexxxxwith the size in MB). - Type
exitto close DiskPart and PowerShell.
For a more detailed explanation, visit this guide.
Shrinking a Partition with PowerShell
You can shrink a partition to free up space:
- Follow steps 1–4 from the example above to select the partition you wish to shrink.
- Type
shrink desired=xxxx, replacingxxxxwith the amount of space in MB to remove. - Type
exitto leave DiskPart and save the changes.
Visit this page for a detailed guide on shrinking partitions.
Extending a Partition to Maximum Size
To extend a partition to its maximum possible size:
- Use
list volumeandSelect Volume #to identify the partition. - Type
extendwithout specifying a size to use all available unallocated space. - Type
exitto leave DiskPart and PowerShell.
Troubleshooting Unsupported Resize Errors
If you encounter "size not supported" errors, it might be due to insufficient unallocated space or limitations of the file system. Here’s how to handle it:
- Ensure there is unallocated space adjacent to the partition you wish to resize.
- Check that the partition uses a compatible file system, such as NTFS.
- Use third-party tools like IM-Magic Partition Resizer for complex scenarios.
Refer to this troubleshooting guide for more help.
Resizing a Partition Remotely
To resize a partition on a remote machine:
- Ensure PowerShell Remoting is enabled on the target machine.
- Use
Invoke-Commandto execute the resize commands. For example: - For advanced scenarios, consider using
Invoke-Expression.
Invoke-Command -ComputerName "TargetMachine" -ScriptBlock {
    diskpart
    list volume
    select volume #
    extend size=xxxx
    exit
}
Resize Partition Using IM-Magic Partition Resizer
For Windows 11/10/8/7 => Download Partition Resizer Free [100% Free]
For Windows Server 2025-2003 => Download Partition Resizer Server [Free Demo]
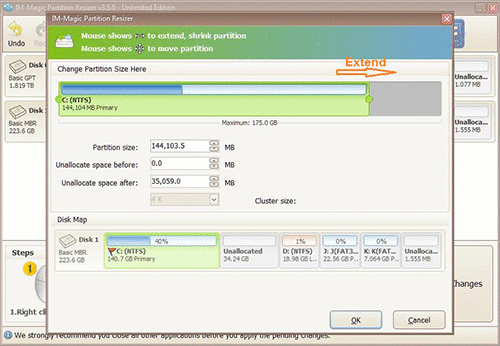
For a simpler and safer method to resize partitions, use IM-Magic Partition Resizer:
- Download and install the application from here.
- Launch the app, right-click the partition to resize, and select "Resize/Move."
- Adjust the slider to create unallocated space or extend the partition.
- Click Apply to finalize changes.
 Shrinking a partition in Windows
 Extending a partition in Windows
IM-Magic Partition Resizer offers a user-friendly way to handle partition resizing without the risks of manual commands.
More Related Articles You May Like
Related Product
- IM-Magic Partition Resizer Server - Partition space redistributing software that works for Windows Server 2003-2025.