3 Ways to Resize Partition on Windows Server 2016
Summary
Managing disk partitions can sometimes be challenging. In this article, we provide comprehensive guidance on how to resize partitions on Windows Server 2016. Discover the most effective and safest methods to optimize your disk space management effortlessly.
Table of Contents
Introduction
Partitioning a hard drive involves dividing its storage into smaller sections, called partitions. This process can improve file organization, data security, and system performance. Most laptops come with a single drive by default, but partitioning allows you to allocate space for specific purposes, enhancing convenience and functionality.
| Disk Management | Diskpart | Partition Resizer* | |
| Shrink FAT32 Partition | NO | NO |  |
| Extend FAT32 Partition |  Yes, if unallocated space is available on the right |
 Yes, if unallocated space is available on the right |
 |
| Extend FAT32 C Drive | NO | NO |  |
| Extend NTFS C Drive |  Yes, if right unallocated space is available Yes, if right unallocated space is available |
 Yes, if right unallocated space is available Yes, if right unallocated space is available |
 |
| Move Unallocated Space or Partition | NO | NO |  |
| Delete Recovery/OEM Partition | NO | YES |  |
| Price | FREE | FREE | FREE |
| Download Win 11-7 (100% Free) Download Win Server (Free Demo) |
Note: Partition resizing always requires unallocated space. Whether you use Windows tools or third-party software, ensure unallocated space is available before resizing.
Extend Volume in Windows Server 2016 Using Disk Management
The Disk Management tool in Windows Server 2016 resembles earlier versions. It allows basic operations such as shrinking and extending partitions but has some limitations. To extend a partition, unallocated space must be adjacent and located on the right side of the target volume.
Video Tutorial: Learn how to shrink and extend volumes in Disk Management on Server 2016.
If Disk Management fails to perform the desired action, consider using a reliable third-party tool like Partition Resizer.
Use the Diskpart Command Prompt to Expand Partition Size
Diskpart is a command-line tool for managing partitions. Follow these steps to resize a partition:
- Step 1: Open Command Prompt as an administrator.
- Step 2: Launch Diskpart by typing
diskpart. - Step 3: List disks with
list disk. - Step 4: Select the desired disk using
select disk X. - Step 5: List partitions on the selected disk with
list partition. - Step 6: Select the partition using
select partition Xand perform actions like shrinking (shrink desired=size) or creating new partitions.
Limitations: Diskpart only works on NTFS partitions with adjacent unallocated space. For more flexibility, try third-party tools.
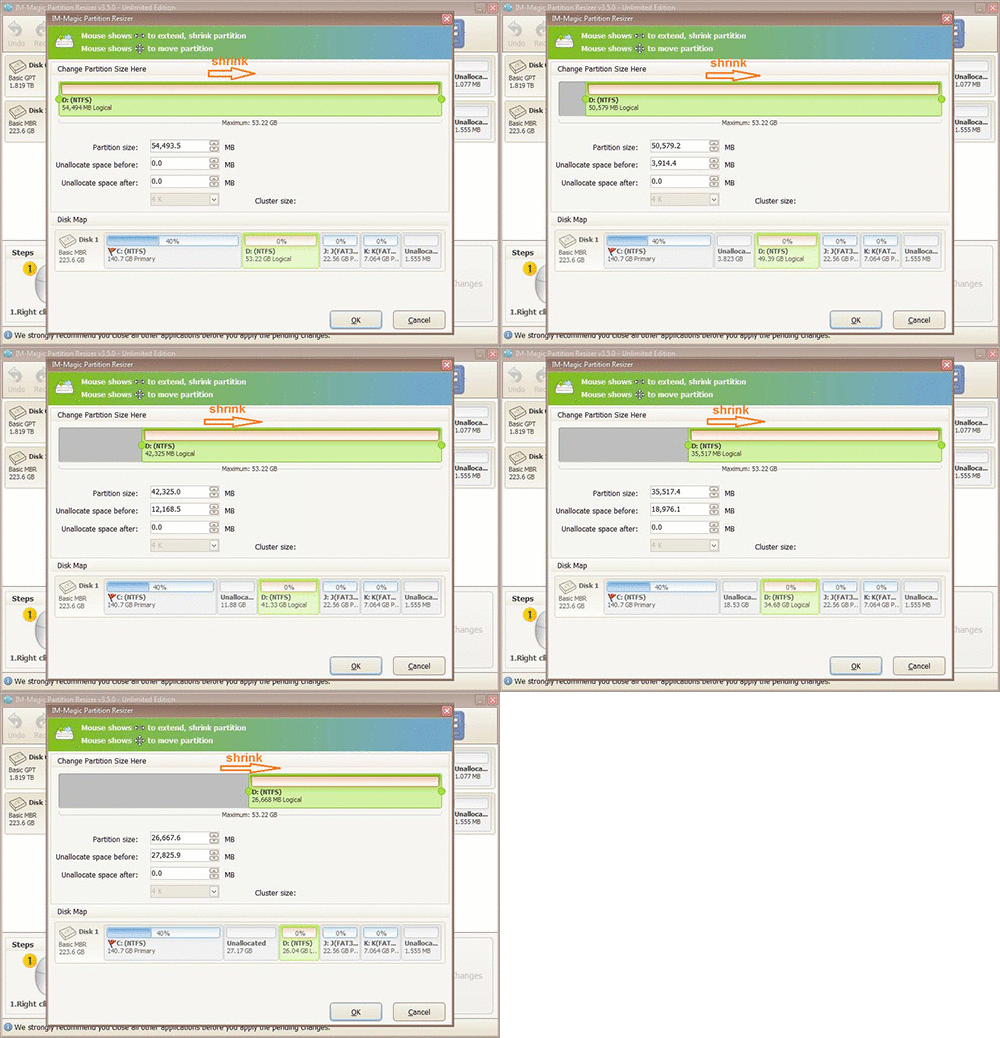
Resize Partition in Server 2016 with IM-Magic Partition Resizer Server
How do I change the size of a partition in Windows Server 2016? IM-Magic Partition Resizer is an easy-to-use tool for resizing partitions without data loss. It works on all Windows Server versions and offers advanced functionality like moving partitions and resizing FAT32 volumes.
Steps to Resize a Partition:
- Right-click the target partition and select "Resize/Move."
- Drag the edges to adjust its size or shrink it to create unallocated space.
- Use the unallocated space to expand another partition.

Reasons to Resize Partition on Windows Server 2016
- Better file organization by separating sensitive and shared data.
- Facilitate data backups by isolating critical files.
- Improve system performance by optimizing storage usage.
- Enable multiple operating systems on the same drive.
How Do I Increase C Drive Space in Server 2016?
Increasing C drive space in Windows Server 2016 can be necessary when your system drive runs out of space, potentially leading to slower performance or system issues. Here’s how you can expand your C drive safely:
Method 1: Using Disk Management
- Right-click on My Computer and select Manage.
- In the Computer Management window, navigate to Storage > Disk Management.
- If there is unallocated space adjacent to the C drive:
- Right-click the C drive and select Extend Volume.
- Follow the wizard to allocate the unallocated space to your C drive.
- If no unallocated space exists, you may need to shrink another partition first to create space.
Method 2: Using Diskpart
If Disk Management doesn’t work, try the Diskpart command-line tool:
- Open Command Prompt as an administrator and type
diskpart. - Use the following commands:
list disk: Displays all disks.select disk X: Replace X with the disk number where your C drive resides.list partition: Lists all partitions on the selected disk.select partition Y: Replace Y with the partition number of the C drive.extend: Extends the C drive into available unallocated space.
Method 3: Using IM-Magic Partition Resizer
If you encounter difficulties with the built-in tools, a third-party utility like IM-Magic Partition Resizer can make the process simpler:
- Download and install IM-Magic Partition Resizer.
- Open the software and locate your C drive in the disk layout.
- Drag the partition edges to allocate unallocated space to the C drive.
- Click Apply to save the changes.
Note: Ensure that you back up your data before making any partition changes.
By following these steps, you can effectively increase your C drive space in Windows Server 2016 without data loss.
Conclusion
Partition resizing can enhance system efficiency and file management. Choose the method that best fits your needs from the options detailed above.
More Related Articles You May Like
Related Product
- IM-Magic Partition Resizer Server - Partition space redistributing software that works for Windows Server 2003-2025.
