Gparted Resize Partition on Linux/Windows and Its Free Alternative
Summary
This page is about how to use Gparted to resize partitions and its free alternative on Windows to better manage hard disk partitions.

Updated on 2026/06/05
by Andrew Wright
Table of Contents
- Part1: Gparted resize Windows partition alternative [completely free alternative]
- Part2: Gparted resize Linux partition [root partition, ubuntu partition]
- Part3: Gparted resize bitlocker/encrypted partition
Part1: Resize Windows Partition with Gparted VS Partition Resizer (Both Free)
Why Partition Resizer for Windows resizing partition? Simply because Partition Resizer is more user friendly. Here is a table that shows the comparison.

Video: How to resize partition with free tool Partition Resizer in Windows 11/10
IM-Magic Partition Resizer offers a convenient solution for resizing partitions on Windows 11 systems without compromising data integrity. This user-friendly tool employs advanced algorithms to dynamically adjust partition sizes, allowing users to manage disk space effectively.
The software supports various file systems, including NTFS and FAT32, and it works seamlessly with Windows 11. Its intuitive interface simplifies the resizing process, making it accessible for users with varying levels of technical expertise.
Step-by-step guide on how to use IM-Magic Partition Resizer:
1. Download, install and launch the software.
2. Backup important data with the Clone disk or copy disk function in the free software.
3. Select the partition to resize.
4. Resize the partition using the slider or input fields.
5. Allocate the desired size for the partition.
6. Preview and review the changes.
7. Apply the changes by clicking APPLY in the software.
8. Wait for the resizing process to complete.
What's special in IM-Magic Partition Resizer?
It offers roll-back protection that can help protect data and OS even when there were unexpected accidents such as power surge during the process.
Also read: how to resize partition on Windows 11/10
Video: How to resize partition with Gparted in Windows 11/10
(What are the situations where gparted cannot be used to resize partitions?)
- Encrypted partitions: gparted does not support resizing encrypted partitions. If your partition is encrypted using tools like LUKS or BitLocker, you cannot use gparted to resize it.
- Mounted partitions: gparted cannot resize partitions that are currently mounted or in use. You need to unmount the partition before attempting to resize it.
- Filesystem errors: If the partition has filesystem errors or inconsistencies, gparted may not be able to resize it. It is recommended to run a filesystem check and fix any errors before using gparted.
- Unsupported filesystems: gparted supports a wide range of filesystems, but there are some less common filesystems that may not be supported. Make sure your partition uses a supported filesystem before attempting to resize it with gparted.
For more information, you can refer to the following links:
- GParted FAQ: https://gparted.org/faq.php
- GParted Documentation: https://gparted.org/documentation.php
Gparted resize partition Linux [including resizing root partition Linux]
Resizing a Linux partition involves adjusting its size to allocate more or less space as needed. This process can be done using various tools, but one common method is using the GParted tool, which provides a graphical interface for managing partitions. Here's a general guide on how to resize a Linux partition using GParted:
**Note:** Before you proceed, it's important to back up your important data. While resizing partitions is generally safe, there's always a slight risk of data loss, so having a backup is a good practice.
1. **Create a Backup:** Make sure you have a backup of your important data to prevent any data loss during the partition resizing process.
2. **Boot from a Live CD/USB:** You'll need to boot your computer from a Live CD or Live USB that contains GParted. This ensures that the partitions you want to resize are not in use.
3. **Open GParted:**
- Once you're in the live environment, open the terminal.
- Run the command `sudo gparted` to launch GParted with root privileges.
4. **Select the Partition:**
- In GParted's graphical interface, you'll see a list of all the partitions on your system.
- Select the partition you want to resize.
5. **Resize the Partition:**
- Right-click on the selected partition and choose "Resize/Move."
- In the dialog that appears, you'll see a slider that represents the partition's size.
- Drag the slider to adjust the partition's size. You can also manually enter the new size in megabytes (MB) or gigabytes (GB).
- Ensure that you leave enough space for your data and the operating system.
6. **Apply the Changes:**
- Once you're satisfied with the new partition size, click the "Resize/Move" button.
- Review the changes in the GParted main window.
- Click the "Apply" button to execute the partition resizing. This process may take some time, depending on the partition size and your system's speed.
7. **Verify and Reboot:**
- After the changes are applied successfully, GParted will notify you.
- Close GParted and reboot your system.
8. **Check the Resized Partition:**
- Once your system boots up, open a terminal and use the `df -h` command to verify the resized partition's size.
Remember that while GParted is a powerful tool, it's important to use it carefully. Mistakes can lead to data loss, so always ensure you have backups and follow the steps accurately. If you're not comfortable using GParted, you might consider seeking help from someone with more experience or consulting official documentation specific to your Linux distribution.
Gparted to Resize Root Partition Linux
Resizing the root partition on a Linux system can be a bit more involved than resizing other partitions because the root partition is usually mounted and actively used by the operating system. However, it's still possible to do with the help of a Live CD/USB and tools like GParted. Here's a step-by-step guide:
Note: As with any partition manipulation, make sure to back up your important data before proceeding.
-
Create a Backup: Before making any changes to your system, ensure you have a backup of your important data.
-
Boot from a Live CD/USB: Boot your computer from a Live CD or Live USB that has GParted or other partition management tools.
-
Open GParted:
- Launch a terminal in the live environment.
- Run sudo gparted to open GParted with root privileges.
-
Unmount the Root Partition:
- You cannot directly resize the root partition while it's mounted.
- Right-click on the root partition (usually mounted as "/") and select "Unmount."
-
Resize the Root Partition:
- After unmounting, right-click on the root partition and choose "Resize/Move."
- Adjust the partition size by dragging the slider or entering values manually.
- Make sure to leave enough space for the operating system and your data.
- Click "Resize/Move" to apply the changes.
-
Apply the Changes:
- Review the changes in the main GParted window.
- Click the "Apply" button to execute the resizing process.
-
Check and Repair File System:
- After resizing, you might need to repair the file system using a tool like e2fsck for ext4 or similar tools for other file systems.
- Run sudo e2fsck -f /dev/sdXY (replace sdXY with your root partition's identifier) to check and fix the file system.
-
Update Boot Configuration (if necessary):
- If the partition has moved, you may need to update your system's boot configuration.
- If you use GRUB as your boot loader, you might need to run sudo update-grub.
-
Reboot:
- Close GParted and reboot your system from the hard drive.
-
Verify the Resized Partition:
- Once the system is up, open a terminal and use the df -h command to confirm that the root partition has been successfully resized.
Remember that resizing the root partition can be risky, so follow the steps carefully and make sure you have a backup in case anything goes wrong. If you're not comfortable with the process, consider seeking assistance from someone experienced with Linux system administration.
Gparted Live to Resize SWAP/Ubuntu Partition
Video: How to resize swap Linux partition
Adjusting partitions using Gparted Live can be done after Ubuntu installation that has improper space arrangement. Users may allocated too much space to /temp and too little to /var, resulting in space issues during software installation. Here is the plan to resize /var using Gparted, which is a tool for managing partitions.
To resize Ubuntu partition using Gparted, go with the following steps:
1. Download the Gparted Live image from https://gparted.org/download.php.
2. Use Tuxboot to create a bootable USB drive with the Gparted Live image. The user notes that Tuxboot doesn't support Windows 10, so they used Ubuntu to perform this step. The USB drive must be formatted as FAT32.
3. Boot the computer from the created USB drive, entering Gparted Live. The user keeps the default keyboard layout and language settings.
4. The user aims to resize /var. They plan to allocate around 50GB from /dev/sda3 and assign it to /var. They reference the Gparted manual (https://gparted.org/display-doc.php?name=help-manual) for guidance.
a. They first choose /dev/sda3, click "Resize/Move," and allocate 50GB from it as unallocated space.
b. Then, they copy the contents of /dev/sda8 (which holds /var), paste it into the unallocated space, and resize the copied partition to 45GB.
c. The user renames the copied partition to /dev/sda9 to avoid conflicts with the original /dev/sda8.
d. They delete the original /dev/sda8 partition, creating unallocated space in its place.
e. They create a new partition in the unallocated space, resulting in a new /dev/sda8.
5. After completing the partition adjustments, they exit Gparted and shut down the system.
6. Upon rebooting, they use the "df -h" command to verify that the /var partition now has 45GB of space.
In summary, the content discusses a process to adjust partition sizes using Gparted Live due to a misallocation of space during Ubuntu installation. The above steps successfully resizes the /var partition to resolve space-related errors during software installation.
Gparted resize bitlocker/encrypted partition
You must first unlock the BitLocker to resize the partition. Follow the below process:
Method 1. Unlock Bitlocker drive via Settings
Step 1: Head over to Settings and enter 'encryption, and tap on "Manage BitLocker."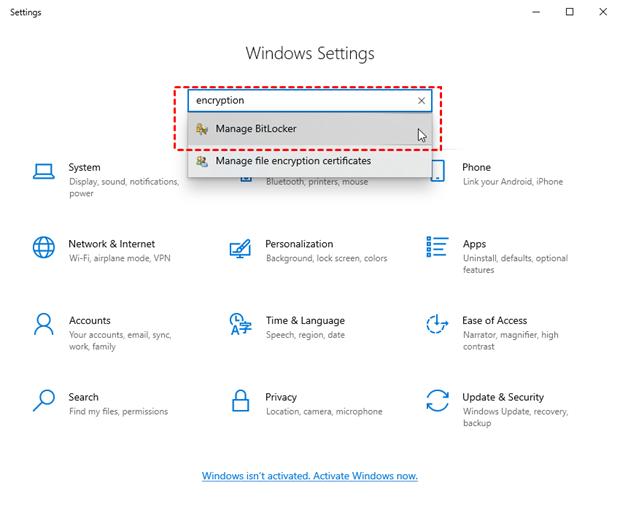
Step 2: You will notice a pop-up; opt for the drive; tap on "Turn off BitLocker."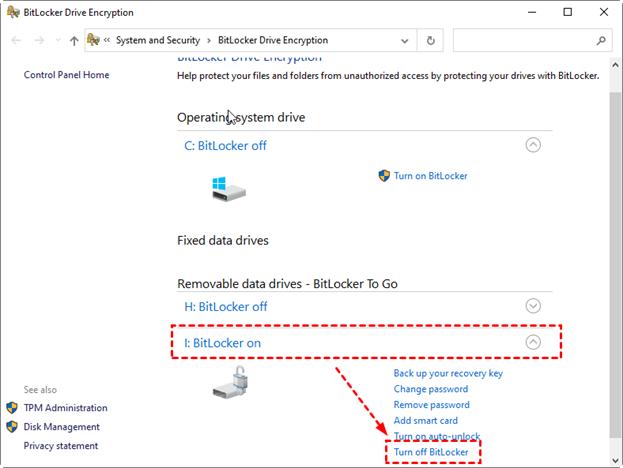
Step 3: Hit "Turn off BitLocker" to affirm now you have successfully unlocked the drive.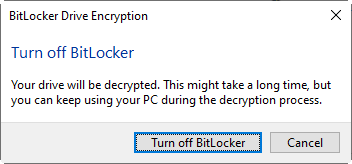
BitLocker encryption is a security feature integrated with Windows that encrypts the entire partition or drive.
GParted cannot directly resize a BitLocker-encrypted partition or any encrypted partition, unlock these encrypted partitions at first.
GParted primarily works with Linux filesystems and cannot handle encrypted partitions directly, as it lacks the necessary decryption capabilities.
To resize a BitLocker-encrypted partition, you should use Windows tools like Disk Management or third-party tools such as IM-Magic Partition Resizer that are compatible with BitLocker encryption and can handle the decryption process safely while resizing the partition.
Related Product
- IM-Magic Partition Resizer Server - Partition space redistributing software that works for Windows Server 2003-2025.