How to move recovery partition using Gparted [2 free tools]
Content Navi
- Move recovery partition with Partition Resizer Free {eaiser&free}
- Move partition using Gparted
- Can't move partition gparted [fixes with partition software free]
Why do we recommend free tool Partition Resizer?
- 1, Free of charge, Partition Resizer is totally free to move volumes without losing data
- 2, Easy to use with user friendly UI compared with Gparted
- 3, Totally safe with roll-back algorithm that can protect your disk and OS when unexpected accident such as power surge happens
- 4, Partition Resizer can help clone the disk to another disk as backup to ensure everything goes fine
Part1: Move recovery partition easily with better free tool
IM-Magic Partition Resizer is a free tool that can help move recovery partition without losing data with better user friendly interface that worth a try when Gparted comes with complicated steps and more difficult user interface.
Conditions: Moving the recovery partition needs unallocated space on the disk that you may shrink some from another large volume or delete a volume to create unallocated space.
Video: How to move recovery partition
For Windows 11/10/8/7/Vista/XP/2000 ==> Download IM-Magic Partition Resizer Free (100% free)
For Windows Server All versions ==> Download IM-Magic Partition Resizer Server (free trial)
Part2: Move recovery partition using Gparted
Video: how to move partition to the end of disk with Gparted
Moving a recovery partition can be a risky operation, and it's essential to proceed with caution to avoid data loss or system instability. Before attempting to move a recovery partition, ensure you have a backup of all critical data on your computer.
GParted is a popular open-source partition editor that allows you to manage disk partitions. To move a recovery partition using GParted, follow these general steps:
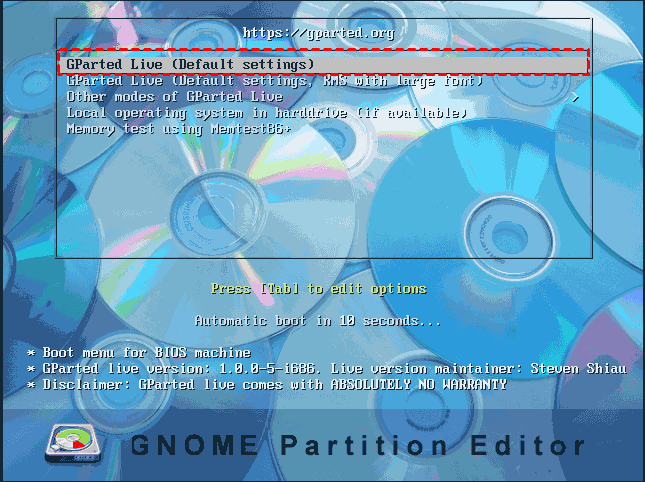
Important Note: The steps described here are for general guidance and may vary depending on your specific system configuration. Always back up your data and proceed with caution. Additionally, ensure you have a live USB or CD with GParted to perform these operations.
Video: how to make a Gparted Live USB
Create a Backup: Before you begin, back up all your important data to an external drive or cloud storage to avoid data loss in case anything goes wrong. We would recommend you use Partition Resizer to clone your disk to another disk as backup which can clone not only the data drive but also the OS together with its' recovery partition or anything on the drive.
- Boot from GParted Live USB/CD: Insert the GParted Live USB/CD into your computer and boot from it. You may need to access your BIOS/UEFI settings to set the boot priority and boot from the USB/CD.

- Open GParted: Once GParted is loaded, you should see a graphical interface showing your disk partitions.
- Identify the Recovery Partition: Locate the recovery partition on the disk. Typically, it is a small partition and might have a recognizable label like "RECOVERY" or "OEM Partition."
- Unmount the Recovery Partition: If the recovery partition is currently mounted (which is unlikely in GParted Live), right-click on it and choose "Unmount" to ensure it's not in use.
- Resize the Adjacent Partition: You need to create enough free space next to the recovery partition to accommodate its move. To do this, right-click on the partition adjacent to the recovery partition (usually the main system partition), and select "Resize/Move." Shrink this partition to create free space.
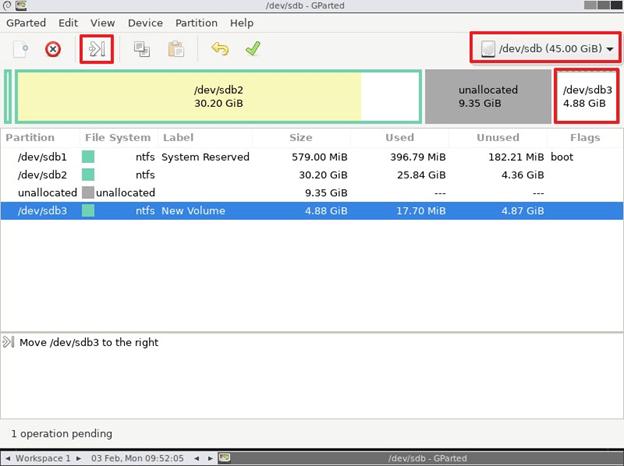
- Move the Recovery Partition: With the free space created, right-click on the recovery partition and choose "Resize/Move." In the Resize/Move dialog, drag the partition to the new location (the left side of the unallocated space).

- Apply the Changes: Before applying the changes, double-check that everything looks correct in the GParted interface. Once you are sure, click the "Apply" button to perform the operations. This step can take some time, depending on your system's configuration and the partition sizes.
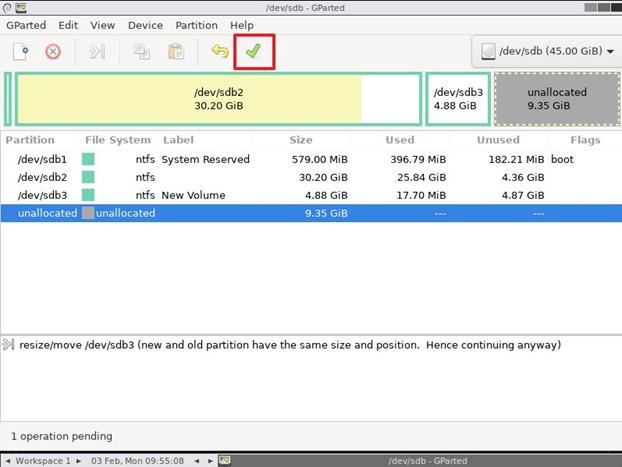
- Reboot: After the operations are completed successfully, close GParted and reboot your computer.
Remember that moving partitions carries inherent risks, and there is always a chance of data loss or system instability. If you're not familiar with partition management or unsure about the process, it's best to seek assistance from an experienced user or a professional technician to avoid potential problems.
Also read: how to move windows 11/10 recovery partition
Part3: Can't move partition gparted
GParted may encounter situations where it cannot move a partition due to various reasons. Some common reasons include:
-
File System In Use: If the partition you are trying to move is currently in use (for example, it contains the operating system that is running), GParted will typically prevent such an operation. Moving a partition while it's in use can cause system instability or make the system unbootable. In such cases, you need to run GParted from a different bootable media (e.g., Live USB or Live CD) so that the partition is not active.
-
File System Errors: If the file system on the partition is corrupted or has errors, GParted may not be able to correctly identify the partition's boundaries, thus preventing the move operation. In such cases, you should first fix the file system errors and then attempt to move the partition.
-
Locked Partitions: Some applications or services may lock a partition to prevent any changes to it. For instance, if there are other programs actively using a particular partition in your system, GParted may be unable to move it. You can try closing all applications or processes that might be locking the partition and then try again.
-
Partition Table Errors: Errors in the partition table can lead to GParted being unable to handle partition movements properly. Try using tools like gdisk or fdisk to check and fix partition table errors.
-
Disk Issues: Sometimes, disk failures or bad sectors can cause GParted to fail in reading or writing data, preventing the partition move operation.
Before attempting any partition operations, it's crucial to back up your important data. Partition operations involve data movement and modification, which carries the risk of potential data loss. If you are unsure about how to deal with these issues, it's advisable to seek professional technical support or consultation to avoid unintentional data damage.
FAQs
Question#1: move swap partition gparted
If you want to move a Linux swap partition using Gparted, you may need to create unallocated space at first next to the swap partition, and then Gparted can help move the swap partition location when you enter the size of its left volume or right volume space.
Question#2: move boot partition gparted, move unallocated partition gparted, move ntfs partition gparted, move efi partition gparted???
Boot partition, unallocated partition, ntfs partition, EFI partition are all supported in free tool Partition Resizer that you may download this disk partition tool to move them in the disk without losing data. Note: Unallocated space is needed for changing the location of these volumes.
More Related Articles You May Like
Related Product
- IM-Magic Partition Resizer Server - Partition space redistributing software that works for Windows Server 2003-2025.