How To Configure Windows Low Disk Space Warning Threshold
Summary
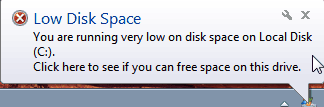
The low disk space warning threshold could be quite intrusive. In most cases, the low disk warning bar starts popping up when your disk is running lower than 200MB. At that level, the warning bar is constantly in your face. The good news is that you can configure the warning bar and disable it totally. However, the best way to go about this is to free up space or by extending your partition.

Updated on 2026/06/05
by Andrew Wright
Table of Contents
Risks of Low Disk Space
The risks of having a low disk space on your computer abound.
 Configure low disk space warning threshold
#1 Slow pc, your computer begins to drag with a low disk space memory as your computer apps need enough disk space to run. When this happens, your workflow on your computer will be so slow and unsmooth as you would not be able to run apps easily to complete tasks. This is so as the apps would be so starved of space, running them smoothly will be impossible.
#2 Possible crashes: Another risk low disk space can cause is that it could crash out your system. Your OS needs space to run. In the case that space is not available, your Windows could entirely crash.
#3 Potential data loss: The final risk and most painful is that when your computer suddenly crashes, you could lose a whole lot of data and files. This is a user’s worst nightmare.
How to Setup/Disable the Low Disk Space Warning Threshold
You can disable the warning bar if you think it is too intrusive and you still have some memory to run by.
Part1: Video - how to disable low disk space warning on Windows 11/10/8/7/Server
Disable low disk space warning using Regedit
You will have to do this via the registry function of your system. However, one thing you should note is that if you misuse this function, you can affect the functioning of your windows. Type ‘regedit’ into your start menu to launch the registry and grant it administrative control.
Use the navigation bar and navigate to this key:
“HKEY_CURRENT_USER\SOFTWARE\Microsoft\Windows\CurrentVersion\Policies\Explorer”. After that, then go to the left panel and click on “New > DWORD (32-bit) Value”. Name hat value to “NoLowDiscSpaceChecks”. After you are done with that, then click twice on the “NoLowDiscSpaceChecks” you just named. Type 1 into the Value Data box, and click ok. Close the Registry box and restart your system for a full change to take place.
Part2: set up low disk space warning
Here are the steps to set up low disk space on Windows computers:
Step1: Open cmd, and type 'perfmon'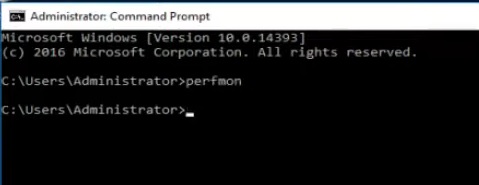
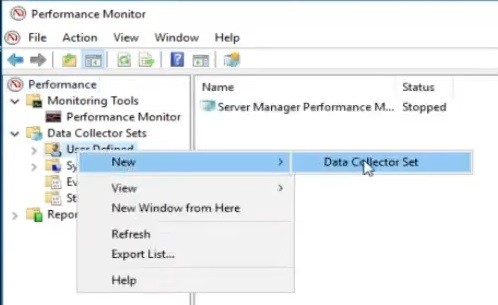
Step2: Click Data Collector Sets -> Right click User Defined -> New -> Data Collector Set
Step3: Name: Type the name of the alter as you wish, and then click Create manually, and then click NEXT
Click Add, and then click Memory -> Select Available MBytes and click ADD, and then type: Alter when below limit: ***(The disk space that you want to receive the alter), and then click NEXT, 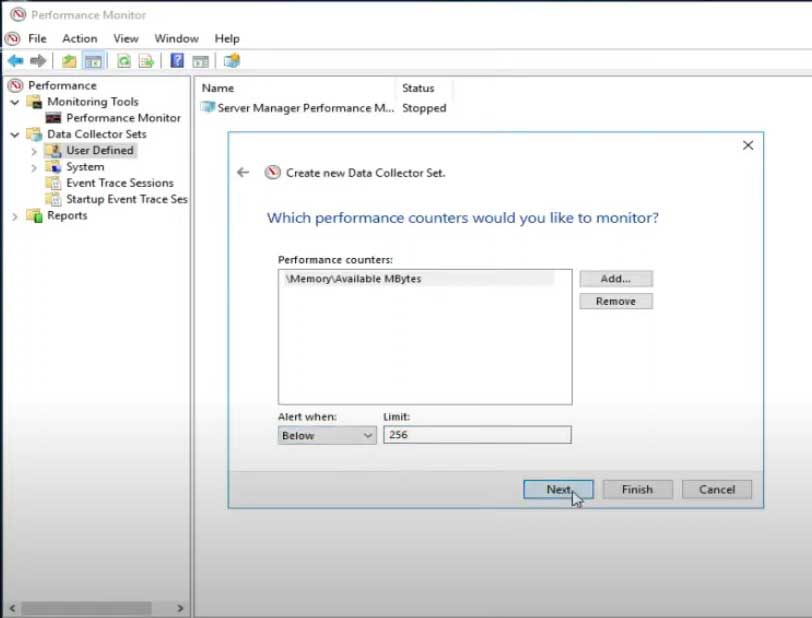
How to Extend Partition (with/without 3rd party free tool)
Way#1 : Expand partition using Disk Management (Windows built-in tool)
You can extend your partition using windows inbuilt utility called Disk Management only when you delete right side volume with the following terms:
- There is right side unallocated space(Deleting the right side volume is the only way to create unallocated space and expand drive in Disk Management.)
- The drive is not fat32 that you want to expand (Even with right side unallocated space, fat32 drive does not enable extend volume in Disk Management.)
- The free space is from a primary volume not a logical drive
- The disk must be GPT if you want to extend space to over 2TB to the disk (Free tool Partition Resizer can help convert mbr go gpt without losing data.)
Expanding a partition in Windows using Disk Management is a relatively straightforward process. Here are the steps to follow:
- Open Disk Management. You can do this by right-clicking the Start button and selecting Disk Management from the context menu.
- Locate the partition that you want to expand. You can identify it by its size and drive letter.
- Right-click the partition and select "Extend Volume" from the context menu.
- The Extend Volume Wizard will open. Click "Next" to proceed.
- In the next window, you will be asked to select the amount of space you want to add to the partition. The available space will be displayed in megabytes (MB). Enter the amount of space you want to add, or use the slider to select the amount. Click "Next" when you're done.
- In the next window, you will be asked to confirm your selections. Click "Finish" to start the partition extension process.
The partition will now be extended. The process may take a few minutes, depending on the size of the partition and the amount of space being added.
It's important to note that you cannot extend a partition if there is no unallocated space available on the disk. In such cases, you will need to shrink an existing partition to create unallocated space before you can extend the partition you want to expand.
For non NTFS drives, no unallocated space at the right side, you need a free tool called Partition Resizer.
Way#2 : Expand partition using Partition Resizer (100% free tool)
The best way, however, is to use the IM-Magic Partition Resizer Free edition to extend the partition. It is very easy and guarantees no loss of data in the process of extending the partition for free.
Video: how to shrink a volume and expand another one without losing data
For Windows 11/10/8/7 => Download Partition Resizer Free [100% Free]
For Windows Server 2025-2003 => Download Partition Resizer Server [Free Demo]
More Related Articles You May Like
Related Product
- IM-Magic Partition Resizer Server - Partition space redistributing software that works for Windows Server 2003-2025.