How to Add Space From D Drive to C Drive (Windows 11 / 10)
If your C drive is full and your D drive has free space, you may want to move that space to C. This guide explains the correct limitations of Disk Management and also shows an easier, no-data-loss method using IM-Magic Partition Resizer.
Why extend the C drive?
Windows updates, system files, and applications can fill the C drive quickly. Extending C helps improve performance and prevents update errors.
Method 1: Free Tool (Safer — No Data Loss)
A better method is using the free tool IM-Magic Partition Resizer. It lets you shrink D, move unallocated space, and extend C without deleting anything.
Video: Move disk space from D to C drive without data loss with free tool
For Windows 11/10/8/7 => Download Partition Resizer Free [100% Free]
For Windows Server 2025-2003 => Download Partition Resizer Server [Trial]
Steps with IM-Magic Partition Resizer
- Download and install IM-Magic Partition Resizer (Free Edition). (Download link is above.)
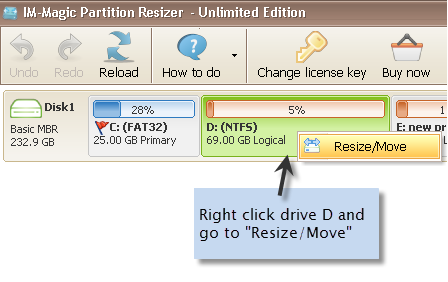
- Right-click D → Resize/Move → shrink it to create unallocated space. (Shrink the left border of the D drive, and then the unallocated space will be created at the left side of the D drive. Hover the cursor at the left border of the D drive, and you can shrink it when the cursor shows two arrows.)
- Move the unallocated space so it sits next to C by moving the partition that is next to the unallocated space.
- Right-click C → Resize/Move → add the unallocated space to the C drive by expanding the C drive border to add the space.
- Click APPLY CHANGES in the end, and you will have a large C drive.
Also read: How to move space from D to C drive
Method 2: Using Disk Management (Works Only by Deleting D)
Important limitations:
- You cannot shrink D and use the space to extend C.
- You cannot move partitions in Disk Management.
- You can extend C only if you delete the entire D drive to create unallocated space.
- There must be no Recovery or EFI System Partition between C and D.
Steps to Delete D and Extend C Using Disk Management
- Press Windows + X and click Disk Management.
- Locate the partitions: ensure the order is [ C ] [ D ] with no partitions in between.
- Right-click the D drive and choose Delete Volume.
- Confirm deletion.
This will turn D into **Unallocated space**. All data on D will be erased, so back it up first.
- Right-click the C drive and choose Extend Volume.
- Use the Extend Volume Wizard → click Next → accept the default maximum space → Finish.
- The C drive now expands into the formerly D space.
Warning: If a Recovery or EFI partition sits between C and D, you will not see the “Extend Volume” option for C. Disk Management cannot bypass system partitions.
FAQ
Can shrinking D extend C in Disk Management?
No. Shrinking D places unallocated space to the right of D, not next to C. Disk Management cannot move it.
Is deleting D the only way to extend C using Windows tools?
Yes — and only when D is directly beside C with no Recovery/EFI partition between them.
How to move space to the C drive from D drive in Windows 11/10 safely?
Use IM-Magic Partition Resizer, which can move and resize partitions without deleting D.
Keywords: how to add space from d drive to c drive, how to add space in C drive from D drive, how to move space to the C drive from D drive in Windows 11 10
How to Add Space in C Drive from E Drive (Windows 11 & 10)
Quick summary: You can transfer free space from E drive to C drive to fix low disk space issues. The easiest and safest method is to use the free tool IM-Magic Partition Resizer, which can shrink, move and extend partitions without data loss. A manual Windows method is also included below.
Why move space from E to C drive?
If the C drive is full, Windows updates may fail, apps may crash, and your system can slow down. Moving unused space from E to C gives Windows the room it needs to work properly.
Method 1 — Easiest: Use the Free IM-Magic Partition Resizer
This is the recommended method because Windows Disk Management cannot move partitions, but IM-Magic Partition Resizer can. This allows you to extend C even when the unallocated space is not next to it. The tool supports Windows 11, Windows 10, and earlier systems.
Soluton#1: Steps to Move Space from E to C Using IM-Magic Partition Resizer (Keep the E drive)
- Download and install IM-Magic Partition Resizer Free.
- Launch the tool, select the E drive, and right-click on E.
-
Choose the Resize/Move option, then drag the border (left side) of the E drive inward to shrink it and create unallocated space.
(If the E drive is next to the C drive, drag the left border of E inward to create unallocated space, click OK, and the unallocated space will appear on the right side of the C drive.)
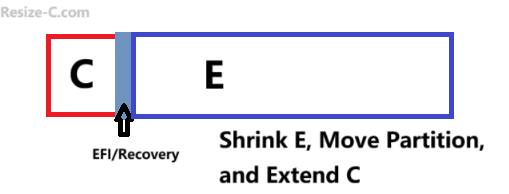
(If a Recovery or EFI partition sits between the E and C drives, then in Step 3-2, right-click the Recovery/EFI partition, choose the Resize/Move option in Partition Resizer, move the entire partition to the right when the cursor shows four arrows, and click OK.) - Right-click the C drive, choose Resize/Move, and drag its border to include the unallocated space. Then click OK.
- Click Apply and allow the tool to complete the process.
This method avoids deleting partitions and is suitable even for beginners. It lets you preview operations before applying them and avoids common limitations found in Windows Disk Management.
Note: If a Recovery or EFI partition stands between the C and E drives, then Step 3-2 adds the action of moving the Recovery/EFI partition after Step 3.
Solution#2: Merge E and C Drives to C Using IM-Magic Partition Resizer (Combine the E disk space into C to keep the whole E drive as a sub folder under the C drive)
- Download and install IM-Magic Partition Resizer Free.
- Launch the tool, right-click on E, choose "Merge Partitions"
- Choose the C drive and then combine E and C into one C drive, click OK
(If a Recovery or EFI partition sits between the E and C drives, then it's better use the first option, not this merge option.) - Click Apply and allow the tool to complete the process.
This method can merge E and C drives into one C drive and keep all data on the E drive to be a sub folder in the C drive.
Note: If a Recovery or EFI partition stands between the C and E drives, then the Solution#1 will be better. If you insist on combining the E and C drives, first delete the Recovery partition, extend the C drive, and then merge the C and E drives. If the EFI sits there, no way of combining the E and C into one C drive.
Method 2 — Manual approach using Windows built-in tools
Overview
Windows Disk Management allows shrinking and extending partitions, but only works when unallocated space is directly next to the C drive. If D or other partitions are in between, Disk Management will not extend C, and you cannot move partitions using built-in tools.
Steps (high level)
- Back up your files before modifications.
- Open Disk Management and Shrink E to create unallocated space.
- If unallocated space isn’t adjacent to C, you must delete the partition between them (data loss risk!) or use a safe tool like IM-Magic.
- Right-click the C drive and choose Extend Volume when possible.
Safety Tips Before Resizing Partitions
- Back up important data to an external drive or cloud.
- Close running apps and temporarily turn off disk encryption like BitLocker.
- Only apply changes after previewing the operation plan.
Frequently Asked Questions (FAQ)
Q: Can I move space from E to C without deleting E?
A: Yes. Tools like IM-Magic Partition Resizer can shrink and move partitions without deleting E. Windows Disk Management alone may require deleting partitions if they block the C drive.
Q: Is IM-Magic Partition Resizer really free?
A: The free edition supports moving, shrinking, and extending partitions. Advanced or server features may be paid.
Q: Is resizing partitions safe?
A: Normally yes, but always back up important data because power loss or hardware issues can cause partition errors.
Q: Does this work on Windows 11?
A: Yes. Both methods work on Windows 11 and Windows 10. IM-Magic Partition Resizer also supports both systems.
Final note: If you want the simplest and safest approach, choose IM-Magic Partition Resizer first, then follow its resize wizard step by step.