2 Free Ways to Disable Low Disk Space Red Bar
Summary
About the worst nightmare of any computer user is the red bar alert on the hard disk. The colour red does not come with something good; it is always an omen that something is definitely wrong something somewhere. This is encountering the red colour on the disk bar is something you should be very wary of and not take with levity. In most cases, it means your computer’s memory is really running low.

Table of Contents
Reasons for the Disk Red Bar
As aforementioned, there are many reasons for the red colour on the disk space bar. While it may be that your disk is running low, in some other cases, it is not that. One of the cases that may cause your disk space showing may because your PC has been running very slow. Whenever this happens, you have some other problems like your computer taking very long loading up. Another reason why you may put your disk bar in red colour is if a partition of your hard disk is stuffed with junk files. What this means is that while your hard disk may be free, if the partition that runs your OS is crammed full, you may have that part of the partition show the red bar telling you to free up some space off that partition. Above all, the most known reason for red space bar on your computer disk is simply that you are running out of memory.
Remove the Low Disk Red Bar Warning - 7 Fixes
How to disable low disk space warning message for C or D or a volume?
The low disk space warning message is a system notification that alerts you when your computer's hard drive is running out of free space. While this warning is helpful, it can also be annoying and distracting, especially if you have limited storage space or frequently work with large files.
#1 Disable the message from Control Panel
Here are some steps to disable the low disk space warning message in Control Panel:
- Click on the Start menu and select "Control Panel."
- Click on "System and Security," then select "Administrative Tools."
- Double-click on "Computer Management" and select "Disk Management."
- Right-click on the drive that you want to disable the warning for and select "Properties."
- Click on the "Quota" tab and uncheck the "Enable quota management" checkbox.
- Click "Apply" and then "OK" to save the changes.
#2 Disable the warning from Registry Editor
Alternatively, you can also disable the low disk space warning through the Registry Editor:
- Press the Windows key + R to open the Run dialog box.
- Type "regedit" and press Enter.
- Navigate to HKEY_CURRENT_USER\Control Panel\Desktop.
- Locate the value named "LowDiskSpaceMinimumMB" and double-click on it.
- Change the value data to 0 and click "OK" to save the changes.
- Close the Registry Editor and restart your computer for the changes to take effect.
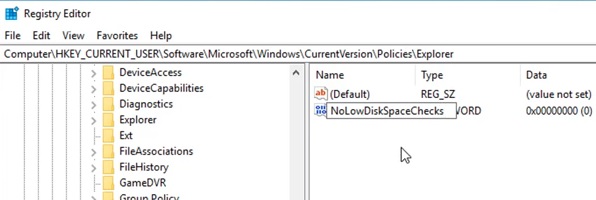
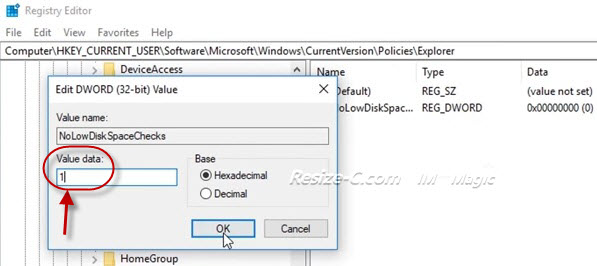
Or you may create an item in HKEY_CURRENT_USER under the folder of Explorer by giving the name NOLOWDISKSPACECHECKS and then set the value data to 1.
Please note that disabling the low disk space warning message can lead to problems if you run out of storage space. Therefore, it is recommended that you regularly monitor your disk space usage and take necessary actions to free up space as needed.
While we have identified that out of the many reasons for the red colour on the disk bar, low memory is the most common cause; it is time to know the different solutions to solving the low disk red bar.
#3 Move files from one drive to another. The first solution to the low disk space red bar is to move your very important folders off the partition that has the red bar on it and move it to another partition. 
Also read: how to move files from c to d drive to save space
#4 Disk clean up on the partition to free it of all junks that may be cluttering the space. 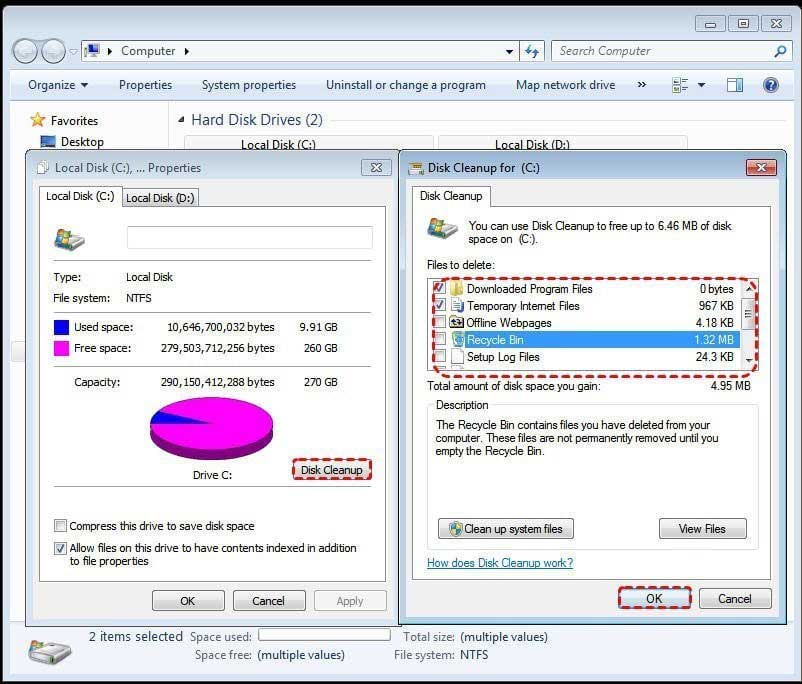
To launch the Disk Cleanup option, right click on the partition you want to action. Click on Properties and then Disk Cleanup. The function will run a scan on the partition and recommend what to clean. Once you click the ok button, it begins the Disk Cleanup process.
#5 Delete all the temporary files and caches of every application. This may seem like a solution that may not have much effect in freeing your disk space. However, the solution does so much in the long run than you give it credit for.
#6 Uninstall all applications and delete folders which are not need of anymore. So many things, we leave many large redundant files on our hard disk. Clean up all the files and applications you no longer need on your computer,and you will be amazed at how much space you would have.
#7 Extend Partition with Partition Freeware IM-Magic Partition Resizer Free
The ultimate solution is using the amazing IM-Magic Partition Resizer Free. With the freeware, you can extend the volume of your hard disk. That automatically removes the red bar from the disk bar. Is is a 100% safe and free program to manage partitions, if you use Windows 11/10/8/7XP/Vista, you can use it for completely free. And it is very easy to use , you can just drag the mouse to resize your partitions.
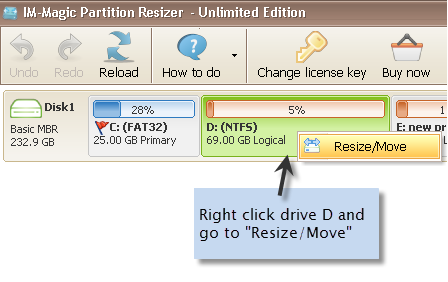 Extend partition with partition freeware

Steps to reallocate disk space to c drive (Add 50+GB space to c if possible)
Watch the following video that will show you how to use free tool Partition Resizer to redistribute disk space from one to another on the same disk without losing data.
More Related Articles You May Like
Related Product
- IM-Magic Partition Resizer Server - Partition space redistributing software that works for Windows Server 2003-2022.