Extend Volume Greyed Out Windows Server 2019 Solutions - 2 ways
Summary
Sometimes, you may find that the “Extend Volume” option in the Disk Management module is greyed out on Windows Server 2019 when you try to extend your partitions. Don’t worry! This article will show you how to extend a partition even when the "Extend Volume" option is greyed out.

Updated on 2026/06/3
by Andrew Wright
Table of Contents
The Scenario: Extend Volume Greyed Out on Windows Server 2019
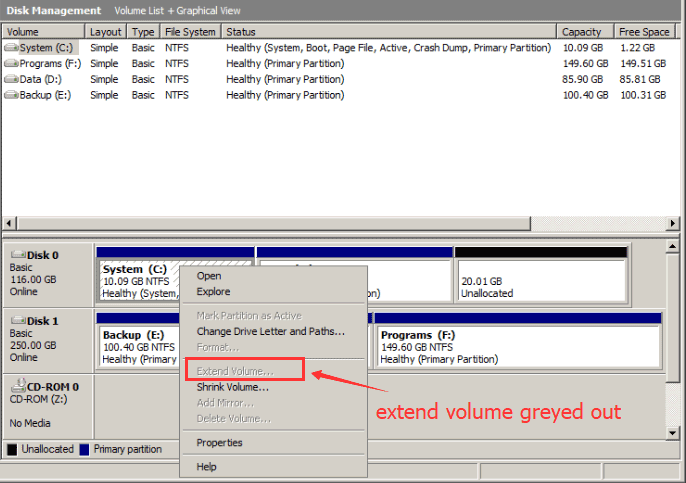
You may have experienced a situation where, when you try to extend a specific partition that is running out of space, you open Disk Management, right-click the partition, and—Voila!—the extend partition option is greyed out, leaving you unable to do anything about it.
 How to Extend Partition when Extend Volume is Greyed Out
Fortunately, this article provides a solution to enable the Extend Volume option in Disk Management, as well as methods for safely resizing partitions without losing data, using IM-Magic Partition Resizer SERVER.
#1 How to Extend Partition in Disk Management when Extend Volume is Greyed Out in Server 2019
Disk Management can't extend a volume in the following cases:
- There is no unallocated space next to the drive you want to expand. Fix: You can create unallocated space by deleting the adjacent volume. Then, the Extend Volume option will be enabled if the partition is NTFS and no recovery partition is in the way.
- The disk is MBR and limited to 2TB. Fix: You need to convert the disk to GPT if you want to exceed 2TB. IM-Magic Partition Resizer Server can convert an MBR disk to GPT without data loss.
- The drive is not NTFS (it cannot extend FAT32 partitions). Fix: Since you can't convert the OS drive (C:) from FAT32 to NTFS directly, your best option is to use a third-party tool like IM-Magic Partition Resizer, which can resize any partition without data loss, and works with both NTFS and FAT32.
- The unallocated space is from another disk without RAID. Fix: To redistribute disk space from another disk, you need to set up RAID.
Also read: How to extend FAT32 partitions
Resolution: Delete volume to create unallocated space, and then extend the volume in Server 2019
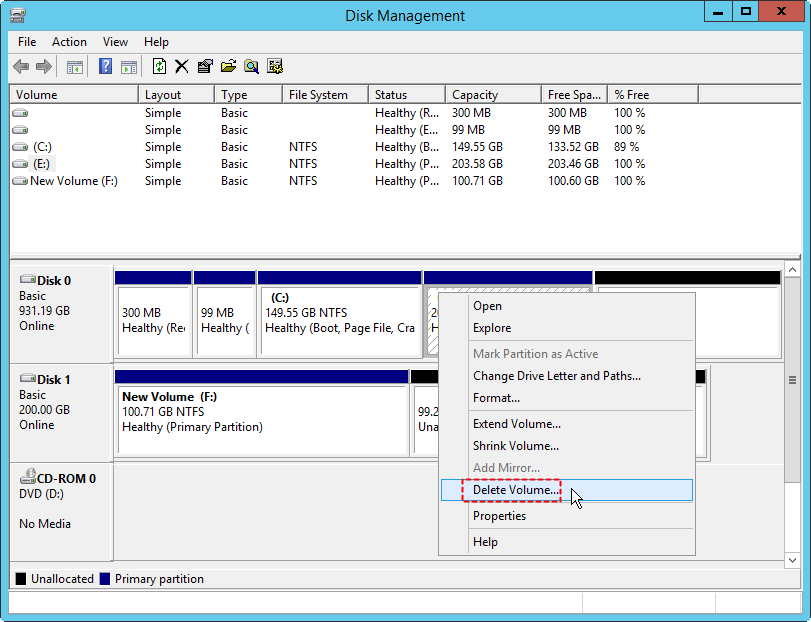
Backup Partition Before Deletion
Before deleting any data, please back up the drive to another one. You can do this by simply copying the files, or by using the IM-Magic Partition Resizer tool to fully clone one partition to another.

Also read: How to copy partition to bacup data
Video - How to shrink/delete a volume in Disk Management to extend a volume (without using any third-party software)
Note: If the unallocated space is not next to the C: drive (or whichever drive you want to expand), or other issues are present (e.g., MBR disk, non-NTFS partition, extended partition), the Extend Volume option will still be disabled. These issues can easily be resolved by using IM-Magic Partition Resizer Server, which can extend, shrink, merge, convert, and move partitions without data loss.
Extend volume greyed out due to the recovery partition
Problem: Extend volume would grey out if there is recovery partition or OEM partition stands in the way.
Solution: Move or delete the recovery partition. (Disk Management cannot move or delete the recovery partition)
#2 Extend Partitions with IM-Magic Partition Resizer Server
Besides managing disk space without data loss, IM-Magic Partition Resizer can also help clone disks, migrate OS, convert disks to GPT without data loss, check and repair bad sectors, fix logical damages, and more.
For Windows 11/10/8/7 => Download Partition Resizer Free [100% Free]
For Windows Server 2025-2003 => Download Partition Resizer Server [Free Demo]
Note: Extending a volume requires unallocated space. Here are a few ways to create unallocated space:
- Shrink a large volume, then move the volumes in between to place the unallocated space next to the drive you want to expand.
- Delete a volume.
- Add a new disk to the RAID array.
[Guide] Steps to extend a volume without data loss using IM-Magic Partition Resizer Server
 This step-by-step guide will show you how to extend any volume using IM-Magic Partition Resizer.
Step 1: Download, install, and launch the program.
Step 2: Right-click the large volume to create unallocated space.

Steps to resize your disk partition
Step 3: Right-click C: and drag the border to acquire the free space if the unallocated space is next to the drive you want to expand. If not, right-click the in-between partition to move it, then extend C:.
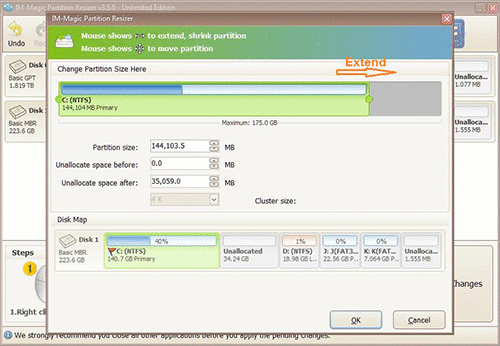
Steps to resize your disk partition
Step 4: Apply the changes in the software to implement the adjustments.
For more tutorials, feel free to visit https://www.resize-c.com/video/
Why IM-Magic Partition Resizer?
- 1. When deleting or shrinking a volume doesn’t work in Disk Management.
- 2. When unallocated space is not adjacent to the drive you want to expand (Partition Resizer can move unallocated space).
Video Tutorial to Extend Partitions on Windows server
#3 Disk Management vs. IM-Magic Partition Resizer
| Disk Management | IM-Magic Partition Resizer* | |
|---|---|---|
| Extend NTFS Partition with Adjacent Unallocated Space on the Right Side |  |
|
| Extend FAT32 Partition | NO | |
| Move Unallocated Space | NO | |
| Move Partition | NO | |
| Move System Reserved/Recovery Partition | NO | |
| Delete System Reserved/Recovery Partition | NO | |
| Convert Disk to GPT without Losing Data | NO | |
| Clone Disk | NO | |
| Migrate OS | NO | |
| Download |
Download for Windows 11-7 (100% Free) Download for Windows Server (Free Demo) |
IM-Magic Partition Resizer has a free version for Windows PC platforms, from XP, Vista, 7, 8 to 11. For Windows Server OS, Partition Resizer Server offers more stable functions to help manage disk space on Windows Servers.
Please download the appropriate edition as needed.
More Related Articles You May Like
Related Product
- IM-Magic Partition Resizer Server - Partition space redistributing software that works for Windows Server 2003-2025.