How to Move a Partition to the End of the Disk with IM-Magic Partition Resizer
If you are looking for a reliable way to move a volume drive to the end of the disk, IM-Magic Partition Resizer is one of the safest and easiest tools available. This guide explains how to move a disk partition to the end of the disk and covers several real-life scenarios such as moving the D drive, Recovery partition, or EFI partition.
Content links
- Move D drive to end of disk (C, D, Unallocated | C, D, E, Unallocated | C, D, E) -->[Watch Video Guide]
- Move Recovery to end of disk? (System reserved recovery partition) -->[Watch Video Guide]
- Move EFI to end of disk? --> [Watch Video Guide]
Why Use IM-Magic Partition Resizer?
Windows Disk Management cannot move partitions/volumes. IM-Magic Partition Resizer overcomes this limitation by offering advanced features with a simple interface.
- ✔ Move partitions without data loss
- ✔ Supports system, data, Recovery, and EFI partitions
- ✔ Compatible with HDD & SSD
- ✔ User-friendly drag-and-drop interface
- ✔ 100% data and OS safe
- ✔ Roll back protection even from power surge when resizing partitions
Note: Moving a partition is based on the presence of unallocated space (shrinking or deleting a partition will create unallocated space). Partition Resizer can change the position of the unallocated space to the left or right.
For Windows 11/10/8/7: Download Partition Resizer Free [100% Free]
For Windows Server 2025-2003: Download Partition Resizer Server [Free Demo]
Common Cases to Move a Partition to the End of the Disk
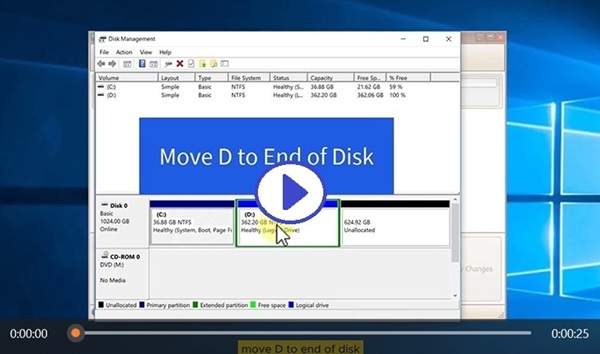
Case 1: Move D Drive to the End of the Disk (Video included below)
Partition Map#1: C, D, Unallocated -> Move D to end of disk

This is the most common scenario. Many users want to extend the C drive but unallocated space is blocked by the D partition.
- Problem: Unallocated space is not adjacent to C drive
- Solution: Move D drive to the end of the disk
- Result: Unallocated space becomes next to C drive
IM-Magic Partition Resizer allows you to drag the D partition to the far right, making space available immediately 👍.
Video: How to move D drive to end of disk (C, D, Unallocated)
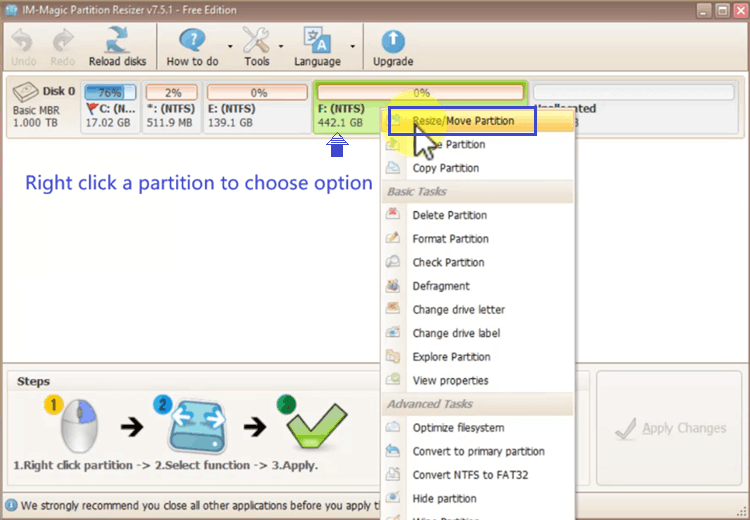
Steps:
- Download Free (WinXP-11) | Download Free Demo (Win Server), install and open Partition Resizer
- Right click D, choose 'Resize/Move Partition'
- When the cursor shows cross arrows, drag the whole D drive right to the end, click OK
- Click APPLY CHANGES, and then the D will be moved to the end
Partition Map#2: C, D, E, Unallocated -> Move D to end of disk

Video: How to move D drive to the end of the disk (C, D, E, Unallocated; C, D, E)
Note: When other partitions prevent moving drive D to the end of the disk, you can either shrink or delete a partition to create unallocated space at the end first. Then copy drive D to the end, delete the original D, and rename the new partition to D.
Alternatively, you can delete the remaining partitions and then move drive D to the end.
Partition Map#3: C, D, E -> C, D, E, Unallocated -> Move D to end of disk
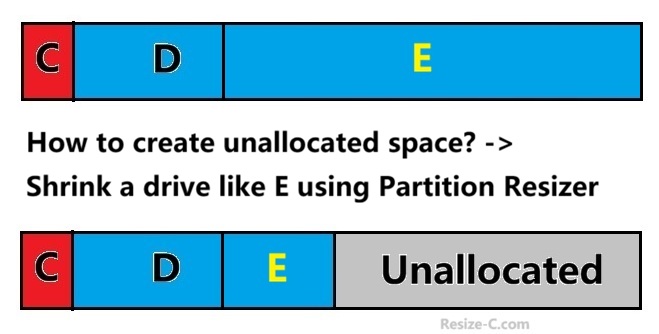
As shown in the image above, if your disk partition map is completely filled with drives, how can you create unallocated space? You can use Partition Resizer to shrink a volume, which will create unallocated space. Then, repeat the process shown in partition map #2.
The steps are included in partition map#2 video. Please check above video.
Case 2: Move Recovery Partition to the End of the Disk

Video: How to move healthy system reserved recovery partition to end of disk
Note: Relocating or removing the recovery partition will disable the existing OS recovery environment. If recovery is no longer required, the partition can be deleted. Typically, the operating system will recreate a new recovery partition during a future major update.
Best Solution: Create System Reserved recovery partition at the end of the disk, watch the following guide.
Move the Recovery to end of hard disk?
Solution#2: Delete D, move recovery to end of disk using Partition Resizer (please copy D partition to another disk before the deletion)
Steps:
- Open Partition Resizer, right click D, choose option 'Copy Partition' (Please copy it to another disk for backup first)
- Right click D, choose option 'Delete Partition', confirm, click OK
- Right click the Recovery, choose option 'Resize/Move Partition'
- Hover the mouse on the Recovery, when the cursor shows cross arrows, drag the Recovery to the end of the disk
- Click APPLY CHANGES
Also read: How to move recovery partition to end of disk
Solution#3: Delete the recovery using Partition Resizer
Move the Recovery partition to the end of the disk? You can also delete it directly using the free tool Partition Resizer.
Why? Moving or deleting the Recovery partition will disable the operating system’s restore feature. If you choose to remove it, you can safely delete the partition. However, if you want to move it without risk, first back up both the C: drive and the Recovery partition to another disk using the Migrate OS Wizard in the free tool IM-Magic Partition Resizer.
Details: How to clone OS with recovery to another disk
Windows often places a Recovery partition between C drive and unallocated space, blocking extension.
- Recovery partition is usually small (500MB–1GB)
- Hidden and cannot be moved by Disk Management
- Essential for system repair ⚠️
With IM-Magic Partition Resizer, you can safely move the Recovery partition to the end of the disk without deleting it but the current OS restore will be disabled.
Case 3: Move EFI System Partition (ESP, including moving the EFI to end of disk)

Video: How to move EFI partition to extend C or end of disk
On GPT disks, the EFI System Partition may block disk operations.
- Required for UEFI boot
- Usually 100MB–300MB
- Must not be deleted ❌
IM-Magic Partition Resizer supports moving the EFI partition carefully, keeping the system bootable while reorganizing disk layout.
Steps:
- Clone D to another disk using Copy Partition option in Partition Resizer (Right click the D and then the option Copy Partition will show up)
- Delete D
- Right click EFI, choose 'Resize/Move Partition', hover the mouse on the Recovery, when the cursor shows cross arrows, move the EFI to the end of the disk, click OK
- Click APPLY CHANGES in the end
Note: If there are several volumes behind the EFI, you need to backup them all to another disk first, and then delete them all, and then move the EFI to the end. At last you may choose to copy all volumes back to the source disk again.
Case 4: Multiple Partitions Blocking C Drive Extension
In complex disk layouts, you may have:
- D drive + Recovery partition
- OEM partition + EFI partition
- Several logical partitions
IM-Magic Partition Resizer allows you to move multiple partitions step by step until all unallocated space is consolidated at the desired position.
How to Move a Partition to the End of the Disk (Step-by-Step)
Step 1: Launch IM-Magic Partition Resizer
Install and open IM-Magic Partition Resizer. All disks and partitions will be displayed visually.
Step 2: Select the Target Partition
Right-click the partition you want to move (D, Recovery, or EFI) and choose Move/Resize.
Step 3: Drag the Partition to the End
Drag the partition block completely to the right until it reaches the end of the disk.
Step 4: Apply Changes
Click Apply. The system may reboot to complete the operation 🔄.
More Cases
Important: Before proceeding with any operation that involves deleting a partition, use the 'Copy Partition' feature in Partition Resizer to create a backup of the partition on another disk.
Partition Map (C, Recovery, D, E) -> Task: Move Recovery to end of disk
Option1: Shrink E, clone Recovery to end of disk (the unallocated space shrunk from the E), disable the first Recovery, enable the cloned copy of the Recovery, delete the first Recovery
Our remark: The enabling and disabling the Recovery partition is depeneded on Windows, if you do not know the process, this method is not recommended since the enabling of another Recovery is another process that may be hard for you.
Option2: Delete the Recovery, simply give up the task of moving the recovery to the end since once the Recovery has been modified, the current OS restore feature is disabled. The new recovery will be automatically be created in the next Windows update.
C, EFI, D, E -> Task: Move EFI to end of disk
Option2: Delete E, Delete D, move EFI to the end (Please backup E and D to another disk first)
Important Tips Before Moving Partitions ⚠️
- 🔒 Always back up important data
- 🔌 Avoid power interruption
- 🧠 Do not force shutdown during operation
- 🛠 Use only trusted tools like IM-Magic Partition Resizer
Frequently Asked Questions
Is it safe to move a partition with IM-Magic Partition Resizer?
Yes. IM-Magic Partition Resizer uses data-protection technology to ensure files remain intact during partition movement.
Can I move partitions on an SSD?
Yes. The software fully supports SSDs and maintains proper alignment for performance ⚡.
Do I need to reinstall Windows after moving partitions?
No. When done correctly, moving partitions does not require reinstalling Windows.
Conclusion
If you need to move a partition to the end of the disk, whether it is the D drive, Recovery partition, or EFI system partition, IM-Magic Partition Resizer provides a safe, flexible, and beginner-friendly solution.
With proper preparation and the right tool, disk reorganization becomes simple and risk-free ✅.