Free to Remove Readonly Attribute in Windows
Sometimes, you may face difficulties in modifying files or saving new data to a partition when it is set as readonly. To make a partition writable, you need to remove the readonly attribute. This page provides step-by-step instructions on how to clear the readonly status on hard disk partitions for Windows computers.
Free Methods to Clear Readonly Status on Windows 7, 8, 10, 11
Follow any of these three free methods to remove the readonly attribute from partitions:
Method 1: Using Free Tool - Partition Resizer Free
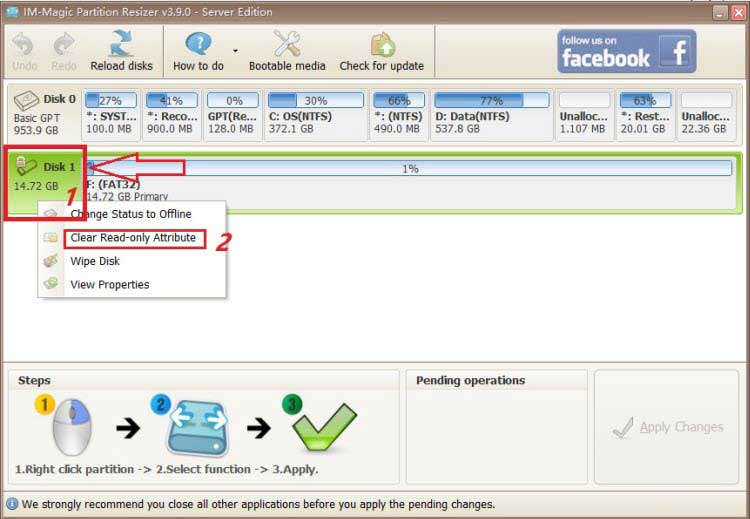
Use the free IM-Magic Partition Resizer tool to quickly remove the readonly attribute from your disk. Here's how:
- Right-click the disk in the software interface (on the left part of the disk icon).
- Select the option "Clear Read-only Attribute".
For Windows 11/10/8/7 ⇒ Download Partition Resizer Free [100% Free]
For Windows Server 2025-2003 ⇒ Download Partition Resizer Server [Free Demo]
Method 2: Removing Readonly Attribute via File Explorer
You can modify the permissions of a partition directly in File Explorer:
- Open My Computer (or This PC on Windows 10/11).
- Right-click the readonly partition and select Properties.
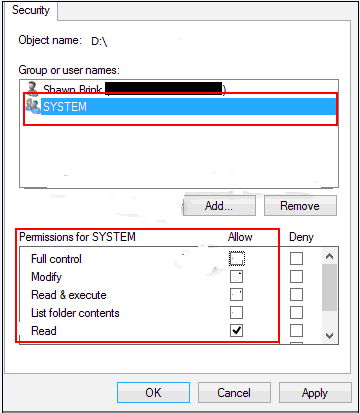
- Navigate to the Security tab and click the Edit button.
- Select your username under the list and modify the permissions under Permissions for system.
- Click OK to save the changes.

Method 3: Using Diskpart in Command Prompt
Diskpart is a built-in Windows utility that allows you to manage partitions. To remove the readonly attribute:
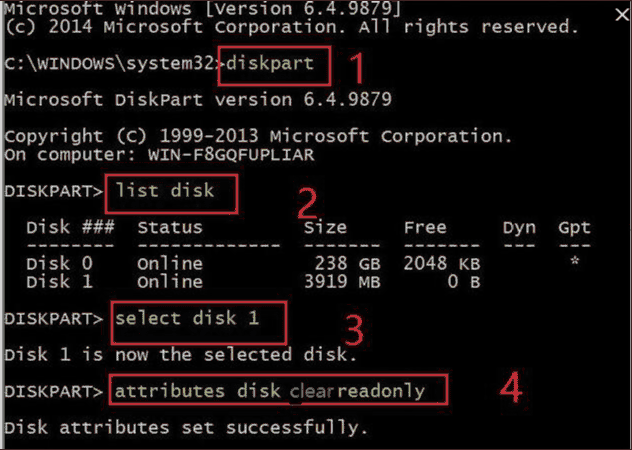
- Open Command Prompt as an administrator.
- Type diskpart and press Enter.
- Type list disk and identify the disk with the readonly attribute.
- Type select disk X (replace X with the disk number).
- Type attributes disk clear readonly and press Enter.
Removing Readonly Attribute in Windows XP
Windows XP lacks some of the features available in newer versions. However, you can still remove readonly attributes from files or folders using these methods:
Method 1: Using Properties Menu
- Open My Computer and locate the readonly file or folder.
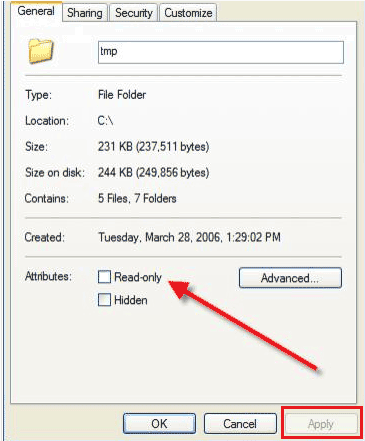
- Right-click it and select Properties.
- Uncheck the Read-only option under the General tab and click Apply.
- Click OK to confirm the changes.
Method 2: Using Attrib Command
- Click Start and select Run.
- Type the following command and press Enter:
attrib -r +s drive:\path\foldername
Example:attrib -r +s d:\myfile
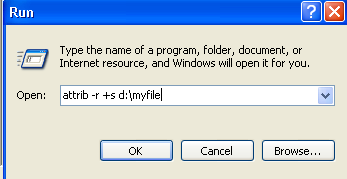
Note: These methods can also be used in newer versions of Windows to remove the readonly attribute from files or folders.
Freeware to Remove Readonly Attribute
You can use IM-Magic Partition Resizer, a free tool compatible with Windows XP, Vista, 7, 8, 10, and 11, to manage readonly attributes:
- Right-click the partition and select "Remove readonly attribute".
- Confirm the action and click "Apply Changes".
More Related Articles You May Like
- free to check partition for errors and bad sectors - free methods to check disk partition for errors and repair problems on it...Read more >>
- free to defragment hard drive on windows pc - free to defragment hard disk partition on windows xp, vista, 7, 8 ,10...Read more >>
- free to defragment hard drive from command prompt - how do you defragment hard drive with command line on your computer...Read more >>
- free to convert logical partition to primary partition - free solutions for logical drive to primary partition converting on windows...Read more >>
- free to convert primary partition to logical partition - free to change primary partition to logical with free methods...Read more >>
- free to delete all partitions on windows xp 7 8 10 - free to delete all partitions on a hard disk or removable disk on windows...Read more >>
- free to hide disk partition in windows xp vista 7 8 10 - how do you hide disk partition to protect private data on windows computer...Read more >>
- cannot initialize disk external hdd that shows uninitialized - free to initialize hard disk drive external hdd when it shows uninitialized on computer...Read more >>
- free to initialize disk on windows xp 7 8 10 - how can you initialize hard disk drive on Windows XP, vista, 7, 8, 10 for free..Read more>>
- free to set readonly attribute for disk partition - free solutions for windows users to set a hard disk partition readonly...Read more >>
Related Product
- IM-Magic Partition Resizer Server - Partition space redistributing software that works for Windows Server 2003-2025.