Windows XP/Vista/7 Partition Tool
Are you looking to manage disk space on Windows XP by repartitioning your hard drive? Windows XP Disk Management offers basic functions such as formatting partitions, deleting partitions, and changing drive letters and paths. However, what if you want to resize your hard drive to reallocate space without losing any data? For example, you may want to move free space from another partition to your C drive if the C partition reports low disk space warning message. To do this safely, you need a partition tool that allows you to resize your hard drive on Windows XP without losing data.
| Disk Management | Symantec PartitionMagic | Partition Resizer | |
| Windows 2000/XP |  |
|
|
| Windows Vista/7/8/10/11 | |
NO | |
| Shrink fat32 partition | NO | |
|
| Extend fat32 partition | YES when unallocated space at right side |
|
|
| Extend fat32 C drive | NO | |
|
| Clone disk/partition | NO | |
|
| Convert logical to primary | |
|
|
| Convert MBR to GPT without Data Loss | NO | |
|
| Extend ntfs C drive | YES when right unallocated space is available in Windows 11/10/8/7, not available in Windows XP | |
|
| Move unallocated space or partition | NO | |
|
| Price | FREE | Trial | FREE |
| Not available by Official, only for Windows XP/2000 | Download Win 11-7 (100% Free) Download Win Server (Free Demo) |
Free Partition Tool for Windows XP
If you prefer not to risk data loss when repartitioning, or if you need more flexibility, you can use third-party partition tools such as IM-Magic Partition Resizer Free. This tool allows you to resize partitions without deleting any data, making it a safe option for reallocating space.
IM-Magic Partition Resizer Free ensures 100% data and OS safety, providing a risk-free partitioning solution. Unlike other partitioning tools, IM-Magic Partition Resizer uses a unique algorithm that guarantees the preservation of your data and operating system during the partitioning process. This means you can safely resize, move, and merge partitions without the fear of losing important files or damaging your system.
With IM-Magic Partition Resizer Free, you can:
- Resize partitions safely: Extend or shrink partitions without data loss, even your system (C) drive.
- Move free space: Reallocate unused space from one partition to another to avoid running out of space on important drives.
- Merge partitions: Combine multiple partitions into one without the risk of data loss.
- Create new partitions: Allocate unused space to create new partitions, improving data organization.
- Modify partition sizes: Resize your partitions in a few clicks, with no risk to the operating system or personal files.
- Clone disk for backup.
- Upgrade OS disk to a larger hdd/ssd without OS reinstallation.
- Convert disk gpt without losing data.
- Move the recovery partition without losing data.
- Move partitions without losing data.
- And more.
This tool is ideal for users who want to manage their partitions on Windows XP without worrying about data loss or system crashes. IM-Magic Partition Resizer Free uses advanced technology to ensure 100% safety during every operation, so you can have peace of mind knowing your data and OS will remain intact.
More videos here: https://www.resize-c.com/video/
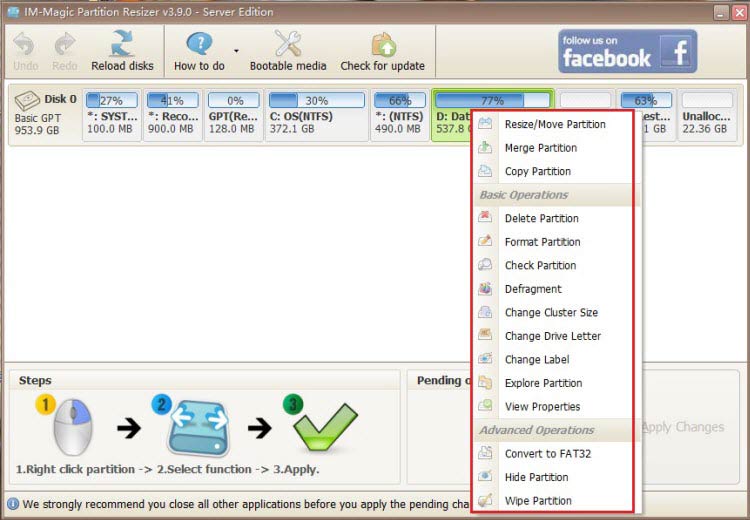
Here is a screenshot of what Partition Resizer looks like.
For Windows 11/10/8/7 => Download Partition Resizer Free [100% Free]
For Windows Server 2025-2003 => Download Partition Resizer Server [Trial]
Situations When You Might Need Windows XP Disk Repartitioning
There are several scenarios where you might consider repartitioning your hard drive on Windows XP:
- 1. System Partition Runs Out of Space: If your system partition (C drive) is running out of space, you can repartition your hard drive to move space from other partitions. This will help you avoid errors or slowdowns due to lack of disk space. For help, see our guide on system partition space issues.
- 2. Too Many Partitions: If your computer has too many partitions, it can become difficult to manage. You may want to merge partitions to reduce clutter and improve system performance.
- 3. Lack of Partitions: If you only have one or two partitions, you may want to create additional partitions for better organization. You can follow our guide on creating new partitions on your Windows XP system.
- 4. Other Reasons: You might have other specific needs for repartitioning, such as setting up partitions for different operating systems or organizing your data more efficiently.
How to Partition a Hard Drive on Windows XP Without Software?
Unlike newer versions of Windows (7, 8, or 10), Windows XP doesn't have built-in functionality for resizing partitions directly. However, you can still repartition your hard drive using Windows XP's Disk Management tool. Here’s how:
- Step 1: Access Disk Management by right-clicking "My Computer" and selecting "Manage." Then go to "Disk Management" under the "Storage" section.
- Step 2: Right-click on a partition and select Delete Partition to remove it and free up unallocated space.
- Step 3: Repeat the previous step for any other partitions you want to remove. The deleted partitions will appear as unallocated space.
- Step 4: Right-click on the unallocated space and choose New Partition. Specify the size of the partition you want to create. You can use the full unallocated space or leave some space for additional partitions.
- Step 5: Assign a drive letter to the new partition and wait for the system to format it.
Conclusion: By following these steps, you can easily create new partitions or resize existing ones using Windows XP's Disk Management. However, be cautious: deleting partitions will erase all data on them, so make sure to back up important files before proceeding.
Important Notes:
- Before deleting any partitions, ensure you have backed up all important data. Deleting a partition will erase all files stored within it. You can use an external hard drive or cloud storage to back up your files.
- Windows XP’s Disk Management tool is limited and does not offer the ability to extend or shrink partitions (except for deleting and recreating them). If you need more advanced features, consider using third-party partition software.
Last updated on 2026/06/02
More Related Articles You May Like
- how to fix low disk space warning in windows 7 - how can you resolve the problem when windows 7 says low disk space warning...Read more >>
- windows 7 extend volume grayed out - solution for partition increasing when extend volume is grayed out on windows 7...Read more >>
- how to extend system partition c on windows 7 - what is the solution for system partition size increasing on windows 7...Read more >>
- free to increase size of partition on windows 7 - increasing size of system partition, data volume on windows 7 for free...Read more >>
- how to create a partition in windows 7 - free download partition magic for windows 7 to create new volumes on windows 7...Read more >>
- windows 7 local disk c is running out of space - fix issue when windows 7 reports that local disk drive c is running on low disk space...Read more >>
- how to delete a windows 7 partition - partition software download to delete volume on windows 7 without using disk management...Read more >>
- partition software for windows 7 32 bit and 64 bit system - partition manager free download to resize disk on windows 7 32 and 64 bit...Read more >>
- add unallocated space to system partition windows 7 - how do you add unallocated space to system partition when windows 7 runs low on c...Read more >>
- expand c drive windows 7 vmware - free to expand the size of system partition c drive in vmware on windows 7...Read more >>
Related Product
- IM-Magic Partition Resizer Server - Partition space redistributing software that works for Windows Server 2003-2025.