Move or Delete OEM Partition in Windows 11 10 8 7 Vista XP
Do you want to delete OEM partition on Windows 10, 8, 7, Vista, XP since you want to add its space to another partition?
What is OEM partition?
OEM partition is a partition that is usually available in Lenovo, HP and Dell. Generally speaking, you may feel that OEM partition is not useful until you run into problem like system crash or system failures on your computer. If there is an OEM partition on your computer, you can restore your PC to factory settings or perform system recovery when you meet any PC problems.
Is it safe to delete an OEM partition?
Deleting an OEM partition, like those from HP or Dell, is generally not recommended. These partitions contain recovery tools, diagnostics, and factory settings essential for restoring the system. Removing them could prevent easy recovery if something goes wrong. Backup your system before considering deletion.
Content Navi
- #1 Move OEM/Recovery Partition instead of Deletion
- #2 Delete OEM/Recovery Partition using Free Tool Partition Resizer
- #3 Delete OEM/Recovery Partition using Diskpart CMD
#1 Move OEM/Recovery Partition Location instead of Deletion
Here is a method that helps get problem solved and get oem/recovery partition kept on your computer.
OEM partition in the way of c drive expanding?
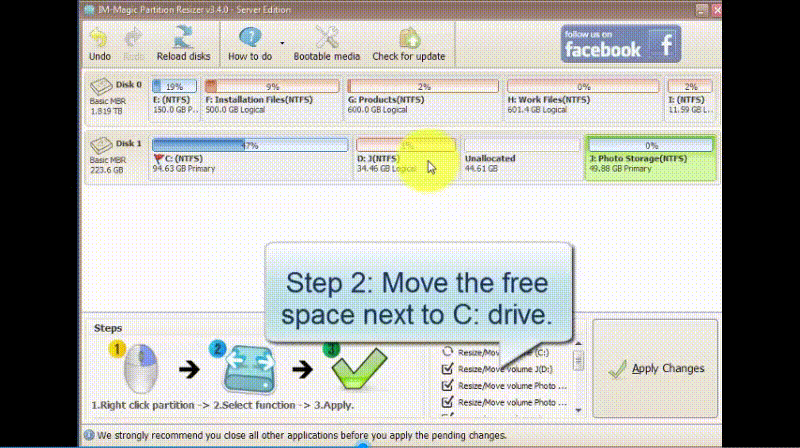
If the recovery partition or OEM partition stands inbetween the c drive and the unallocated space, you may use free tool IM-Magic Partition Resizer that can safely move the OEM/recovery partition without losing data and then the unallocated space will be moved to close the c drive.
Video: How to move recovery partition (It's the same way you try it with your OEM partition)
Example: Move the location of D drive and the unallocated space without losing data
Also read: how to move oem/recovery partition to the end of disk
For Windows 11/10/8/7/Vista ==> Download IM-Magic Partition Resizer Free (Free)
For Windows Server all versions ==> Download IM-Magic Partition Resizer Server (Free Demo)
#2 Delete OEM Partition on Windows with Free Partition Software
For most users, Diskpart command is not a good choice to delete OEM partition because it is usually difficult to handle. If so, you can use free partition software to easily delete OEM partition. IM-Magic Partition Resizer Free is a partition manger for Windows 11 10, 8, 7, Vista, XP, which helps delete OEM partition in a few simple steps.
1, Download and open Partition Resizer, the free tool.
2, Right click the OEM partition in free tool Partition Resizer, and go to Delete Partition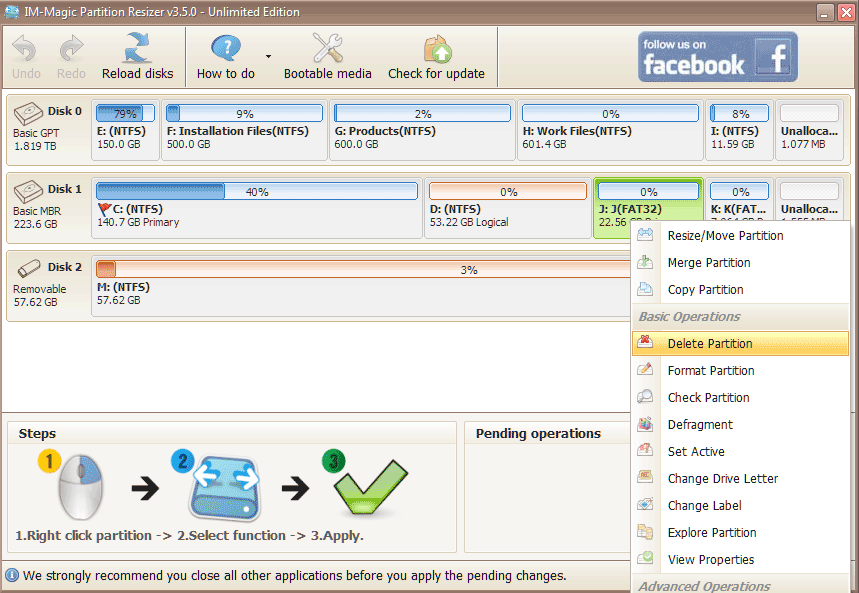
3, Confirm the deletion
4, Click Apply Changes to get the oem partition deleted.
#3 Diskpart to Delete OEM Partition in Windows
There is another utility on Windows, which enables you to delete OEM partition on your
computer. This utility is Diskpart command line.
Now, follow the steps below to delete OEM partition on Windows 10 by
running Diskpart command line:
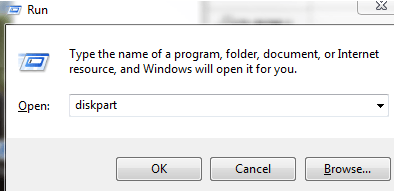
Step1. Press Win + R keys (or click Start button on taskbar and then click Run) to launch Run dialog box. Then type diskpart.exe in the box and click OK button.
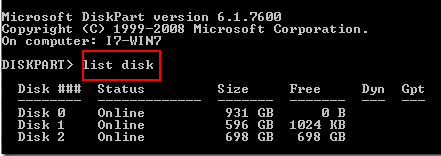
Step2. Type list disk and press Enter key so that it will
show all disks on your computer.
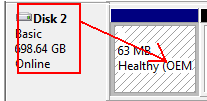
Step3. Go to Disk Management to check which disk the OEM partition is located on. Here, you
can see that OEM partition is under Disk 2.
Step4. Type select disk 2 and press Enter key

Step5. Type list partition and press Enter key so that it
will show partitions under disk 2.

Step6. Make it clear which partition the OEM partition stands for (for example, partition
1). Type select partition 1 and press Enter key.

Step7. Type delete partition override to delete the OEM partition.

FAQs
Question: Is it ok to delete oem reservered partition?
In general, it is not recommended to delete the OEM reserved partition on your computer. This partition is created by the computer manufacturer to store system recovery tools and other important files that are necessary for the proper functioning of your system.
If you delete the OEM reserved partition, you may not be able to use certain features or tools that are designed to work with your computer's hardware. In addition, deleting this partition could cause issues with system recovery, as you may not be able to restore your system to its original factory settings.
That being said, there are some situations where deleting the OEM reserved partition may be necessary. For example, if you are replacing your hard drive or upgrading your system, you may need to delete this partition to make room for a new operating system or recovery partition. However, in such cases, it is important to ensure that you have a backup of any important files or data before proceeding with the deletion.
In summary, it is generally not recommended to delete the OEM reserved partition on your computer unless you have a specific need to do so, and you have taken appropriate precautions to ensure that your data and system are protected.
Why Delete OEM Partition on Windows?
OEM partition offers a good chance for PC users to restore their computer back to original
state to fix some terrible PC issues. However, sometimes you may want to delete the OEM
partition on Windows PC due to following reasons:
1. OEM partition is not active, which is not visible on the My Computer on
Windows. Therefore, you cannot write data to this partition. You probably want to delete the
OEM partition since you do not think it is necessary to remain such an inactive partition on
your computer.
2. You do not think that you need to restore Windows 10, 8, 7, Vista or Windows XP back
to factory settings, so you want to delete the OEM partition.
3. Usually, OEM partition contains some available space. You may want to delete
the partition so that you can get some unallocated
space to add it to another partition on your computer that is running out of disk
space.
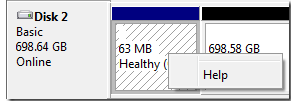
Disk Management Grayed out to Delete OEM Partition on Win 10 8 7 Vista XP
When saying delete partition on Windows, almost everybody thinks that it is an easy thing. Usually, you just need to open Disk Management and then right click the partition you want to delete and select Delete Volume (on Windows 10, 8, 7, Vista) or Delete Partition (on Windows XP) option so that you can delete the selected partition. However, Windows Disk Management only allows you to delete the data partition. Disk Management will gray out if you want to run it to delete an OEM partition under any Windows platform. Probably, you may only see Help option after right clicking an OEM partition on PC.
Read more to learn how to access Disk Management to delete partition:
Windows 10 Disk
Management
Windows 8 Disk
Management
Windows 7 Disk
Management
Windows XP Disk
Management