How to Wipe All Data from Disk Using IM‑Magic Partition Resizer
This guide provides clear, step‑by‑step instructions to completely erase all data from a hard disk drive (HDD) or solid‑state drive (SSD) using IM‑Magic Partition Resizer. Performing a full disk wipe ensures that previous files cannot be recovered, which is essential before selling, donating, or recycling a drive.
1. Before You Begin – Preparation & Precautions
Note: Please do not wipe your OS disk, or your computer will become unbootable. However, if you have an old OS disk, a dual-boot configuration, or more than one bootable operating system, and you want to remove one of them, you may use this option. Wiping disk data will also wipe the disk partition plans, which means the data and its partitions are gone forever, leaving the disk to be unallocated.
Proper preparation prevents mistakes. Follow these essential steps before launching the wipe procedure:
- Backup critical data – Copy any needed files to an external drive, cloud storage, or another internal disk. The wipe operation will make all existing data inaccessible.
- Identify the correct disk – Open Windows Disk Management (diskmgmt.msc) or the IM‑Magic interface to verify disk model, size, and label. Wiping the wrong disk (e.g., system drive) will cause OS failure.
- Close all running applications – Ensure no programs are accessing the target drive to avoid conflicts.
- Power stability – Use a laptop with sufficient battery or a desktop with UPS. Interrupting the wiping process may leave the drive in an inconsistent state.
- Administrator privileges – Run IM‑Magic Partition Resizer as administrator (right‑click → Run as administrator).
2. Download and Install IM‑Magic Partition Resizer
If you haven’t installed the software yet, download the official version from the IM‑Magic website. The tool offers a free edition that supports basic disk wiping functions (note: advanced wipe patterns might be in Pro version, but the “Wipe Disk” feature is typically included).
For Windows 11/10/8/7, dowload free software => Download for Win 11-XP [Free Software]
For Windows Server 2025-2003, Download free Demo => Download for Win Server [Trial]
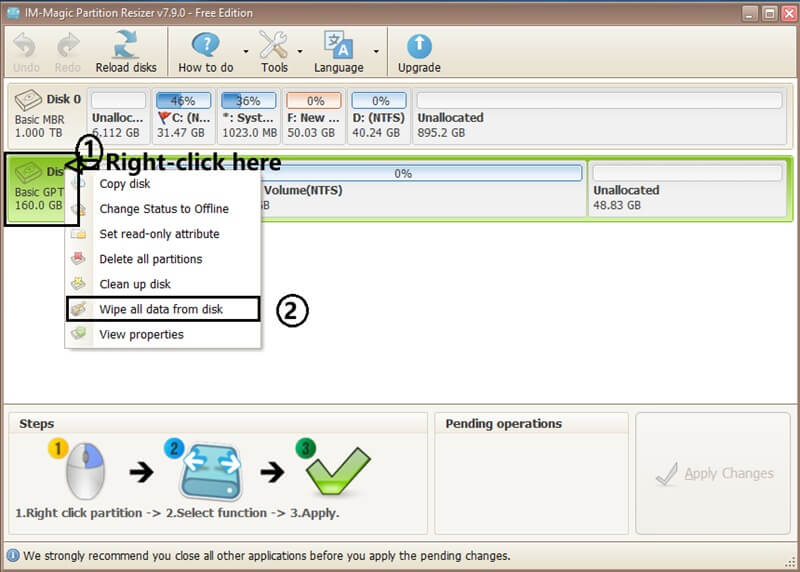
3. Locate the “Wipe Disk” Feature and Choose The Disk (Right-click)
IM‑Magic Partition Resizer provides a dedicated disk erasure utility separate from partition resizing. To access it:
- On the main dashboard, you will see a list of all physical disks along with their partitions.
- Right‑click on the disk you want to erase (not one partition, hover your cursor to the disk instead of the partition, and then right-click).
- And select “Wipe Disk” from the context menu.
Tip: If the “Wipe Disk” option is greyed out, ensure you selected the physical disk entry (e.g., “Disk 1”, “Disk 2”) rather than a volume letter (C:, D:).
Choose the Target Disk – Double Verification
After clicking “Wipe Disk”, a dialog box will appear showing disk details. This is your final checkpoint:
- Verify disk model name, total capacity, and interface type (SATA, NVMe, USB).
- Confirm that the listed disk matches the one you intend to wipe. For example: Disk 2: 500GB SAMSUNG SSD.
- If you have multiple drives of identical size, check additional identifiers like partition layout or unique serial number (shown in properties).
5. Select Data Wiping Method (Security Level)
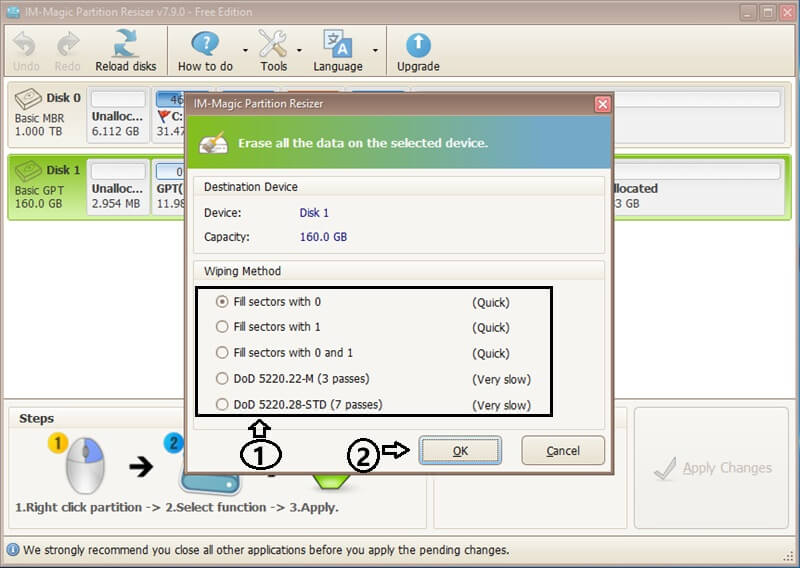
IM‑Magic Partition Resizer typically offers several wipe methods. The chosen method determines how many times data is overwritten. For most users, a single pass with zeros is sufficient to prevent software‑based recovery. For highly sensitive data, choose multi‑pass patterns.
- Quick Wipe (One Pass Zeros) – Overwrites all sectors with zeros. Fast and sufficient for general privacy needs. Recommended for SSDs to reduce wear.
- Quick Wipe (One Pass Ones) – Overwrites all sectors with ones. Fast and sufficient for general privacy needs. Recommended for SSDs to reduce wear.
- Quick Wipe (One Pass Zeros and Ones) – Overwrites all sectors with a pattern of zeros and ones. Fast and sufficient for general privacy needs. Recommended for SSDs to reduce wear.
- DoD 5220.22-M (3 passes) – US Department of Defense standard: Pass 1 writes zeros, Pass 2 writes ones, Pass 3 writes random characters. Offers stronger erasure for HDDs.
- DoD 5220.28-STD (7 passes) – Enhanced DoD standard: Performs 7 overwrite passes including alternating bit patterns and random characters. Provides a very high level of security for sensitive HDD data.
Our recommendation: For hard drives that will be reused or resold, the One Pass Zeros or DoD 3‑pass offers excellent protection without excessive time.
6. Confirm Wipe Operation & Execute
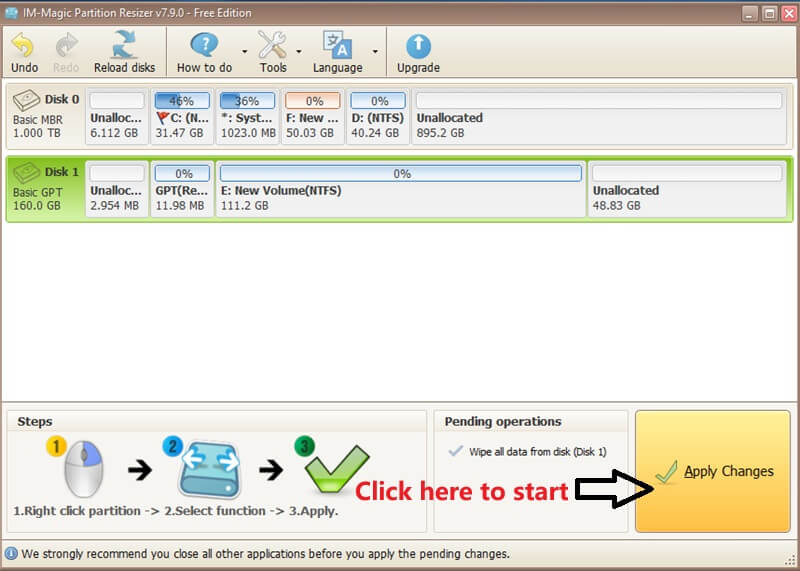
After you select the wiping method, you need to click 'APPLY CHANGES'. And the software will show a final confirmation message: “All data on disk X will be permanently destroyed. Continue?”
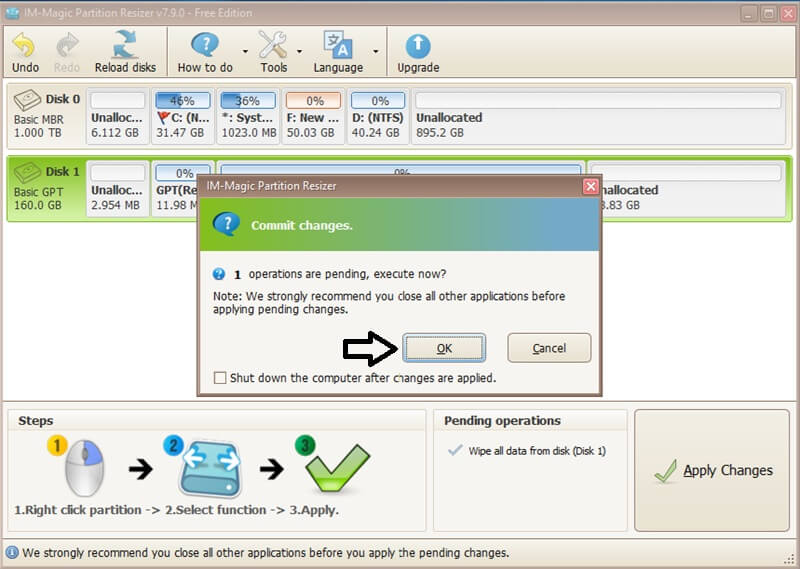
And then it will start to wipe the data once you click OK.
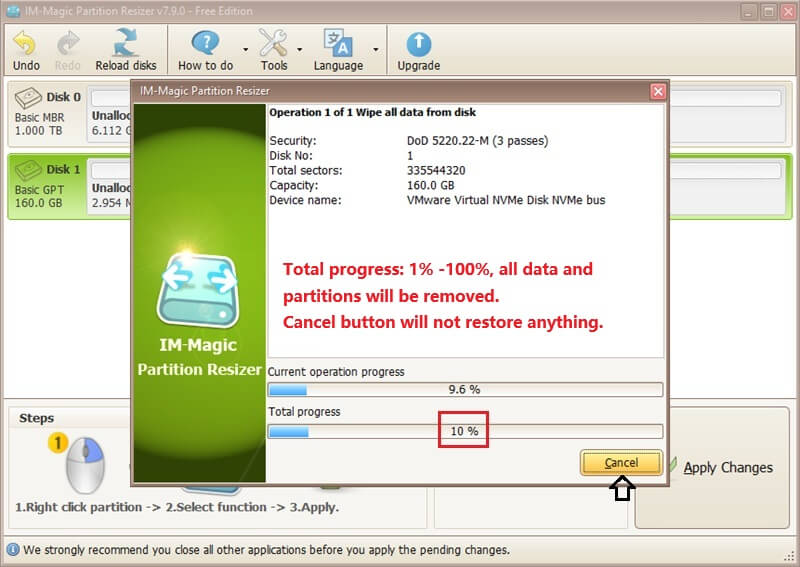
Total progress: 1% -100%, all data and partitions will be removed.
Cancel restores nothing — everything is gone. So please think carefully before confirming the wipe. Rollback protection will not work for this 'Wipe all data from disk' function. (Updated on June 8, 2026)
- Re‑read the warning and ensure the correct disk is highlighted.
- Click “OK” to start or Cancel to cancel your plan. IM‑Magic Partition Resizer may require a system reboot to perform the wipe outside Windows (especially if wiping the system disk or locked drive).
- If a reboot is required, the tool will schedule the operation and restart your PC. Let the process complete without interruption.
- During the wipe, a progress bar indicates the operation status. Do not force shutdown or unplug the drive.
Depending on the disk size and wipe method, this may take from a few minutes (small SSD, quick wipe) to several hours (2TB HDD, multi‑pass). Be patient.
7. After Wipe – Verify & Initialize the Disk
Once the wipe starts, the target disk will contain no partitions and unallocated space. Once it finishes, the disk is now completely clean and ready for new usage.
- Reinitialize: Open Disk Management (right‑click Start → Disk Management). The wiped disk will appear as “Unknown – Not Initialized”. Right‑click the disk label and choose Initialize Disk (GPT recommended for modern systems).
- Create new volume: After initialization, right‑click the unallocated space → New Simple Volume → follow wizard to format with NTFS/exFAT.
- Alternatively, you can use IM‑Magic Partition Resizer again to create fresh partitions.
Important Considerations & Troubleshooting
While the wipe process is straightforward, certain scenarios require additional attention:
- System/boot disk wipe: IM‑Magic Partition Resizer can wipe the OS drive, but you will need a bootable USB or another environment. The software often offers “Create bootable media” feature. If not, consider using the tool from a Windows PE environment.
- SSD wear leveling: For SSDs, standard overwriting might not erase all cells due to internal wear‑leveling. Use the built‑in ATA Secure Erase command if available in IM‑Magic. This sends a sanitize command that resets all flash blocks.
- USB external drives: The wipe feature works on external HDDs/SSDs connected via USB. However, verify stable connection; avoid using hubs without external power for large drives.
- Error “Disk is in use”: Close all file explorer windows and applications. If the error persists, restart Windows and immediately run IM‑Magic Partition Resizer without accessing the drive.
- Long wipe time: Multi‑pass wiping on a large HDD can exceed 6+ hours. You can let it run overnight. Ensure the PC’s sleep settings are disabled.
Frequently Asked Questions (FAQ)
Will wiping a disk with IM‑Magic Partition Resizer remove viruses or malware?
Yes — a full disk wipe destroys all data including any malicious code. After wiping, the drive is clean, but be aware that firmware‑level malware (rare) might persist. For standard threats, a wipe is sufficient.
Can I wipe only a specific partition instead of the whole disk?
IM‑Magic Partition Resizer includes a “Wipe Partition” feature for erasing individual volumes. This guide focuses on full disk wiping. For partition erasure, right‑click the partition and choose “Wipe” (similar process, but does not affect other partitions).
Is the free version of IM‑Magic Partition Resizer capable of wiping disks completely?
The free version typically includes the “Wipe Disk” function, but may limit advanced overwriting patterns. The one‑pass zero fill is generally included. Check the edition comparison on the official site.
After wiping, can I recover any data using tools like Recuva or EaseUS?
If you used a proper overwrite method (any one, Zero fill, or DoD), data recovery software will not retrieve original files. Unrecoverable by software means. However, hardware forensics might theoretically detect residual magnetism on legacy HDDs, but for personal use it is considered irreversible.