📀 Migrate OS Wizard: Clone OS Disk to Another Disk
📑 Table of Contents
Video: How to clone or upgrade to larger SSD/HDD FREE
🔧 Preparations (all scenarios)
- Prepare an empty destination disk (SSD or HDD) and connect it to your PC (internal SATA, NVMe, or USB enclosure). Cloning will erase all data on the target disk. Make sure all data on the destination disk have backup, and then delete all partition to make it unallocated.
- Download and install IM-Magic Partition Resizer. Run as Administrator.
- Backup important data before any disk operation.
- Identify your source disk partition style: Open Disk Management (right-click Start), right-click the disk label → Properties → Volumes tab. It shows MBR or GPT.
⚙️ Common cloning steps (apply to scenarios A, B, C)
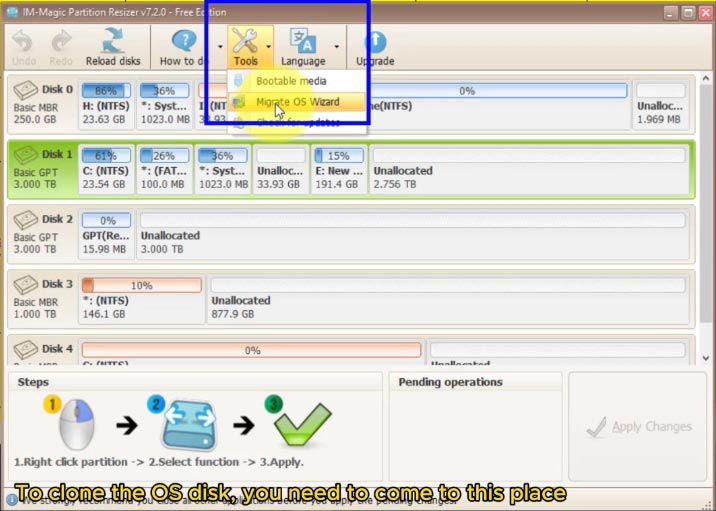
Launch IM-Magic Partition Resizer. On the top toolbar or under the Tools tab, click “Migrate OS Wizard”. The wizard will scan all connected disks.
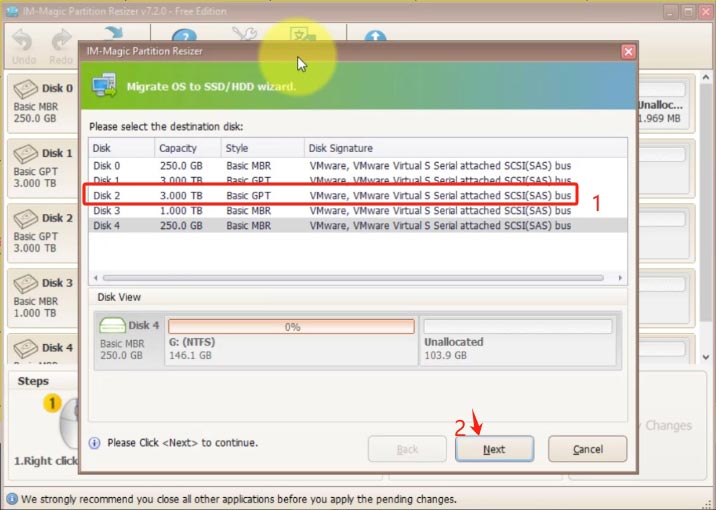
Choose your new empty SSD/HDD from the list. Confirm the disk model and size. Click Next. (If the disk contains partitions, the wizard will prompt to delete them – confirm only after backup.)
The wizard automatically fits system partitions to the target disk. You can drag sliders to resize the C: drive or leave unallocated space. Click Next.
Review the summary. Then click the green “Apply Changes” or “Execute” button. The software may ask to reboot into Pre-OS mode to complete cloning. Confirm the restart.
Do not turn off your PC during the cloning process. After completion, the system restarts. You may need to adjust boot order in BIOS to boot from the new disk.
📌 Three cloning scenarios
Source: MBR | Target: MBR (no style change)
Boot mode: Legacy BIOS or UEFI-CSM
Simple clone, works out of the box. Ideal for older systems.
Source: MBR | Target: GPT (conversion before clone)
Boot mode: UEFI (native)
Upgrade to GPT for >2TB disks and faster UEFI boot.
Source: GPT | Target: GPT (same style)
Boot mode: UEFI
Direct clone for modern systems already using GPT/UEFI.
🟦 Scenario A: Clone MBR OS Disk to MBR Disk
Use this when your target disk is also MBR and you want to keep legacy BIOS compatibility. The wizard preserves the MBR partition style.
- No extra conversion needed. The destination disk will become an exact bootable copy of your source OS (MBR style).
- Make sure your motherboard is set to Legacy + UEFI (CSM) or pure Legacy mode for booting.
- Follow the common steps 1–5 above. After cloning, enter BIOS and set the new MBR disk as first boot device (look for “Hard Disk Boot Priority” or similar).
🟩 Scenario B: Clone MBR OS Disk to GPT Disk (upgrade to UEFI)
GPT supports disks larger than 2TB and offers faster boot times with UEFI. To clone an MBR system disk to a GPT disk, you have two methods, cnverting before the cloning or after:
Method 1 – Pre-convert source OS disk to GPT using MBR2GPT (official Windows tool)
Convert the source OS disk to GPT before cloning:
- Run
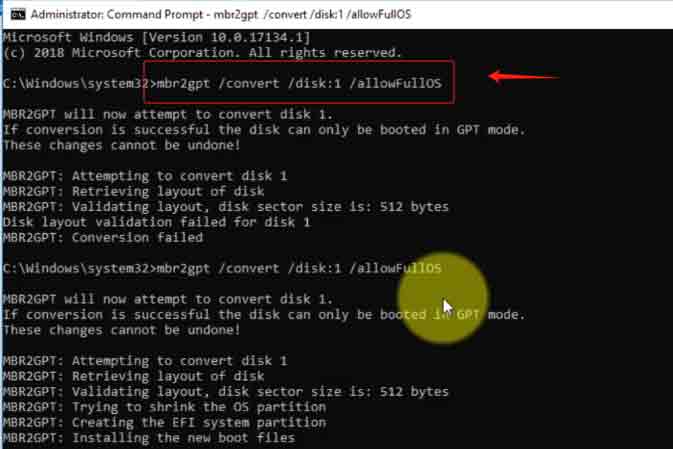
MBR2GPT.exefrom Windows 10/11 (v1703+). Open Command Prompt as Administrator. - Execute:
mbr2gpt /validate /disk:0(replace 0 with your source OS disk number). - Then run:
mbr2gpt /convert /disk:0. This converts the system disk to GPT and enables UEFI boot. Your PC will restart automatically. - After conversion, enter BIOS and switch from Legacy to UEFI mode. Boot back into Windows.
- Now the source disk is GPT. Use the Migrate OS Wizard normally (common steps 1–5) to clone it to your empty destination disk (which will become GPT). This is now a GPT → GPT clone (see Scenario C).
Method 2 – After cloning, convert to GPT using MBR2GPT (official Windows tool)
Convert the target OS disk to GPT after cloning: (The GPT disk must be empty, and it will automatically be changed to MBR since the source disk is MBR. Then you may convert the new OS disk to GPT after cloning with the same Windows built-in command MBR2GPT.)
- Run
MBR2GPT.exefrom Windows 10/11 (v1703+). Open Command Prompt as Administrator. - Execute:
mbr2gpt /validate /disk:0(replace 0 with your source OS disk number). - Then run:
mbr2gpt /convert /disk:0. This converts the system disk to GPT and enables UEFI boot. Your PC will restart automatically. - After conversion, enter BIOS and switch from Legacy to UEFI mode. Boot back into Windows.
- Now the source disk is GPT. Use the Migrate OS Wizard normally (common steps 1–5) to clone it to your empty destination disk (which will become GPT). This is now a GPT → GPT clone (see Scenario C).
MBR2GPT may fail for some cases, check out this page to know when mbr2gpt command can work.
🟪 Scenario C: Clone GPT OS Disk to GPT Disk (UEFI to UEFI)
If your source disk is already GPT (modern Windows installation with UEFI boot), cloning to another GPT disk is the most straightforward scenario. The wizard preserves UEFI boot structure.
Step-by-step for GPT → GPT clone
- Verify source is GPT: In Disk Management, right-click the disk label → Properties → Volumes. Partition style should show GUID Partition Table (GPT).
- Destination disk: The target disk can be uninitialized or already GPT. The wizard will handle formatting. For best results, leave the target disk as "Unallocated" space.
- Follow common steps 1–5 (Open wizard → select target → adjust layout → apply → reboot).
- The wizard automatically detects the source is GPT and creates required partitions on the target: EFI System Partition (ESP), MSR (Microsoft Reserved), and your C: drive.
- After cloning completes, restart and enter BIOS/UEFI settings. Ensure boot mode is UEFI (CSM disabled). Set the new GPT disk as first boot option – it will appear as "UEFI OS" or with the disk model prefixed by "UEFI".
What if the target disk is MBR (not GPT)?
If your destination disk is currently MBR, the Migrate OS Wizard can automatically convert it to GPT during cloning to match the source GPT disk. The wizard will prompt or automatically adjust – just confirm. Alternatively, manually convert the target disk to GPT beforehand using Disk Management (right-click disk label → Convert to GPT Disk – this will erase all data).
bcdedit or simply set the correct boot order in BIOS. To avoid confusion, disconnect the source disk temporarily after first successful boot from the new disk.
🖥️ Set boot order in BIOS (all scenarios)
After cloning is complete, restart your computer. Press the BIOS key during startup (varies by motherboard):
- ASUS / ASRock / Gigabyte / MSI – DEL or F2
- Acer – F2 or ESC
- HP – F10
- Lenovo – F12 or F2
- Dell – F2
Navigate to Boot menu → Set your new disk as the first boot device.
• For MBR disks (Scenario A): Select the disk name without "UEFI" prefix, ensure Legacy/CSM is enabled.
• For GPT disks (Scenarios B & C): Select the entry labeled "UEFI OS" or the disk name with UEFI prefix, ensure CSM is disabled.
Save changes (F10) and exit.
⚠️ Troubleshooting boot failures
- Cloned disk doesn't appear in boot menu? Reconnect cables, check SATA port, ensure disk is detected in BIOS.
- "Inaccessible boot device" blue screen? Enter BIOS and match boot mode to partition style (Legacy for MBR, UEFI for GPT).
- Cloned disk boots to black screen with cursor? Use IM-Magic Partition Resizer bootable USB to repair boot: Tools → "Rebuild MBR" (for MBR) or "Fix UEFI Boot" (for GPT).
- Windows asks for activation after clone? Normally not required as hardware is same. If prompted, click "Troubleshoot" → "I changed hardware on this device".
- Destination disk is smaller than source used space? Migrate OS Wizard will warn you. Free up space on C: drive or choose a larger target disk.
📋 Quick reference summary
| Scenario | Source Style | Target Style | BIOS Mode Required | Special Notes |
|---|---|---|---|---|
| A | MBR | MBR | Legacy / CSM | Direct clone, no conversion |
| B | MBR | GPT | UEFI (disable CSM) | Auto conversion destination disk to MBR or use MBR2GPT first to convert source disk GPT |
| B-2 | GPT | MBR | UEFI (disable CSM) | Auto conversion destination disk to GPT during the conversion |
| C | GPT | GPT | UEFI | Seamless, supports >2TB disks |
For Windows 11/10/8/7, dowload free software => Download for Win 11-XP [Free Software]
For Windows Server 2025-2003, Download free Demo => Download for Win Server [Trial]